Rights needed for Office 365 email scanning
To scan all mailboxes:
- The user credentials used for scanning, must be a member of the “Discovery Management role group”.
- The Discovery Management role group must have a “Application impersonation” role assigned.
- Please refer the KB article on “How to assign the Application Impersonation and Discovery Management role to office 365 scanning user”.
To scan specific mailboxes:
To limit the Office 365 email scanning to particular mailboxes we have to create a new
- Distribution group/list
- Custom management scope
- Custom Management Role group.
In Office 365, a custom management scope used for eDiscovery cannot be used to search inactive mailboxes. This is because an inactive mailbox can’t be a member of a distribution group. For example, let’s say that a user is a member of a distribution group that was used to create a custom management scope for eDiscovery. Then that user leaves the organization and their mailbox is made inactive (by placing a Litigation Hold or In-Place hold on the mailbox and then deleting the corresponding Office 365 user account). The result is that the user is removed as a member from any distribution group, including the group that was used to create the custom management scope used for eDiscovery. If a discovery manager (who is a member of the role group that’s assigned the custom management scope) tries to search the inactive mailbox, the search will fail. To search inactive mailboxes, a discovery manager must be a member of the Discovery Management role group or any role group that has permissions to search the entire organization.
Step 1: Create a new Distribution group/list
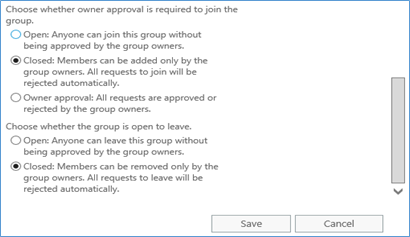
Due to the fact that distribution groups are used in this scenario to scope eDiscovery searches and not for message delivery, consider the following when you create and configure distribution groups for eDiscovery:
- Create distribution groups with a closed membership so that members can be added to or removed from the group only by the group owners.
- Enable group moderation so that any message sent to the group is first sent to the group moderators who can approve or reject the message accordingly.
- Hide the distribution group from the organization’s shared address book.
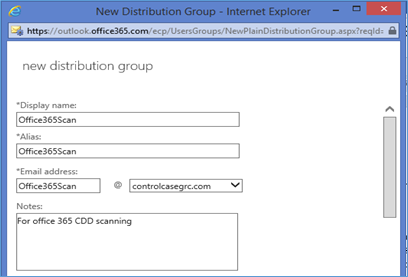
Use the EAC to create a distribution group
- In the EAC, navigate to Recipients > Groups.
- Click New > Distribution group
- On the New distribution group page, complete the following boxes
- * Display name Use this box to type the display name.
- * Alias Use this box to type the name of the alias for the group.
- * Owners By default, the person who creates a group is the owner. All groups must have at least one owner. You can add owners by clicking Add +.
- Members Use this section to add members and to specify whether approval is required for people to join or leave the group. Group owners don’t have to be members of the group. Use Add group owners as members to add or remove the owners as members. To add members to the group, click Add . When you’ve finished adding members, click OK to return to the New distribution group page.
- When you’ve finished, click Save to create the distribution group.
- Please see the below images for more details.
Use the Shell to create a distribution group
- In the following example, the first command creates a distribution group with closed membership and moderation enabled. The second command hides the group from the shared address book.
- New-DistributionGroup -Name “Office365Scan” -Alias Office365Scan -MemberJoinRestriction closed -MemberDepartRestriction closed -ModerationEnabled $true
- Set-DistributionGroup ” Office365Scan ” -HiddenFromAddressListsEnabled $true.
- Although you can use distribution group membership as the recipient filter for a custom management scope used for eDiscovery, you can use other recipient properties to add users to that distribution group. Here are some examples of using the Get-Mailbox and Get-Recipient cmdlets to return a specific group of users based on common user or mailbox attributes.
- Get-Recipient -RecipientTypeDetails UserMailbox -ResultSize unlimited -Filter ‘Department -eq “HR”‘
- Get-Recipient -RecipientTypeDetails UserMailbox -ResultSize unlimited -Filter ‘PostalCode -eq “98052”‘
- You can then use the examples from the previous bullet to create a variable that can be used with the Add-DistributionGroupMember cmdlet to add a group of users to a distribution group. In the following example, the first command creates a variable that contains all user mailboxes that have the value “Vancouver” for the Department property in their user account. The second command adds these users to the Office365Scan Users distribution group.
- $members = Get-Recipient -RecipientTypeDetails UserMailbox -ResultSize unlimited -Filter ‘Department -eq “Vancouver”‘
- $members | ForEach {Add-DistributionGroupMember “Office365Scan” -Member $_.Name}
How do you know this worked?
To verify that you’ve successfully created a distribution group, do one of the following:
- In the EAC, navigate to Recipients > Groups. The new distribution group is displayed in the group list. Under Group Type, the type is Distribution group.
- In the Shell, run the following command to display information about the new distribution group.
- Get-DistributionGroup Office365Scan | FL Name,RecipientTypeDetails,PrimarySmtpAddress
Step 2: Create a custom management scope
Now you’ll create a custom management scope that’s defined by the membership of a distribution group (using the MemberOfGroup recipient filter). When this scope is applied to a role group used for eDiscovery, members of the role group can search the mailboxes of users who are members of the distribution group that was used to create the custom management scope.
This procedure uses Exchange Management Shell commands to create a custom scope named “CddScanScope” Users eDiscovery Scope. It specifies the distribution group named “Office365Scan” Users for the recipient filter of the custom scope.
- Connect to the office 365 exchange server using the PowerShell. Please see the section “Connect to Exchange Online PowerShell” for more information.
- Run this command to get and save the properties of the Office365Scan Users group to a variable, which is used in the next command.
$DG = Get-DistributionGroup -Identity “Office365Scan” - Run this command to create a custom management scope based on the membership of the Office365Scan Users distribution group.
New-ManagementScope “CddScanScope” -RecipientRestrictionFilter “MemberOfGroup -eq ‘$($DG.DistinguishedName)'”
The distinguished name of the distribution group, which is contained in the variable $DG, is used to create the recipient filter for the new management scope.
Step 3: Create a custom management role group
In this step, you will create a new management role group and assign the scope (CddScanScope) that you created in step 2. Add the Legal Hold, Application Impersonation and Mailbox Search roles so that role group members can perform In-Place eDiscovery searches and place mailboxes on In-Place Hold or Litigation Hold. You can also add members to this role group so they can search the mailboxes of the members of the distribution group used to create the custom scope in step 2.
Use the EAC to create a management role group
- In the EAC, go to Permissions > Admin roles, and then click New +.
- In New role group, provide the following information:
- Name: Provide a descriptive name for the new role group. For this example, you’d use O365 Discovery Management.
- Write scope: Select the custom management scope (CddScanScope) that you created in step 2. This scope will be applied to the new role group.
- Roles: Click Add , and add the Legal Hold and Mailbox Search roles to the new role group.
- Members: Click Add , and select the users, security group, or role groups that you want add as members of the new role group.
- Click Save to create the role group.
Use the Shell to create a management role group
- Run this command to create a new role group that uses the custom scope (CddScanScope) created in step 2. The command also adds the Legal Hold and Mailbox Search roles, and adds the CDDServiceAccount security group as members of the new role group.
- New-RoleGroup “O365 Discovery Management” -Roles “Mailbox Search”,” Application Impersonation “,”Legal Hold” -CustomRecipientWriteScope “CddScanScope” -Members “ CDDServiceAccount “
Connect to the Exchange Online PowerShell
You use Windows PowerShell on your local computer to create a remote PowerShell session to Exchange Online. It’s a simple three-step process where you enter your Office 365 credentials, provide the required connection settings, and then import the Exchange Online cmdlets into your local Windows PowerShell session so that you can use them.
- To enable Windows PowerShell to run signed scripts, run the following command in an elevated Windows PowerShell window (a Windows PowerShell window you open by selecting Run as administrator):
Set-ExecutionPolicy RemoteSigned
You need to configure this setting only once on your computer, not every time you connect. - Run the below command in PowerShell. In the Windows PowerShell Credential Request dialog box, type your Office 365 user name and password, and then click OK.
$UserCredential = Get-Credential - Run the following command
$Session = New-PSSession -ConfigurationName Microsoft.Exchange -ConnectionUri https://outlook.office365.com/powershell-liveid/ -Credential $UserCredential -Authentication Basic -AllowRedirection - Run the command: Import-PSSession $Session
Important Note:
Be sure to disconnect the remote PowerShell session when you’re finished. If you close the Windows PowerShell window without disconnecting the session, you could use up all the remote PowerShell sessions available to you, and you’ll need to wait for the sessions to expire. To disconnect the remote PowerShell session, run the following command.
Remove-PSSession $Session
Leave a Reply!
You must be logged in to post a comment.