ACE Enterprise – AWS Prerequisite and Installation
Index
- Hardware requirement
- Operating-system requirement
- Network requirement
- ACE Installation
- Credential requirements
- Activating ACE Endpoint
Hardware requirement:
ACE requires following for deployment and usage:
Recommended Configurations for optimum results are,
Minimum system specifications: 2 core CPU, 4 GB memory &100 GB storage
• T2.large ( Recommended for small environments – Less than 200 machines to be scanned)
• M4.large ( Recommended for medium to large environments – More than 200 machines to be scanned)
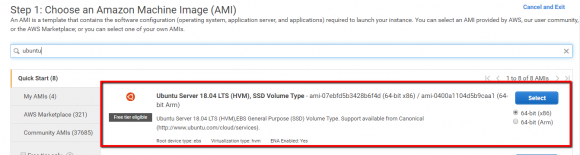
Operating-system requirement:
Currently ACE endpoint installer is only supported on Ubuntu Server 18.04 LTS. You can select Ubuntu operating system while launching an instance, or you can choose available AMI from AWS MarketPlace.
Important Note! Clients have to ensure ACE endpoint system remain compliant for applicable compliance program (e.g. applying system patches, Antivirus, system hardening etc.)
Does ACE support Internet proxy?
During installation: Yes, Can be installed using Internet proxy. HTTP/HTTPS outbound traffic (All) is required to be allowed during installation to ensure all dependencies are installed.
After installation/Application run: No, User shall need to provide direct access to ControlCase API’s as mentioned below in “Network Requirements”. Following are the steps,
1. Remove proxy after installation (if enabled).
2. Whitelist https://cs-dist.controlcase.com/ and https://cs-api.controlcase.com/ on TCP Port 443 on firewall for direct access from ACE machine.
Networking Requirement
Following is the Architecture for ACE Endpoint.
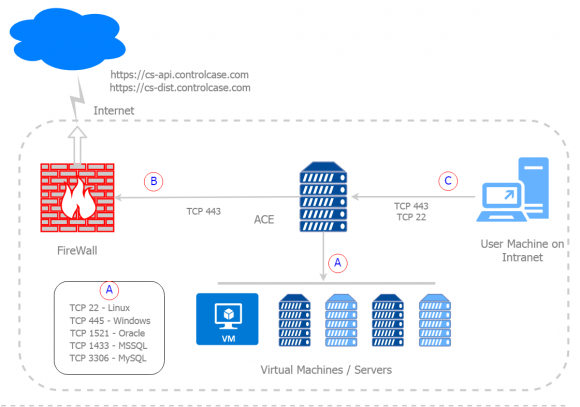
A) ACE to Host Machines
You will need to open firewall ports between ACE installed instance and target destinations.
| Source IP | Source Port | Target Destination IP | Target Destination Port | Description |
|---|---|---|---|---|
| ACE Instance | ANY | (To be scanned instances) | 445 | Windows target instances |
| ACE Instance | ANY | (To be scanned instances) | 22 | Linux target instances |
| ACE Instance | ANY | (To be scanned instances) | 1521 | Oracle database |
| ACE Instance | ANY | (To be scanned instances) | 1433 | MSSQL database |
| ACE Instance | ANY | (To be scanned instances) | 3306 | MySQL database |
*Note: You can create an AWS Security group and attach it to target Windows/Linux servers.
*Note: Database ports mentioned above are default ports. If you are using custom port, open custom port on firewall between ACE instance and target instance.
B) Access to ControlCase gateway and IAM Role
You will need to open firewall ports between ACE installed instance and ControlCase API gateway.
- ACE -> TCP Port 443 on https://cs-api.controlcase.com/ [Required]
- ACE -> TCP Port 443 on https://cs-dist.controlcase.com/ [Required]
- ACE -> TCP Port 443 & 80 on ALL (This is temporary access required only during ACE installation to install all the dependencies. Once ACE is installed, you can remove “ALL” access )
C) Your Local Machine or Jump Server to ACE End-Point machine
This permission is required to access ACE End-point application in your internal network.
| Source IP | Source Port | Target Destination IP | Target Destination Port | Description |
|---|---|---|---|---|
| User terminal/Jump server | ANY | ACE Instance | 443 | To access ACE endpoint UI |
| User terminal/Jump server | ANY | ACE Instance | 22 | To access ACE endpoint for installation |
Note: You can create an AWS Security group and add it to ACE Endpoint.
Attach IAM Role [Mandatory]
In steps given below, we will create a new Role and attach policies to this new Role.
During the final ACE launch time, we will attach this Role to ACE. This will enable ACE to discover assets and fetch asset and network information.
Step 1:
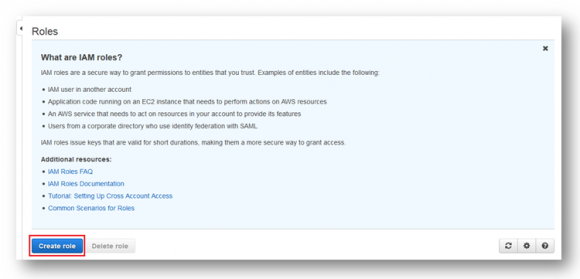
Log on to your AWS Console and select the service IAM
On the IAM Service Dashboard, select “Roles” on the left-hand pane:
Step 2:
Select “Create role” from the IAM Roles Dashboard:
Step 3:
For Trusted Entity – select “AWS Service”
Next, select the “EC2” service below. Click on “Next: Permissions”

Step 4:
In this step, we attach policies which are pre-made by AWS for EC2, IAM, RDS and VPC
Following is the list of IAM permissions that you will need to attach.
- IAMReadOnlyAccess
- AmazonVPCReadOnlyAccess
- AmazonEC2ReadOnlyAccess
- AmazonEC2RoleforSSM
- AmazonSSMFullAccess
- AmazonRDSReadOnlyAccess
Search for the policy “AmazonEC2ReadOnlyAccess” and select it:
Similarly, search for all the other policies and select them.
You are done with this step once you attach these policies to the new role.
Click on “Next:Tags”
Step 5:
In this step, you can attach custom tags to the role to identify it within your organization and AWS account:
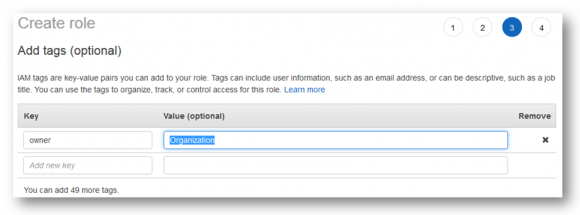
Click on “Next: Review” when done
Step 6:
Provide a Name and Description for the Role.
Review the newly created role with the attached policy.
It should look like this:( Image on next page)
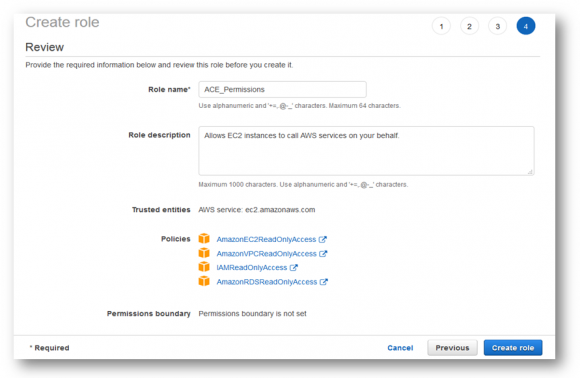
Click on “Create role” and you will have successfully created a new IAM role for the ACE Instance to use.
ACE Installation
Check-list Before installation.
- VM is ready with Ubuntu 18 OS – (2 core CPU, 8 GB memory and 100 GB storage)
- VM has been given access to internet, port 443 (permit All – for installation only, as mentioned in Network Requirement section)
1. Once VM (EC2 instance) is up & all above configurations are in place.
2. Login to VM over SSH
3. Take sudo control using below command
sudo -i4. Execute below command to invoke installer
wget -q -O - https://cs-dist.controlcase.com/ace-endpoint.sh | bashInstallation should take a few minutes depending on your internet connection.
Check-list After installation.
- VM has been given Outbound 443 access to ControlCase API’s
- Machines to be scanned have been given Inbound 445/22 access to ACE VM ( as mentioned in Network Requirement section )
Activating ACE Endpoint
Follow steps mentioned in the link to activate the endpoint. ACTIVATE ACE ENDPOINT
Credential Requirements
- If SSM services are enabled in your AWS account, scans shall run using SSM service. For machines which do not have SSM enabled, can be scanned using UserID and Password / Certificate with read-only admin privileges.
- For Windows, the user should have administrator access
- For Linux, the user should have sudo access without password prompt.
Some more details on windows permissions.
- User should have administrative privileges, as it tries to execute some admin privileged command and opens SVCManager.
- ACE to target Windows Machine should have target port 445 (TCP) communication enabled on each firewall/security group.
- If Windows Machine has its own firewall running, then please configure inbound and outbound rule over port 445 for communication between ACE and running Windows machine.
- If any Antivirus or Malware protection is running on target Windows Machine, then please whitelist all activities performed by process communicating over port no 445.
- psexec copies a psexecsvc file to the admin share and then using remote management starts up a service using that file. It opens up named pipes and uses that for further communication. Please whitelist this as well, mainly psexecsvc executable file.
- File and Printer sharing should be enabled.