Thank you for choosing ControlCase
GRC, a powerful and versatile system that will revolutionize the
way you manage your IT-GRC processes.
This manual contains conceptual, and
"how to" information on basic and advanced tasks using
the Graphical User Interface.
For more information, you canrefer to the ControlCase
GRC Getting Started Guidefor
description of the documentation set, a summary of the ways to
work with ControlCase GRC, and instructions for accessing the
Online Help.
This user manual is for version 6.0
of ControlCase GRC or later. This
edition supersedes earlier editions of this manual.
The
following typographical conventions are used in the online manuals
and online help. These typographical conventions are used to differentiate
the terms used in the documentation; they are not meant to contradict
or change any standard use of typographical conventions in the
various product components or the host operating system.
Italics
Introduces all actionable buttons,
which a user can click
and perform a function or action.
Bold
Emphasizes important information and
field names.
UPPERCASE
Indicates keys or key combinations
that you can use, for example, press the ENTER key.
This
chapter introducesthe
ControlCase GRC terminology, concepts, roles and tasks that the
user needs to be familiar with, in order to use the software efficiently.
ControlCase GRC is a consolidated framework
that quickly and cost-effectively enables IT governance, risk
management and compliance (GRC) with one or several government
or industry regulations simultaneously. It allows IT organizations
to proactively address issues related to GRC and implement a foundation
that is consistent and repeatable.
With ControlCase GRC organizations
are able to:
§Improve IT Governance
§Accelerate time to compliance
§Reduce and manage risk
§Enable sustained compliance more effectively
§Improve collaboration and consistency
§Bridge information silos
§Align regulatory needs to business
requirements
§Lower the cost of becoming and remaining
compliant
§Prove compliance
Using a consolidated framework simplifies
and automates several key compliance needs that include:
§Workflow automation
§Mapping of standards and controls
§User self-assessment
§Analyzing and testing controls
§Measuring impact to the organization
§Measuring and clarifying risk
§Implementing corrective actions
§Reporting on compliance and risk
Some of the main uses of ControlCase
GRC are to:
·Assess:
Assess risk, privacy, vendors, security,
etc. via surveys or questionnaires. Send to mass populations,
specific groups, and individual users as necessary to collect
desired information.
·Review:
Review the results of respondents,
populate standard with controls and control tests, review results
of tests, determine gaps and assign for remediation.
·Remediate:
Gap identified via the Review process
(or other means such as anonymous submission for privacy or security
violations) can be assigned to owners, tracked, re-assigned, or
waived. Track those Gaps via graphical representations.
·Report:
Data
can be presented in any number of reports, exported for further
manipulation or enhanced graphical representation. Even the report
queries can be stored for future use.
·Scan:
Network
shares, websites, and databases can be scanned for cardholder
data. Once found, controlsheet is automatically filled with the
found evidences.
·Manage Vendors and Merchants:
ControlCase
GRCenables organizations
to manage the risk and compliance of their vendors or merchants.
As you explore this latest release
of ControlCase GRC, you
will notice that the GUI contains several new features and concepts.
Although the terms are new, they have much in common with industry
terms you might already understand.
Standard
This is the defined standard that will
be used for accessing the accounts for the organization.
Assessment
This is to assess risk, privacy, vendors,
security, etc. via surveys or questionnaires.
Gap
A Gap is considered as an activity
which appears to have the potential to impact the organization
negatively (e.g., denial of service, malicious code, unauthorized
access, inappropriate usage). This may be reported by anyone within
the organization via email or through the online questionnaire.
Activity
An activity is a gap which has been
determined to pose a real threat to the organization by the activity
manager and which requires further investigation.
Evidence
Evidence includes all information or
physical property that is associated with the investigation of
an activity. This may include log files, hardware, hard copy documents
or any other information that has been collected. All evidence
is assigned a tracking number and is time-stamped upon entry into
the activity file.
Evidence chain
of custody
ControlCase
GRCtime and date-stamps
all evidence and allows you to add notes to the activity file
when evidence is passed from one individual or group to another. This
maintains an evidence chain of custody that helps to keep track
of all evidence and is required for legal purposes.
List Panel
List panel in ControlCase GRC provides
the option of using the SORT and SEARCH functionalities. The user
can sort through one column at a time either in an ascending or
descending manner.
Form Panel
Form panel in ControlCase GRC allows
configuring the form input fields which shall be used to accept
user data into the ControlCase GRC database. Using the form panel,
Administrators can configure the type of forms to use, different
fields to be added, field types, etc.
Public Key
A public key is a value provided by
some designated authority as a key that, combined with a private
key derived from the public key, can be used to effectively encrypt
and decrypt messages. ControlCase GRC uses GnuPG software to send
encrypted emails to external agencies (using their respective
Public Keys), to notify them about activities. Once the activity
is received through encrypted email, the agency can decrypt it
using its private key.
Public Key
ID
Public Key ID is a string that uniquely
matches a key in the GnuPG key ring, which itself is a collection
of keys uploaded into GnuPG. Key ID is prefixed with 0x, for example
0xDD934139. ControlCase GRC requires this Public Key ID while
adding an external agency.
The following concepts will help you
understand how the different modules of the ControlCase GRC interact
with each other.
Framework
ControlCase GRC is built on a very
flexible Framework, where any number of organizational
accounts and processes can be defined to the nth level
and mapped to any customized standard defined by you. The standard
can be designed for an audit, risk assessment, vendor assessment,
candidate assessment, compliance or internal controls.
e.g.: For PCI Audit, organizational
accounts like ‘Email servers’ or audit processes like ‘Self-Assessment
Questionnaire’ can be mapped to industry standard PCI-DSS or self-defined
internal control standards.
Standards
Based on the flexible Framework, ControlCase
GRC can have any defined standard brought in or have a customized
standard created for audit /risk assessment purposes.
e.g.: For PCI Audit, ControlCase GRC
already has a built-in standard defined such as ‘IT Enterprise’.
This standard can either be used for the PCI Audit or for modified
/ customized based on the organization’s requirements.
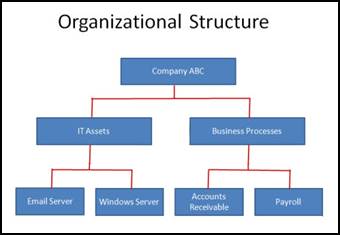
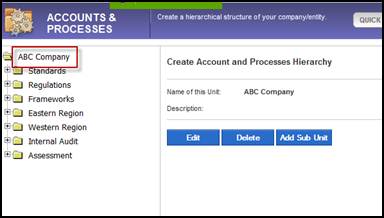
Organization
Definition
Based on the flexible Framework, ControlCase
GRC can classify any hierarchy of organizational accounts defined,
which need to undergo audit /risk assessments.
e.g.: For PCI Audit, ControlCase GRC
can have a hierarchy of organizational accounts or business processes
such as:
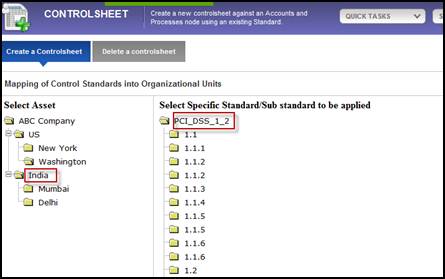
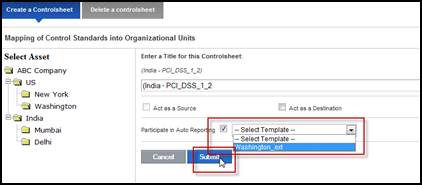
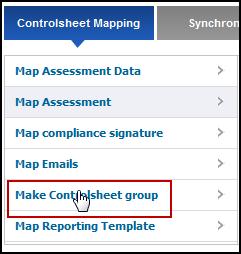
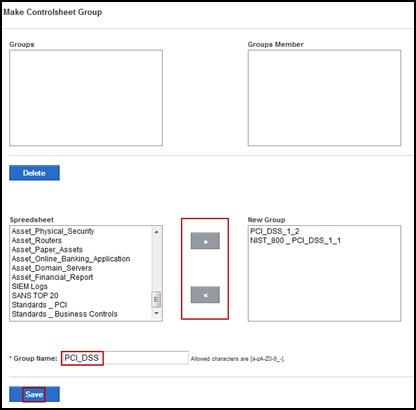
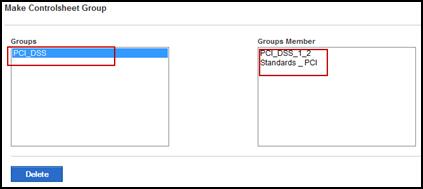
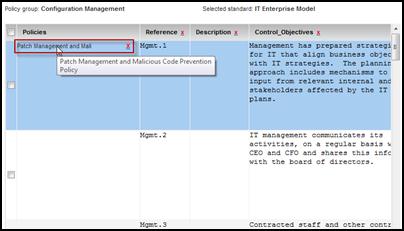
Create Controlsheet
A controlsheet is a mapping between
organizational accounts and processes, and the defined standard.
Once mapped, the controlsheet will create a complete set of control
objectives based on the standard.
NOTE: This term is used interchangeably
with ‘Review’.
e.g.: For PCI Audit, a controlsheet
can be created for organizational accounts such as ‘Email Servers’
and mapped to standard PCI-DSS. The resulting controlsheet could
be named ‘Email Servers – PCI - DSS’
NOTE: A controlsheet can also be created
through a mapping between accounts and processes and an assessment.
This is to be used for transferring responses of an assessment
to a particular controlsheet.
Assessment
Administration
An administrator can create, deploy
and manage Assessments.
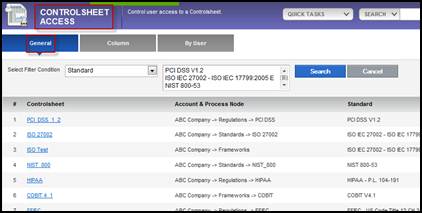
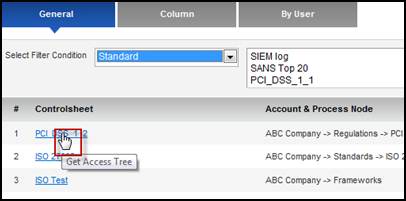
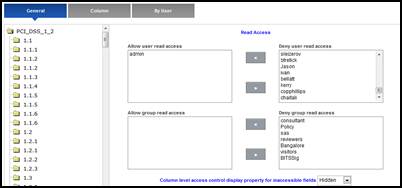
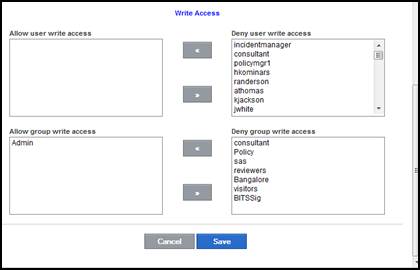
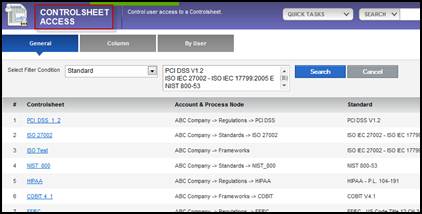
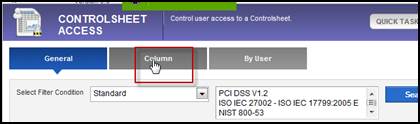
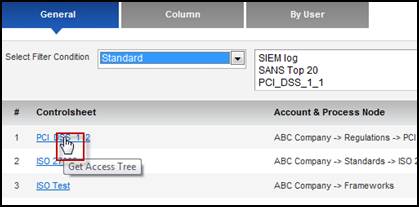
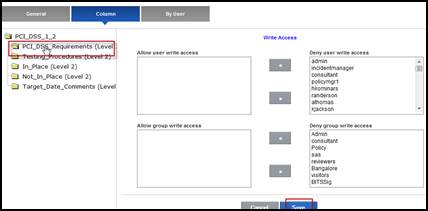
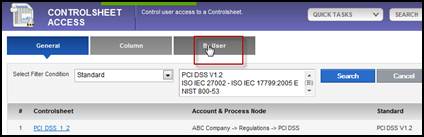
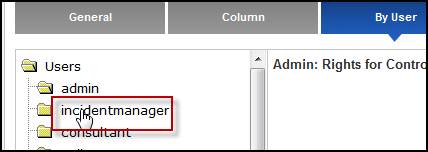
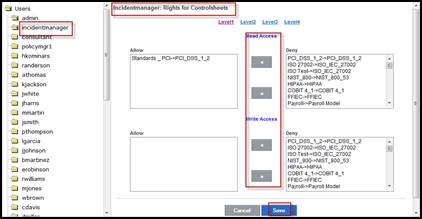
Controlsheet
Access
Administrators can give users and groups
access rights i.e. read /write, to specific controlsheets. This
helps to define a variety of users, such as documenters, reviewers,
etc.
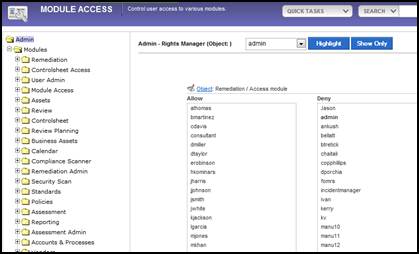
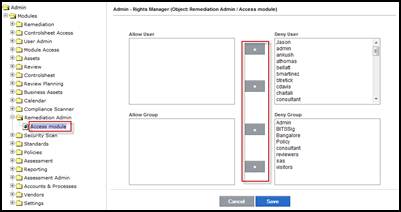
Module Access
Administrators can give users and groups
access rights to specific modules. Based on these rights, the
end users can access the specific functionalities like ‘Reports’,
‘Remediation’, etc.
Reviews
Once a controlsheet is created as described
earlier, the Review function will give the end user access
to all of their audit entitlements. They will use this functionality
to document all of the details for the specific controlsheets
they are working on. The user can have read and/or write access
as per the access rights set for them by the administrator.
Reporting
Reporting
functionality is of utmost importance to track the audit /risk
assessment / compliance process. There are several built-in reports
available within ControlCase GRC which could be useful for compliance
process.
The report designing functionality
lets the end user define and create their own specific reports
based on the selection criteria provided. This feature also provides
the ability to save these custom reports as templates for future
use.
Dashboard
An executive view of panels containing
a list of short-cut links to various tasks or activities presented
to highlight those which need the most attention.
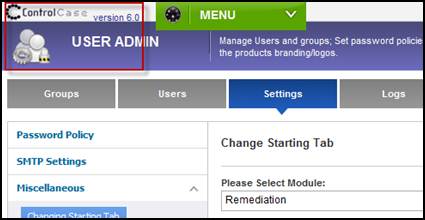
User Admin
-Password
Policy
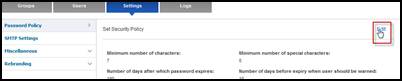
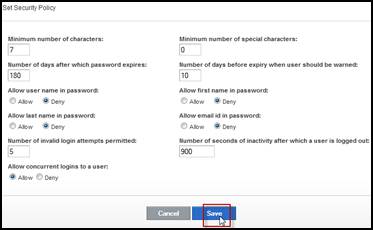
An Administrator can set a password
policy, which all users must adhere to.
-User
Management
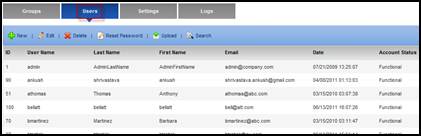
The ControlCase GRC administrator maintains
the rights to create, edit, and delete users to access the application.
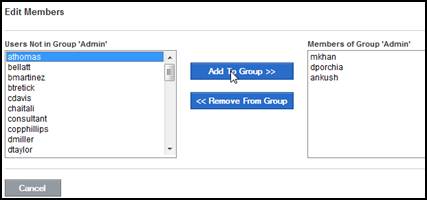
-Group
Management
The ControlCase GRC administrator maintains
the rights to create, edit, and delete groups and assign users
to group that will have access to the application.
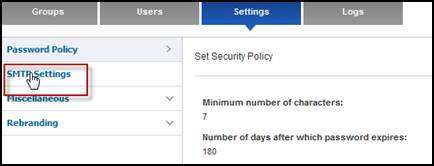
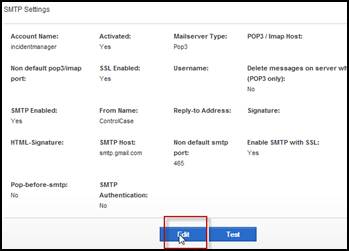
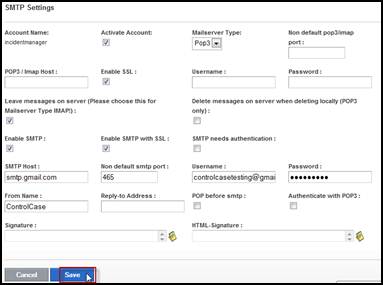
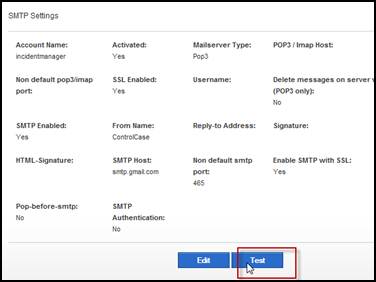
- SMTP Settings
An administrator can set an E-mail
account so that mails can be sent from ControlCase GRC software
using these settings.
Workflow Activity
Template
When a controlsheet is generated from
an assessment, its questions are displayed as column headers and
the collected responses (so far) form the content (rows) of the
controlsheet. The responses of assessments received after creating
the controlsheet are triggered into the review through the activity
template.
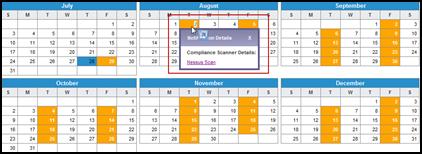
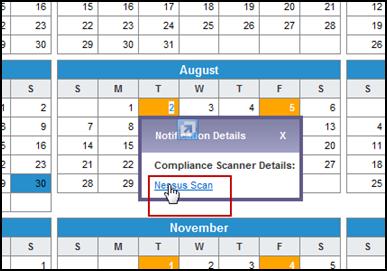
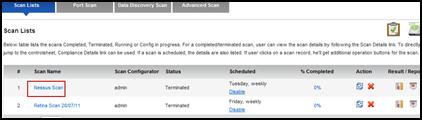
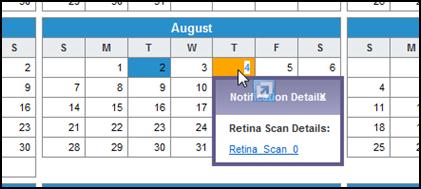
Compliance
Scanner
It is an independent module that is
used to scan entire network, hard disks, databases etc. to search
for credit card data. The results are populated in the controlsheet
and can be seen from the Review tab.
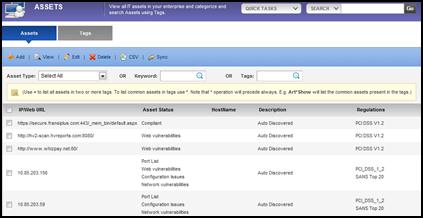
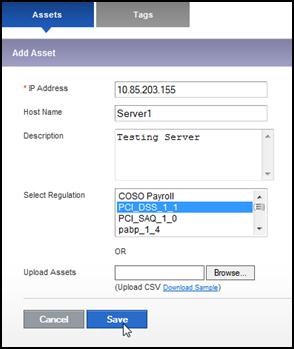
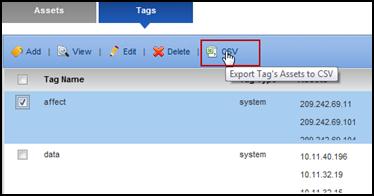
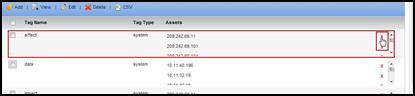
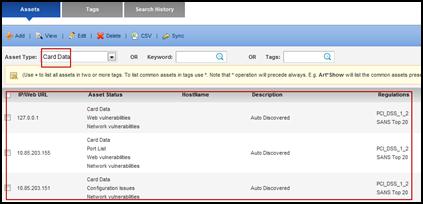
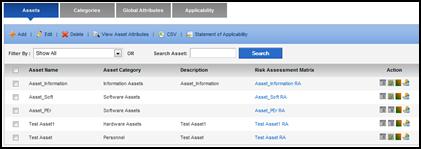
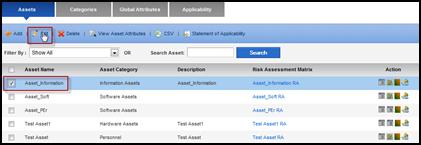
Assets
The list of IP addresses ports, machine
names, and databases etc. that are scanned from Compliance Scanner
and contains valid credit card information.
The
process of Logging-in, Changing Password, accessing the online
Help and Logging-out are explained briefly in this section.
Log-in
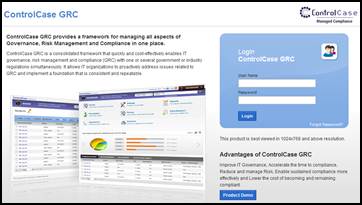
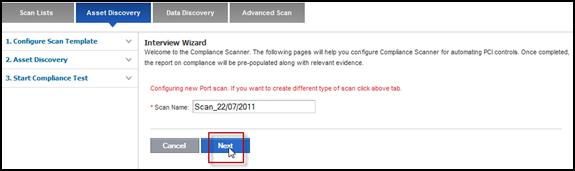
Once
the ControlCase GRC is installed and launched, the following log-in
screen appears. Enter your Username and Password and clickLogin.
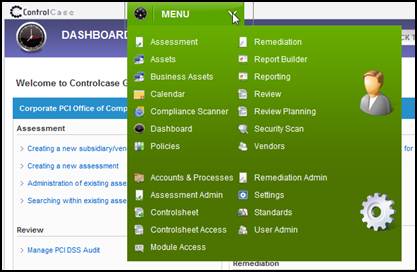
Once you have logged into the software,
you are directed to the following screen where you can see the
various modules in the form of header tabs.
NOTE: To access the various features of
ControlCase GRC, you need to click on the relevant tabs. By default,
theDashboardModule is available for every
user. Other modules are available only to the users that have
been assigned access to them by the Admin user, via theModule Accessmodule.
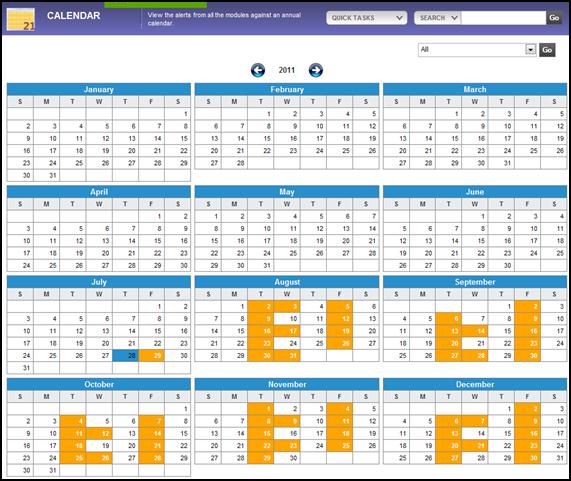
NOTE: The arrows shown in the above figure
help navigate through the modules. The first arrow on the right
side takes the user to the first module; the second arrow to the
previous module of the module displayed next to the arrow. The
last arrow on the left side takes the user to the last module;
the second last arrow to the next module of the module displayed
next to the arrow. The small arrows at both sides provide list
of modules that are currently not displayed on the top.
Change Password
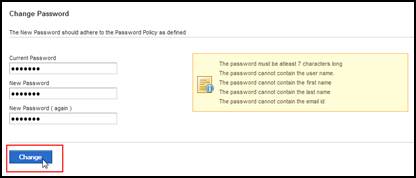
This
is where you can change your password. This is found on the top
right corner of theDashboard.It is recommended that you change
your password at least once in every 45 days or whenever you feel
it may have been compromised.
To change your password, you must enter
your current password, the new password you wish to use, and then
the new password again to confirm it. The password must adhere
to the password policy as stated by the administrator.
Help
The
Help functionality gives the ControlCase GRC user access to the
most commonly used ControlCase GRC features. This is found on
the top right corner of theDashboard.
Logout
You
have to ‘Logout’ whenever you wish to end the session. This is
found on the top right corner of theDashboard.
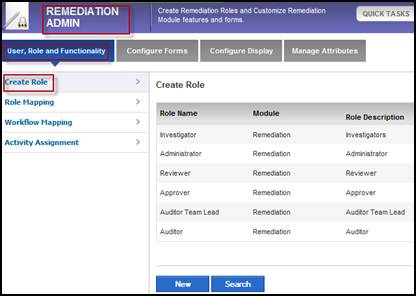
1.Administrators:
Responsible for setting up and configuring ControlCase GRC within
their organization so that users can effectively and efficiently
use ControlCase GRC to manage and control audit documentation.
2.Users: Use ControlCase GRC on a daily basis
for managing their documentation. Users can be classified into
two categories:
Regular Users:
Users whose responsibilities include
documenting, reviewing the controlsheets created with minimal
set of reports available for review etc.
Executive Users:
Users whose responsibilities include
reviewing others work - can be granted admin access and the complete
set of reports available for review.
The way you use ControlCase GRC within
your organization will vary depending on the size of, and the
different assets and business processes within your organization.
The
common process tasks as a user and / or administrator are stated below:
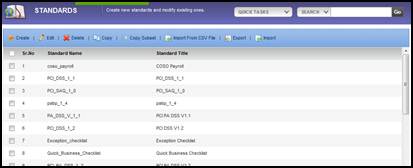
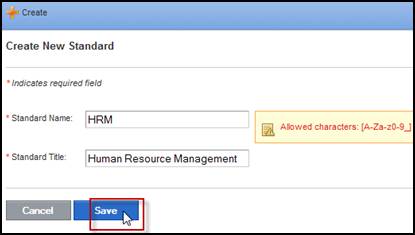
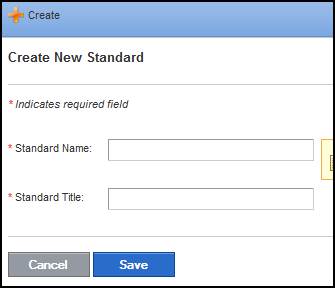
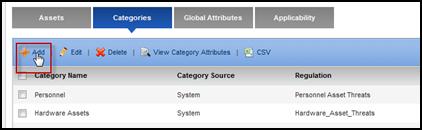
·Creating Standard definition
Method for defining review standards to
be used for creating review sheets of audit or compliance.
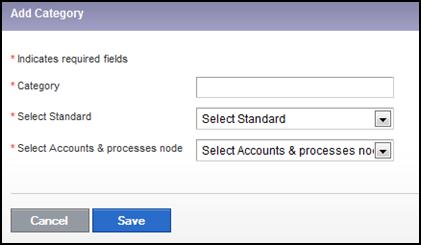
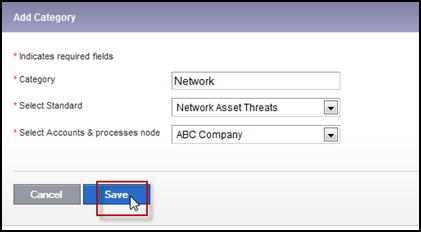
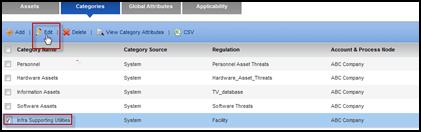
·Creating Accounts and Processes
Method for defining organizational accounts
and processes that will be reviewed for risk assessment, audit or compliance.
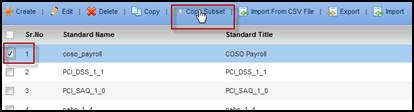
·Creating / Copying Controlsheets
Facilitates creation and deletion of controlsheets
/ reviews which can be created from available Standards in the application.
·Review Documentation
Review pane can be configured to view or
display controls and Documents pane is used to upload/download files with
version management.
·Tests
Test the evidences for ensuring appropriateness
of compliance review.
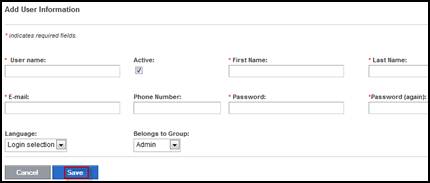
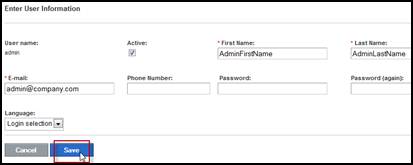
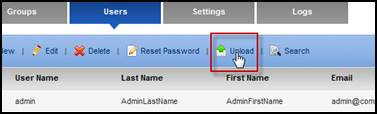
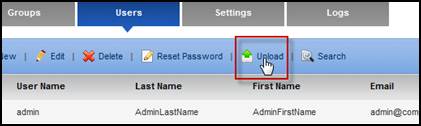
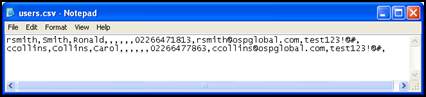
·Creating Users
Facilitates creation of new users, editing
or deleting of existing users, searching for users, or bulk uploading
users using .csv file.
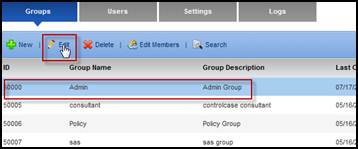
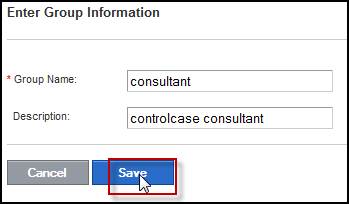
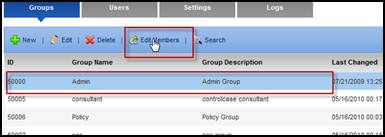
·Creating Groups
Facilitates addition of new groups, editing
or deleting existing groups, searching for groups, or moving group members
among different groups.
·Assigning Controlsheet Access
Used to assign rights to controlsheets.
Access rights could be general, column level, or user based. Rights could
also be assigned to view/edit entire controlsheet or specific
rows
·Assigning Module Access
Facilitates access management of the application
to restrict access to modules or functionalities to individual users or
user groups.
·Reporting
Facilitates creation of reports and graphs.
Reports can be created for issues, incidents, assessment status, assessments,
risk rating, and reviews.
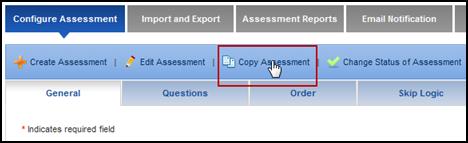
·Create/edit an Assessment
An interface for managing all assessments
needs, from creating, editing to publishing
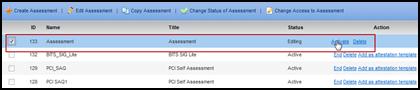
·Change Access/Status of an Assessment
Activate or archive an existing assessment.
Make an open assessment private or a private assessment public or define
access rights for a private assessment.
·Responding to an Assessment
Respond to private and open assessments
for logged-in and external users respectively.
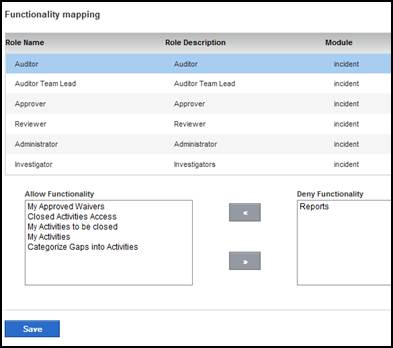
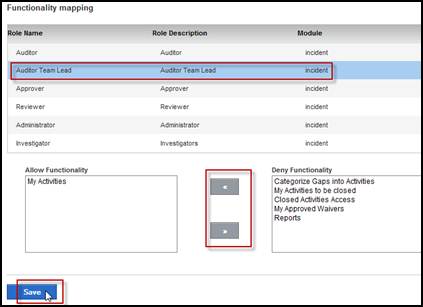
·Create & assign a role for remediation
A means to govern user roles and functionalities
within activity management framework.
·Configure gap and activity attributes
Add a new gap / activity attributes edit
or delete an existing one or search for a specific attribute.
ControlCase GRC process tasks are organized
into two main categories: User and Administrator tasks. These
tasks and the details to perform the task within ControlCase GRC
are mentioned in the table below.
Dashboardis
the first header tab of ControlCase GRC. It isa
control panel that provides access to basic features of the application.
It is a customizable home page, customized per user and acts as
a ‘My starting page’ for each user.
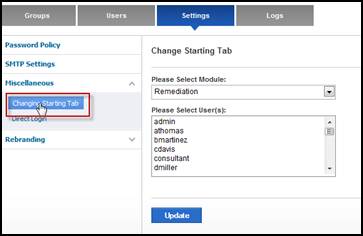
It provides access to following features:
Change
starting tab.
Add/Remove
panel.
News Updates.
Resources
panel & other links.
Search
all modules of ControlCase GRC.
Dashboardprovides
an executive view of panels containing a list of short-cut links
to various tasks or activities, and highlights those which need
the most attention. Furthermore, it allows you to search for any
reviews, reports, etc. that are present or being used in the software.
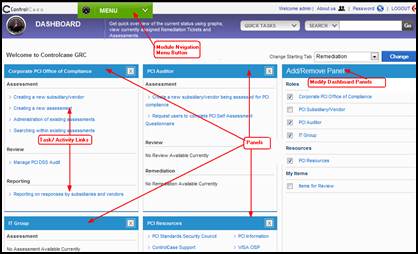
The Dashboard is designed to
provide quick access to the pre-configured roles such as Auditor,
Subsidiary/Vendor, etc. which are displayed in separate panels.
Each Panel in the Dashboard can be added or removed as
desired, based on your role in the organization. This is done
using the Add/Remove Panel on the right hand side of the
Dashboard screen. The Add/Remove Panel consists
of the Panel headers that can be displayed on the Dashboard.
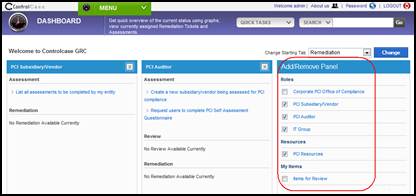
To
add or remove a panel:
Step 1
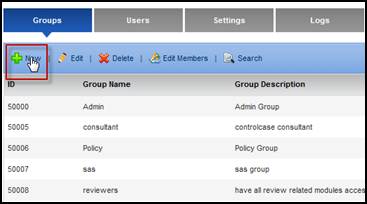
Click
on the Dashboard header tab. The following screen appears.
Step 2
From
Add/Remove panel, select check-box of the required panel
header to put it on display.
Step 3
To
remove a particular panel from display, de-select the checkbox
of the particular panel header.
Tip:The ‘x’ (cross) on the
top right of each displayed panel can also be used to remove the
panel from the Dashboard.
Each Panel on Dashboard is populated
with task/activity links corresponding to the role of the users
i.e. the links would only appear if the user has access to that
particular module. These links take the user directly into the
application, to that specific activity or task, thus acting as
a starting point for application.
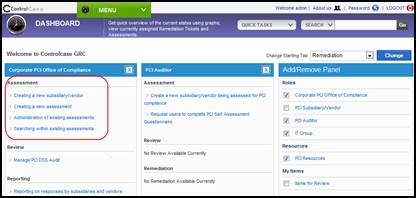
To open a particular link:
Step 1
Click
on the Dashboard header tab. The following screen appears.
NOTE: If the user does not have access
to other modules, the task/activity links from those modules will
not be displayed.
Step 2
Click
on any of the provided link, for example, ‘Creating a new assessment’
link. This directly takes the user to the page where the task
or on activity has to be performed.
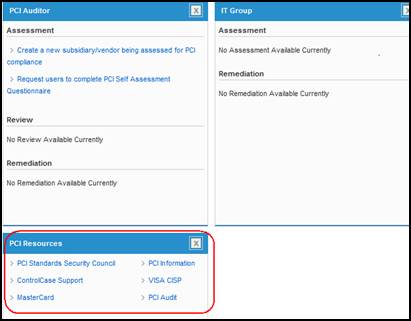
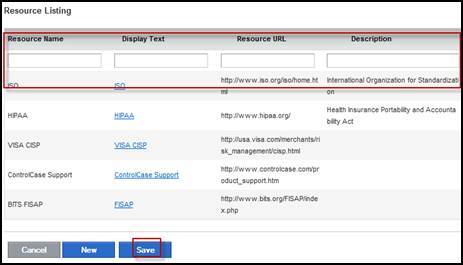
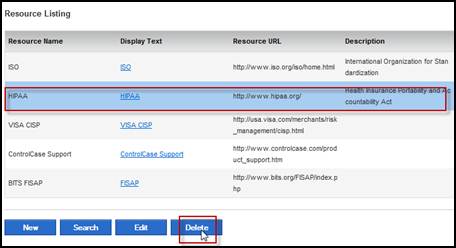
Although all the panels besides Add/Remove
Panel and My Updates are displayed as per the requirements
and accessibility of users and consist of links to other sections
of the application, the Resources panel contains general
web information links (as shown below). These links provide access
to related information.
NOTE: This particular panel is accessible
by all users.
To
open a particular link:
Step 1
Click
on the Dashboard header tab. The following screen appears.
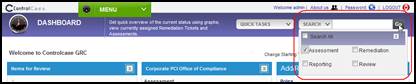
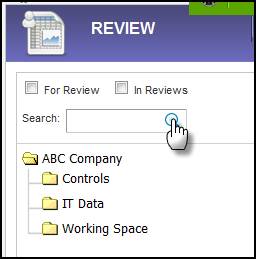
The Search ControlCase GRC panel
on the Dashboard provides the user with facility to look
for any reviews, reports, assessments, etc. that are present or
being used in the application.
To
execute the search functionality:
Step 1
Click
on the Dashboard header tab. The following screen appears.
Step 2
Select the required option for searching.
Available search options:
·Assessment:
Assessment headers such as titles, filenames, and additional information;
it is similar to the ‘Search Assessment’ feature in the Assessment
Admin header tab.
·Remediation:
Gaps and activities reported by the users; it is similar to the
‘Search’ feature in the Remediation header tab.
·Reporting:
Report titles created by the users.
·Review:
Reviews and data within the reviews; it is similar to the ‘For
review’ and ‘In Reviews’ searches available in the Review
header tab.
NOTE: The Search All of ControlCase
GRC feature gives a combined result of all the individual
searches.
Step 3
In
the box, enter the keyword you want to search for.
NOTE:The
search functionality supports ‘sub-word searching’. For example,
to look for the word ‘Preview’, even if the user enters ‘Pre’,
‘re’, ‘view’, etc. in the search box, all the files, names, etc.
with the word ‘Preview’ would be brought up as well.
Through this module, user can review
the results of respondents, populate standard with controls and
control tests, review results of tests, determine gaps and assign
for remediation.
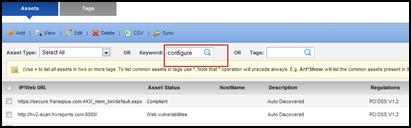
A regular ControlCase GRC user will
have the responsibility to document the details for all the reviews.
The common user tasks include entering data into the ControlCase
GRC application and viewing the reports in different formats.
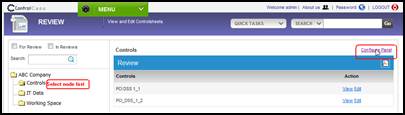
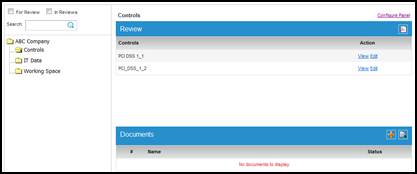
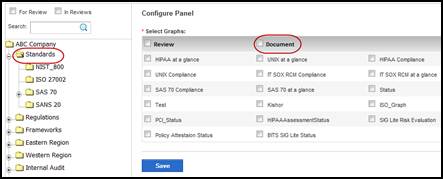
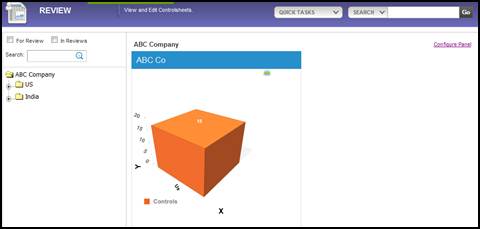
By
default, the right hand side panel is configured for Documents
and Review sub-panes. To Configure any panel click on particular
node and then Configure Panel link
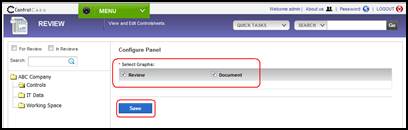
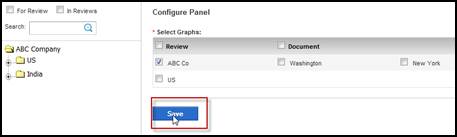
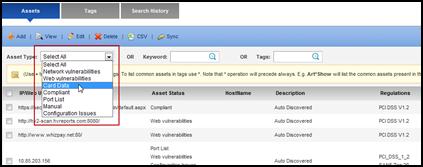
The page shows three types of panels,
namely, Review, Document, and Graph. There are only
one instances of Review and Document panel each
but there can be any number of Graph panels.
To
configure the panel:
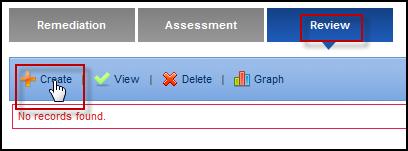
Step 1
Click
on the Review header tab.
Step 2
Click
on the node in the left panel for which you would like to configure
the panel.
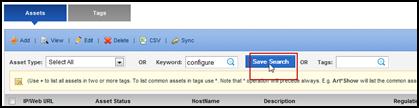
Step 3
Select
the panels that are to be shown and then click the Save
button.
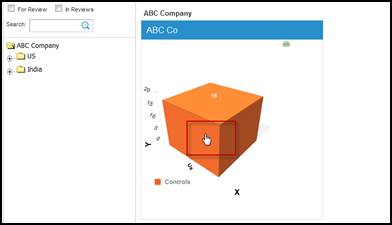
The
panels appear as shown below.
NOTE: To reconfigure the panel, click the
Configure Panel link in the top right corner. The Configure
Panel link is available only for users in the admin group.
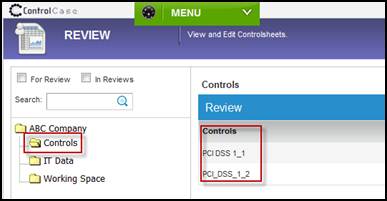
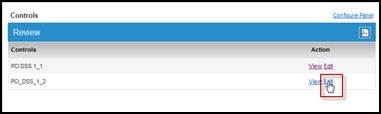
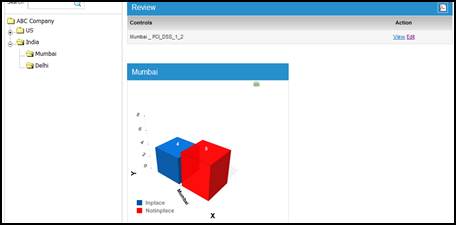
This
panel displays a list of all the controlsheets in the selected
organization or sub-unit of the organization.
To
view the list of controlsheets:
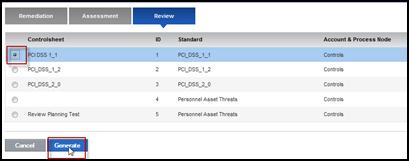
Step 1
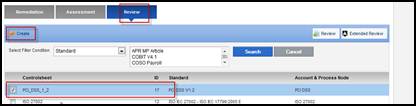
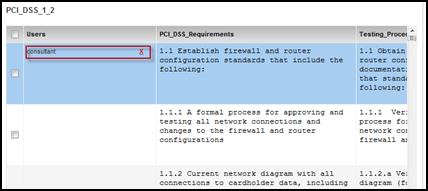
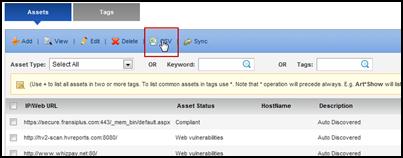
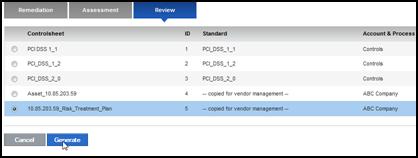
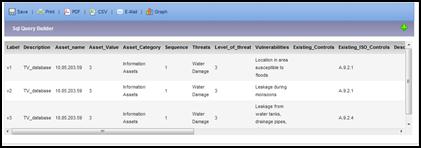
Sample controlsheets contained in the
‘Controls’ part of the organization are shown in the Review
panel below.
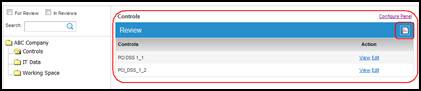
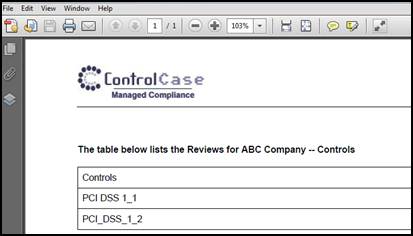
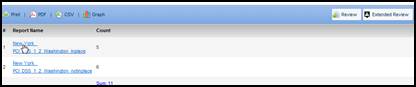
Step 2
To display the list of controlsheets
in the PDF format, click on the PDF view option.
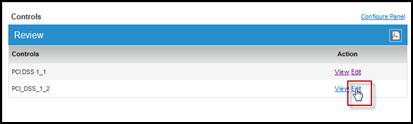
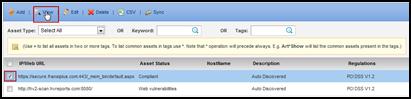
Accessing
Reviews (View)
Reviews
can be read or further modified by users. For this purpose, they
are available in either View or Edit mode, depending upon the
rights the user has been granted by the administrator.
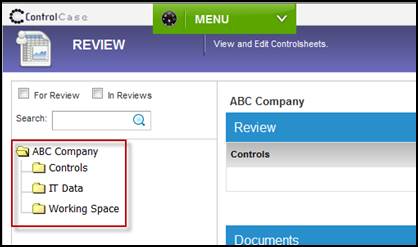
To
access a review:
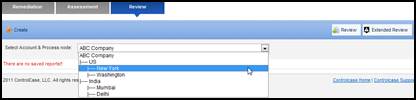
Step 1
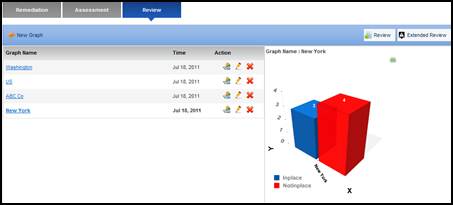
Click on the Review header tab.
The organizational tree appears.
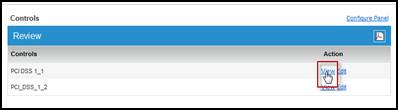
Step 2
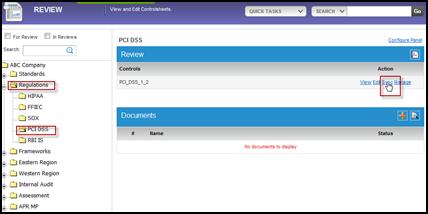
To access specific controlsheets of
a department, for example ‘Controls’, click on it. The reviews
appear as shown below.
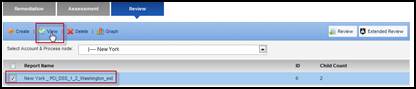
Step 3
To access a review, click View
next to it.
NOTE: If you have write permission, you
can edit the controlsheet by clicking Edit.
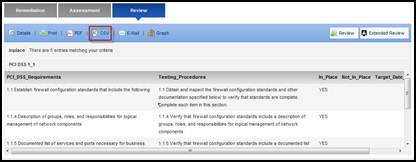
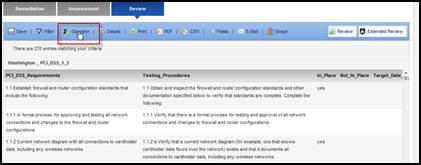
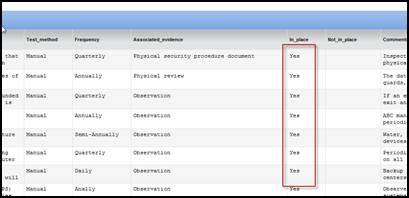
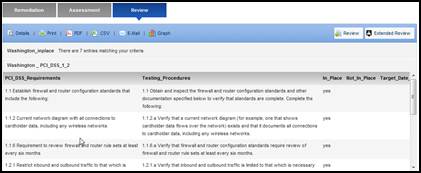
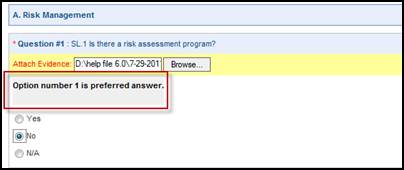
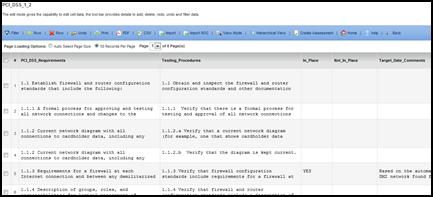
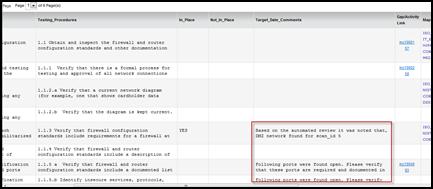
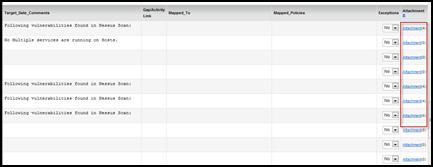
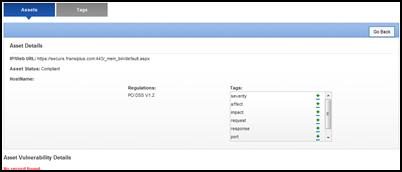
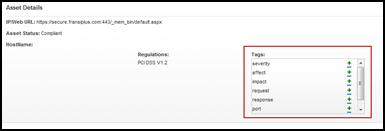
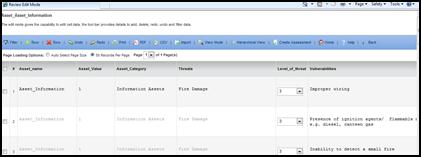
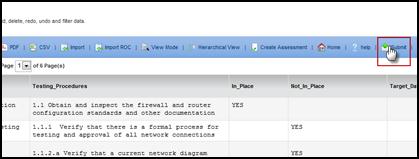
This
screenshot is an example of a worksheet of a review in the View
access mode.
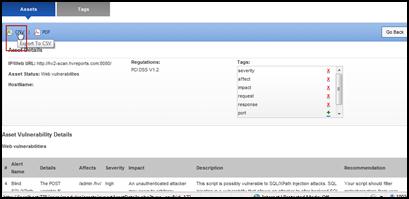
Exporting the Review
To
export the review in CSV format:
Step 1
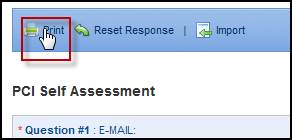
Click
on the Export button.
You
will then be prompted to save or open the ‘report.csv’ file.
If
you are allowed access to edit the review, an Edit button
also appears on the screen as shown below. Or else, you would
only be able to export the review to excel.
Editing Mode allows the user to enter
into the selected review and begin documenting directly into the
cells.
To
edit a review:
Step 1
Click on the Review header tab.
The organizational tree appears.
Step 2
To access specific controlsheets of
a department, for example ‘Controls’, click on it.
Step 3
To edit a review, click Edit
next to it.
NOTE: If you are in the View mode, you
can enter the editing mode by clicking on the Edit button
as shown below.
Step 4
You can now document directly into
the cells.
NOTE: You can also use the editing tools
provided at the top of the sheet. Data and changes made are saved
automatically.
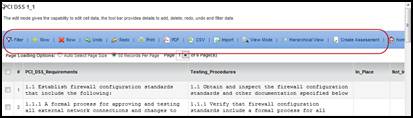
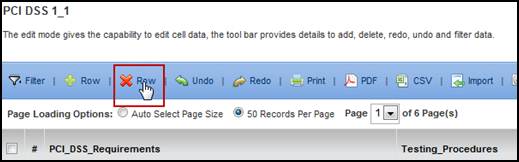
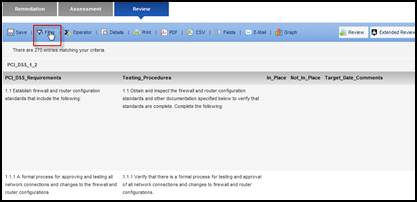
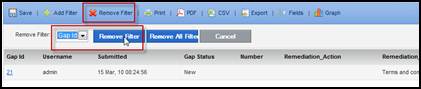
Editing Tools
The editing tools provided within the
reviews are circled in the picture below. These tools, basically
used to ease the job of editing, are explained below.
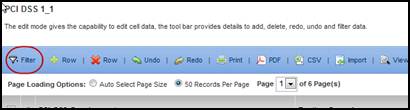
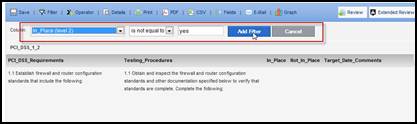
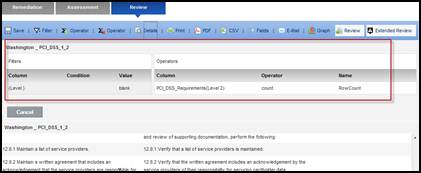
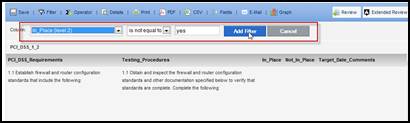
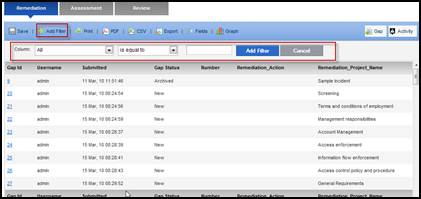
Add Filter
The ‘Add Filter’ functionality
allows the user to search through all the review columns and displays
only the rows containing or leaving out a certain phrase or word
you are looking for or wanting to exclude, respectively.
Step 1
Click on the Add Filter button.
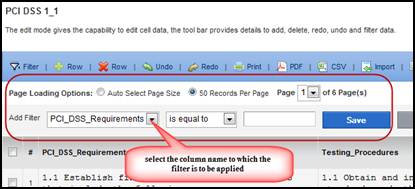
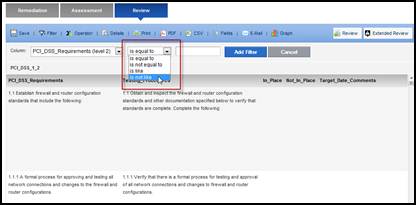
Step 2
From the Column drop-down menu,
select the column name to which the filter is to be applied.
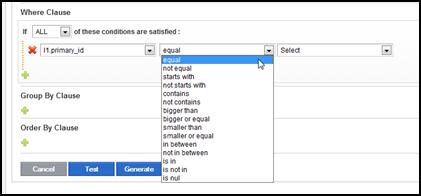
Step 3
Select the condition for applying filter.
Filter options:
is
equal to:To search
for table cells in a selected column for the exact word or phrase.
is
not equal to: To search
for table cells in a selected column which do not contain the
word or phrase mentioned.
is
like: This is similar
to the is equal to feature, but enhanced with the ability
to search even by entering a part of the word or phrase that you
are looking for. For example, entering ‘pre’ in the filter box,
would search for words such as ‘preview’, ‘preface’, etc.
is
not like: This is
similar to the is not equal to feature, but
enhanced with the ability to filter your search even by entering
a part of the word or phrase that you are looking to exclude.
Step 4
Enter the required or appropriate words
into the text box.
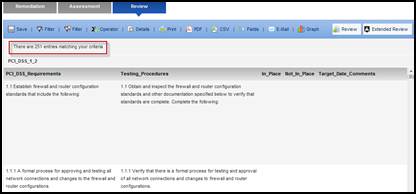
Step 5
Click Add. The filter is added
and applied to the controlsheet which now shows the data based
on the filter.
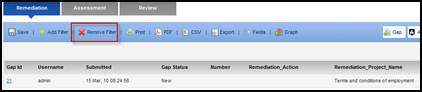
NOTE: Three more buttons are added next
to the Add Filter button; Remove Filter, Save
Filter, and Delete Filter.
Step 6
To remove an added filter, click on
the Remove Filter button.
Step 7
From the Filter drop-down menu,
select the filter that is to be removed.
Step 8
Click Remove.
NOTE: To remove all applied filters, click
on the Remove All button.
Step 9
To save an added filter, click on the
Save Filter button.
Step 10
In the Filter field, enter the
name for the filter and click Save.
Step 11
To delete an added filter, click on
the Delete Filter button.
Step 12
From the Delete Filter drop-down
menu, select the filter that is to be deleted and click Delete
Filter.
Step 13
To apply an already added filter, click
on the Add Filter button.
Step 14
From the Add Filter drop-down
menu, select the filter that is to be applied and click Apply
Filter.
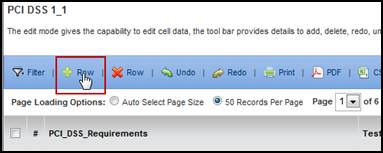
Add Row
The Add
Row functionality allows you to add an additional row at the
end of the review in case you want to edit or insert any data.
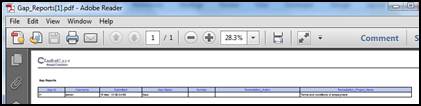
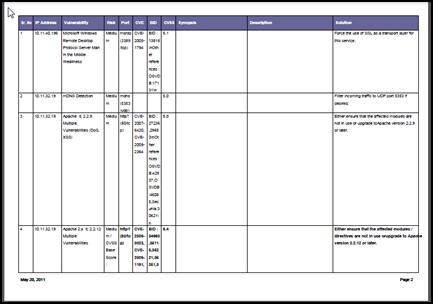
The Export to PDF’ functionality
exports the controlsheet to PDF format.
Step 1
Click on the Export to PDF button.
The PDF file appears as shown below.
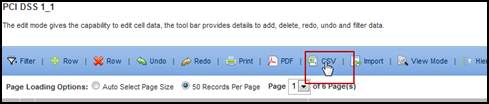
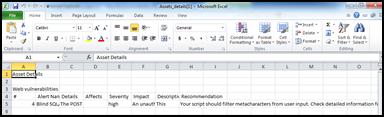
Export to Excel
The Export to Excel functionality
allows you to export the review in CSV format in the local system.
Step 1
Click on the CSV button. User
will then be prompted to save or open the ‘report.csv’ file.
Step 2
Select the required option.
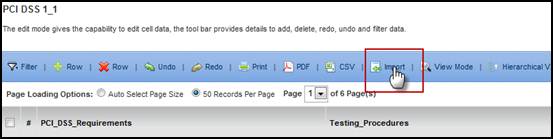
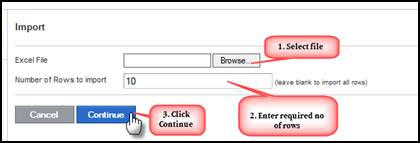
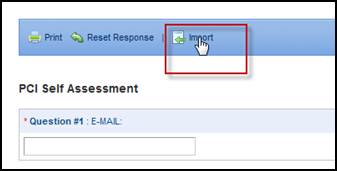
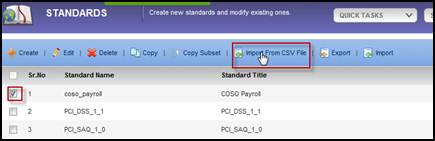
Import from Excel
The Import form Excel functionality
allows the user to import the worksheet from excel CSV worksheet
format.
Step 1
Click on the Import button.
The following screen appears.
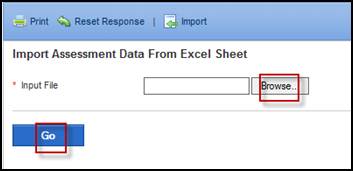
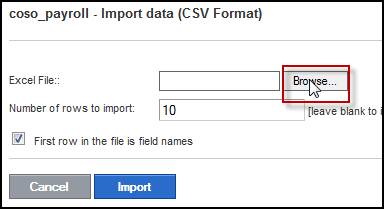
Step 2
Enter the name of the file to be imported.
TIP: Alternatively, click on the Browse
button to browse for the required file.
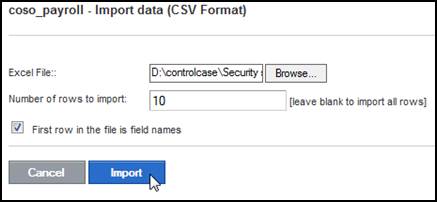
Step 3
In the Number of Rows to import
field, enter the number of rows to import.
NOTE: To import all rows, leave this field
blank.
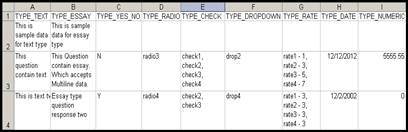
Step 4
Select the ‘First row in the file is
field names’ check box, if you want to synchronize all the column
names in the CSV file to the field names of the controlsheet.
NOTE: make sure that the column names in
the CSV file to be imported matches exactly with the field names
of the controlsheet created.
Step 5
Click Continue.
Creating Test Plans
ControlCase GRC allows the user to
create test plans for the internal control and to attach documents
collected during the testing phase of the audit to the worksheet.
A test plan helps in maintaining information about the test that
is carried on. For instance, it can contain the test date, test
result, the tester who carried out the test, and any other documents
that can be helpful in backing-up the test plan.
To
create a test plan:
Step 1
Click on the Review header tab.
The organizational tree appears.
Step 2
To access specific controlsheets of
a department, for example ‘Controls’, click on it. The reviews
appear as shown below.
Step 3
To access a review, click Edit
next to it.
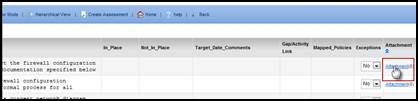
Step 4
Click the Attachment link for
the control against which you want to create a test plan.
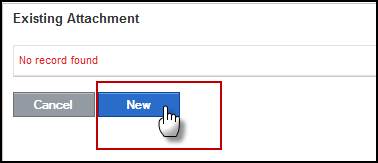
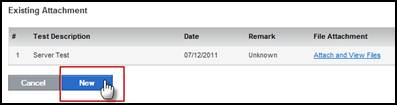
Step 5
To add a new test plan, click the New
button.
This will bring up a screen where you
can enter detailed information about the test plan and attach
the test documents.
Step 6
In the Test Plan box, enter
the name for the test plan.
Step 7
From the Test Status drop-down
list, select the appropriate status in which the test plan is
in.
Step 8
In the Tested By field, enter
the name of the tester.
Step 9
To attach a test document, click the
Browse button and select the document from your directory.
Step 10
In the Description box, enter
a brief description for the uploaded document.
Step 11
In the Test Date box, enter
the data on which the test was performed by clicking the button
next to it.
Step 12
Click the Save button.
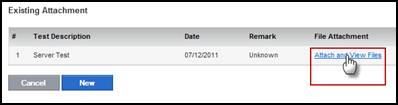
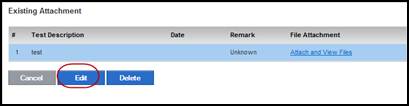
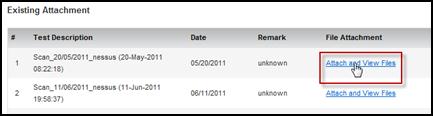
Attaching Additional Test Files
Additional
test files can be attached to an existing test plan as and when
needed.
To
attach an additional test file:
Step 1
Click the Attach and View Files
link.
Step 2
Click the New button.
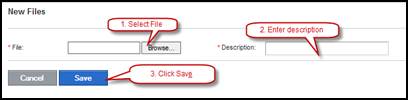
Step 3
Click the Browse button and
locate the new file that is to be attached.
Step 4
In the Description box, enter
description for the attached file.
Step 5
Click the Save button.
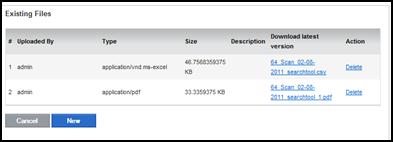
Once
saved, the new file appears in the list of uploaded documents.
Downloading Test Files
Test files
can be downloaded for examination by an auditor.
To
download a test file:
Step 1
Click the Attach and View Files
link.
Step 2
Click the filename that you want to
download.
Step 3
On the File Download screen,
select the required option.
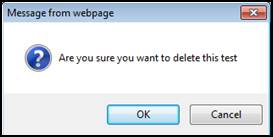
Deleting Test Files
Test file
can be deleted if it is not required anymore or if it is placed
under a wrong test plan.
To
delete a test file:
Step 1
Click the Attach and View Files
link.
Step 2
Click the Delete link next to
the file you want to delete.
Step 3
A confirmation box appears. Click OK.
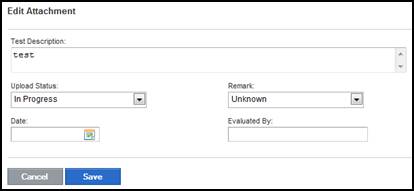
Editing Test Plans
A test plan
can be edited from time to time to reflect its current status.
For instance, you may want to change the test status or the results
of the test on its completion.
To
edit a test plan:
Step 1
Click the test plan that you want to
edit.
The test plan becomes yellow and two
additional buttons, Edit and Delete appear at the
bottom of the screen.
Step 2
Click the Edit button.
Step 3
Make the necessary changes; for example,
change the test status to Completed, the test result to
Pass, and then click the Save button.
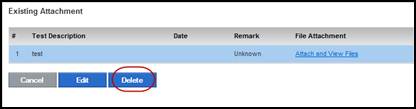
Deleting Test Plans
A test plan
can be deleted if it is not required anymore.
To
delete a test plan:
Step 1
Click the test plan that you want to
delete.
The test plan becomes yellow and two
additional buttons, Edit and Delete appear at the
bottom of the screen.
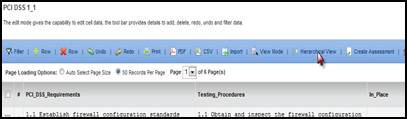
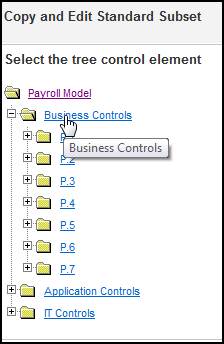
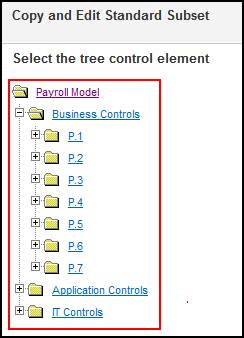
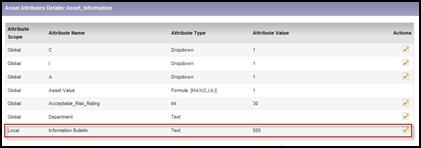
The Hierarchical View functionality
displays the controlsheet in hierarchical tree mode.
The Hierarchical View is as shown below.
In this mode you can add a new row, a new column, and also modify
any existing data in the controlsheet.
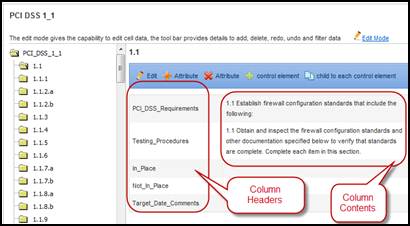
Below, the Column headers of a selected
node and its Column contents are shown. Following that, the various
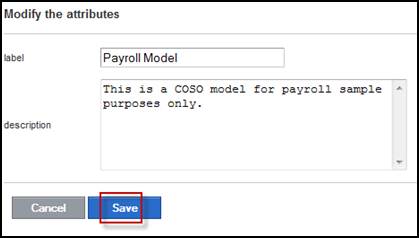
modifications that can be made to a node are discussed.
Modify
Contents of this node
Each node represents certain data cells
of a row. The columns which the node represents are displayed
(on the left) when a particular node is selected and its content
is displayed alongside as shown in the screen above.
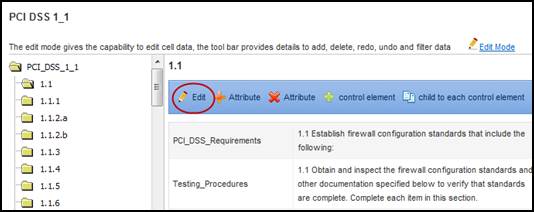
Hence, through this functionality,
you can edit content of row cells displayed.
Step 1
Click on Edit. The next screen
(below) displays the fields present in the selected node with
their respective contents.
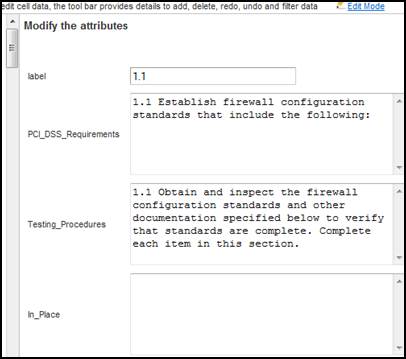
Step 2
Edit the content of the fields and
click Save.
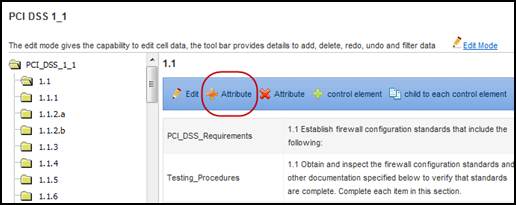
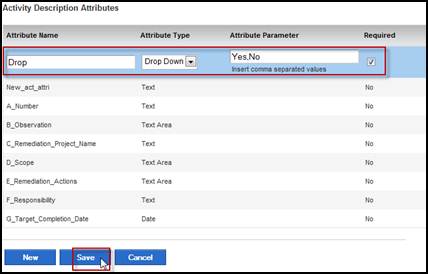
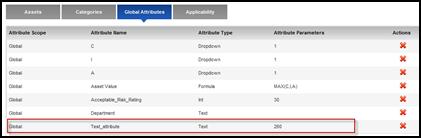
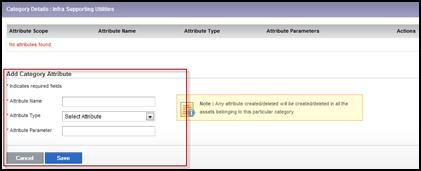
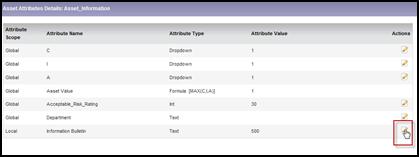
Add a new attribute
This functionality adds a new attribute
to the node. The attribute will represent a new column in the
controlsheet.
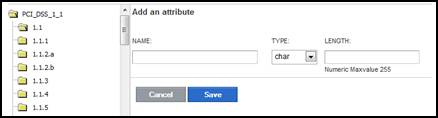
Step 1
Click
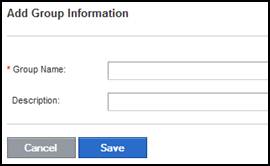
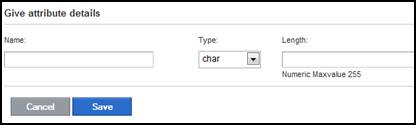
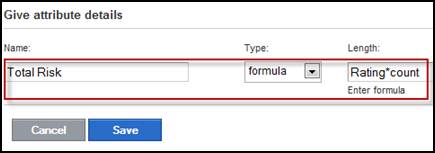
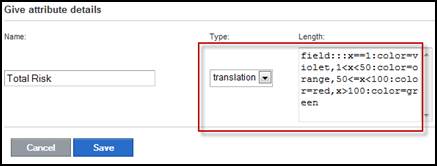
on Add an Attribute. The following screen appears.
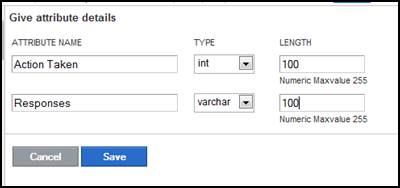
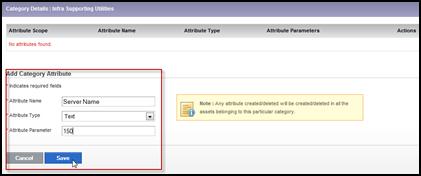
Step 2
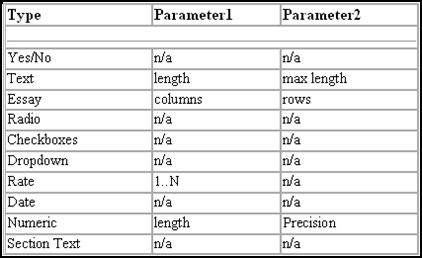
Fill in the details such as ‘Name’,
‘Type’ and ‘Length’ for the new field.
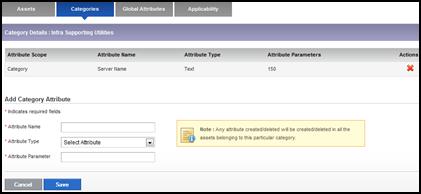
NOTE: This field will then be displayed
as a new column for that particular node.
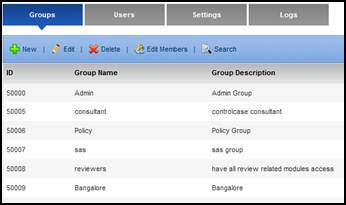
Step 3
Click Save.
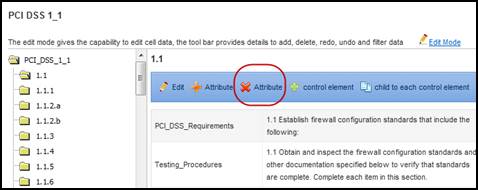
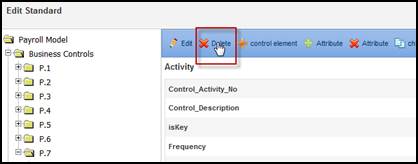
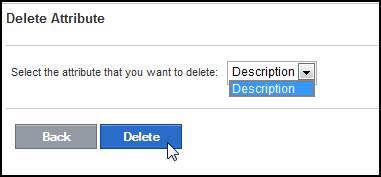
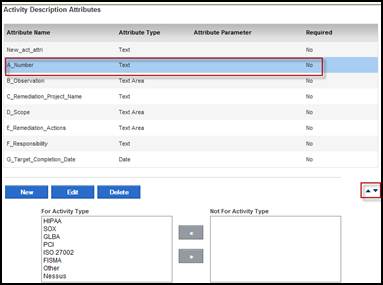
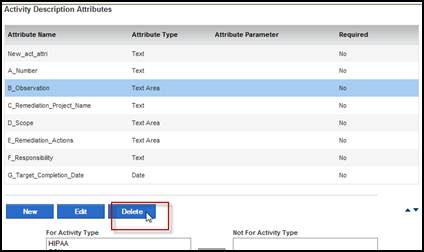
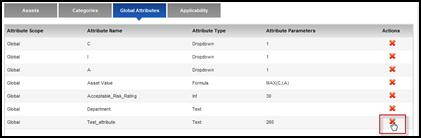
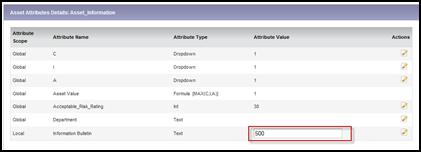
Delete an attribute
This functionality removes any selected
column from the controlsheet.
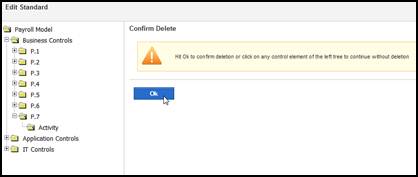
Step 1
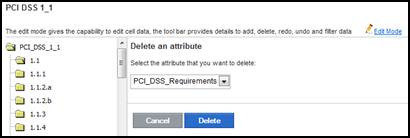
Click on Delete an attribute.
The following screen appears.
Step 2
Select the attribute to be deleted
from the drop-down menu.
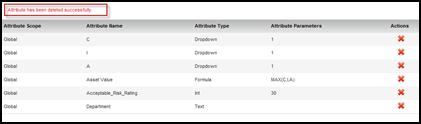
Step 3
Click Save. The attribute is
removed from the controlsheet.
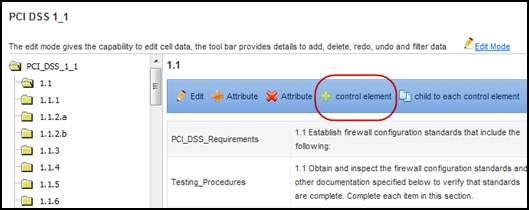
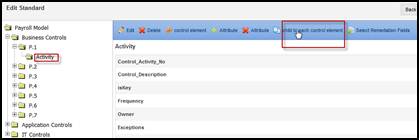
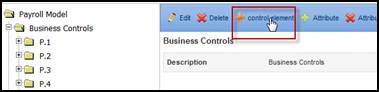
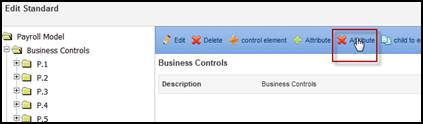
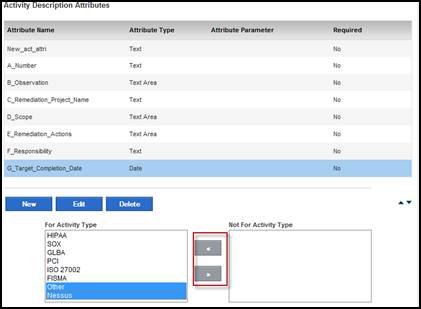
Add a control element
This functionality creates a child
to the selected control element and depending on the number of
attributes given to the child control element; the number of columns
will be created in the controlsheet.
Once a child control element is created
for a particular control element, any more child control elements
created at the same level take up the same attribute-names as
those given to the first child control element created (at that
level).
NOTE: All control elements at the same
level have the same attribute-names.
Step 1
Click on Add a control element.
The following screen appears.
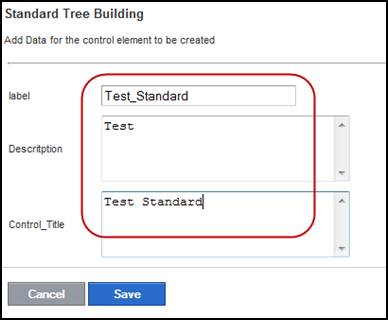
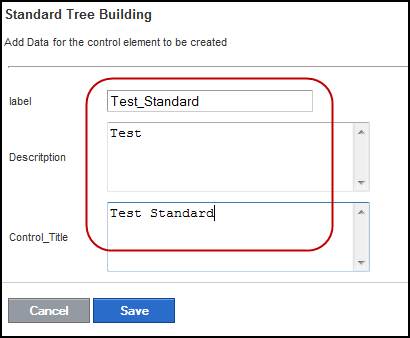
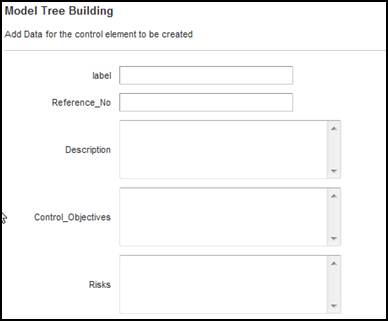
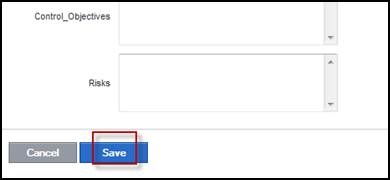
Step 2
Enter the desired label and attribute
name for the new child control element and click Save.
This adds another column to the controlsheet.
NOTE: Child control element creation need
not appear as a new column in the controlsheet. However, if the
created child had to go through the creation of new attributes,
then new column(s) are added to the controlsheet.
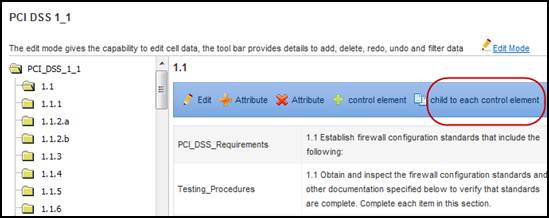
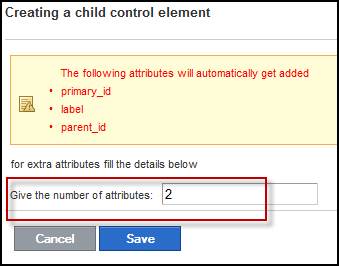
Add a child to each control element
This functionality creates a child
to all the nodes at the same level.
Step 1
Click on Add a child to each control
element. The following screen appears.
NOTE: The Add a child to each control
element feature does not work unless the selected control
element is a leaf control element.
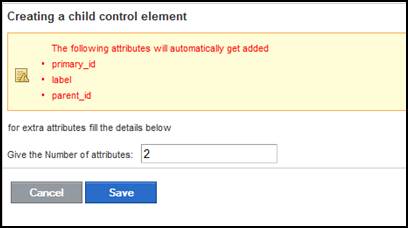
Step 2
Enter the desired number of attributes
for the new child control element and click Save.
Step 3
Fill in the details such as attribute
name, type, and attribute length for the new attribute. This attribute
will then be displayed as a new column in the controlsheet.
Step 4
Click Save to continue. The
following screen appears.
Step 5
Enter the desired label name and attribute
content for the new child control element.
Step 6
Click Save.
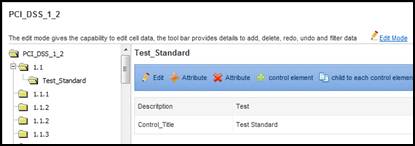
As seen in the screenshot above, ‘Remediation’
was entered as the label name for the new child control element.
On saving the details, the following screen appears where ‘Remediation’
is seen as the child-name and its attribute names are shown on
the right hand side respectively.
You
can use the Search functionality to look for particular review
names (i.e. the ‘For Review’ option), or even specific data within
the reviews (i.e. the ‘In Reviews’ option).
To
search for reviews:
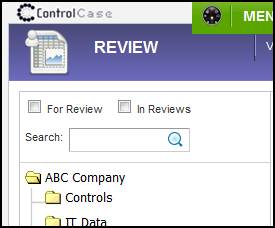
Step 1
Click on the Review header tab
and then click on the Search panel. The Search panel
appears.
Step 2
To search for review names, select
the ‘For Review’ check box. To search for specific data within
the reviews, select the ‘In Reviews’ check box.
NOTE: If you select both the check boxes,
search will be performed for both the options.
Step 3
Enter the particular word or phrase
that you wish to search for through the reviews.
Step 4
Click binocular icon, to run
the search. The search results are displayed in the panel on the
right hand side as shown below.
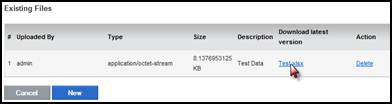
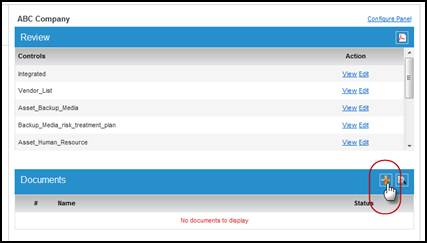
This panel is used to associate documents
with nodes of the organization. When on a particular node, user
may make changes to reviews available for that node. The changes
made have to be supported with some evidence as to why they are
made. The Documents panel helps gain this evidence. The
users can upload their evidences or other documents using this
panel. The uploaded documents will then appear on this panel for
that particular node, for example, the ‘User policy’ file against
the Controls node as shown below.
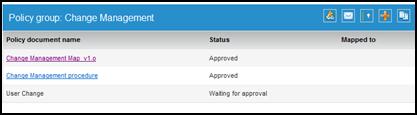
The
panel shows three columns:
·The first column shows the format of
the uploaded document.
·The Name column shows the name
of the file.
·The Status column shows the
status of the file.
NOTE:
To download a file click on its name.
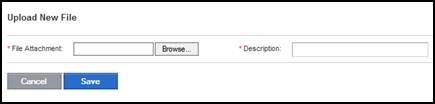
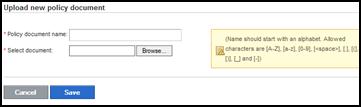
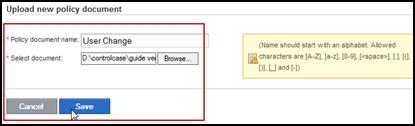
Uploading a New File
Step 1
Click on the Add File button.
Step 2
In the File
Attachment field, enter the file path of the file to be attached.
TIP:
Alternatively, you can click the Browse button to browse
for the required file.
Step 3
In the File Description field,
enter description for the file.
Step 4
Click Save. The file is uploaded
and added at the end of the list.
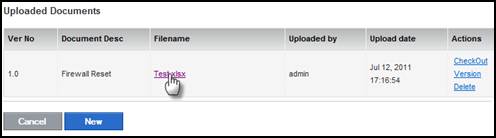
Downloading a File
Step 1
Click on the Uploaded documents
button.
NOTE: You can also click on the file name.
Step 2
Under ‘Filename’
column, click on the file name to be downloaded.
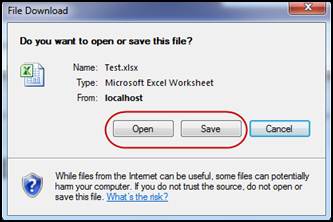
Step 3
Select to open or save the file.
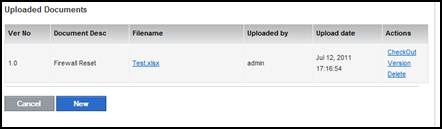
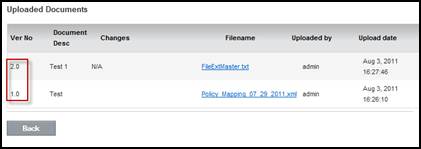
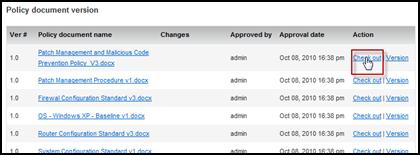
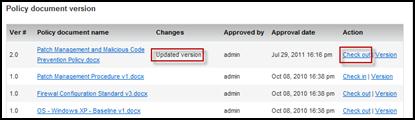
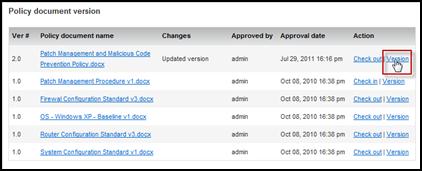
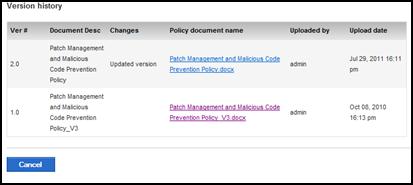
File Versions
In the list of Uploaded Documents,
the first column represents the ‘Version’ of the uploaded file.
This is incremented automatically as and when a user updates and
saves the file.
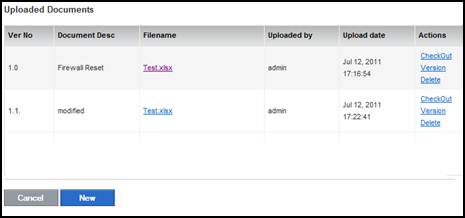
For example, if the default version
is set to ‘1.0’, as soon as the file is updated and saved, the
version of the saved file is displayed as ‘1.1’; and, the following
updates on the file are shown as version ‘1.2’, ‘1.3’ and so on.
To view the full list of previous versions as shown below, click
on Version.
Check-out / Check-in
This concept allows just one user to
work on a single file at a time. Once the user checks out a file,
no other users can then modify or update the file unless and until
it is checked in by the user. The other users will not see the
Check-out option for this particular document when they
log in. This ensures consistency of the documents by preventing
it from modifying my multiple users at the same time. Once you
finish working on the file, you need to upload the updated document.
Step 1
To check out a file, click on CheckOut
next to the file.
Step 2
Under
‘Filename’ column, click on the file name to be downloaded.
Step 3
Select to open or save the file.
Step 4
Make necessary changes and save the
file.
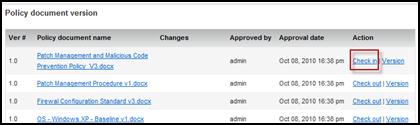
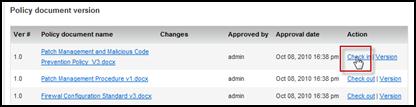
Step 5
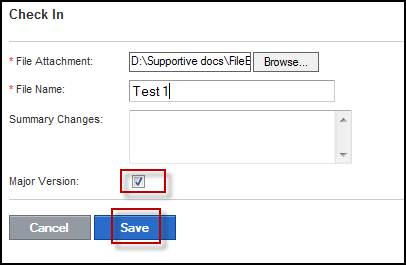
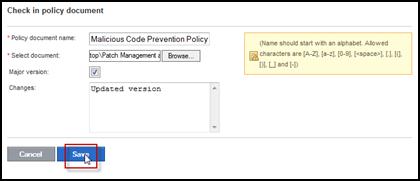
To check in the file, click on CheckIn
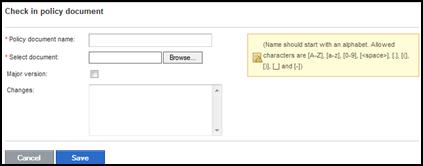
next to the file. The following screen appears.
Step 6
In the File
Attachment field, enter the name of the changed file.
TIP:Alternatively, you can click
the Browse button to browse for the required file.
Step 7
In the File Description field,
enter description for the file.
Step 8
In the Summary changes field,
enter description for the changes made to the file.
NOTE: If you select the ‘Major Version’
option, the version of the updated file would jump to the next
integer. For example, the previous version of the file was ‘1.2’;
the next version would be saved as ‘2.0’ instead of ‘1.3’.
Step 9
Click Save. The file is uploaded
and added at the end of the list.
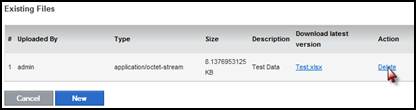
Deleting a File
Step 1
Click on Delete next to the
file you want to delete. A warning message appears.
Step 2
Click OK.
Submitting
Gaps
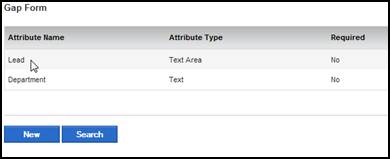
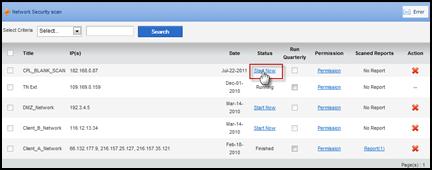
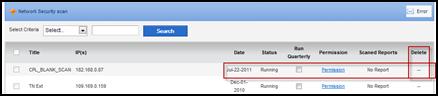
Gaps
may be reported via email, through theRemediationheader tab, or through the company’s
intranet portal. Once the gap has been reported, it appears on
theGappanel.
Gap
reports may be submitted via email by anyone within the organization.
In this, gaps are reported to a particular email address that
is pre-configured with ControlCase GRC. They remain in the mail
box, until they are fetched by the application.
NOTE: To use this feature, configuration
of email account is done using theUser
Adminmodule.
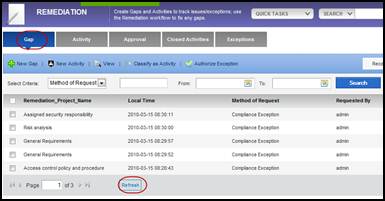
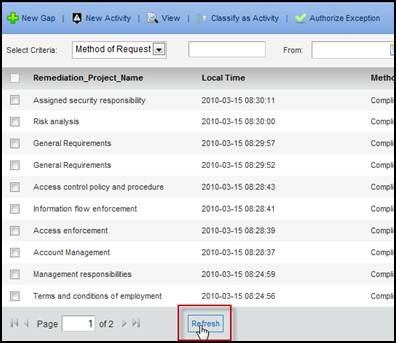
Step 1
E-mails
get reported as and whenrefreshis clicked on, in the Gap
panel as shown below.
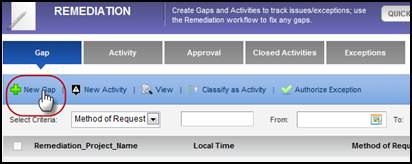
This
feature is available to any user with login access to ControlCase
GRC.
NOTE: To use this feature, theNew Gapform
has to be configured from theRemediation
Adminmodule.
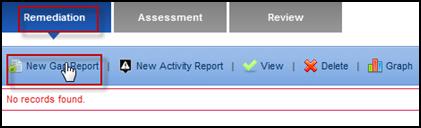
To
submit gaps via the Remediation header tab:
Step 1
Click
on theRemediationheader tab.
Step 2
ClickReport a New Gap.
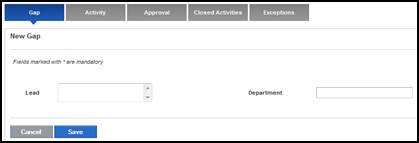
Step 3
Add
details of the gap in the cells provided.
Step 4
ClickSave.
The reported gap is then displayed in the list of gaps under theGappanel.
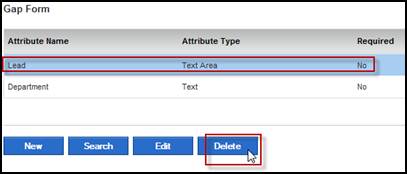
·For information on adding new attributes
in a Gap form, refer to Adding
a new Attribute topic under, Remediation Administration”,
“Configuring the New Gap Form.”
For
those within the organization who are not provided with access
to ControlCase GRC, a link to submit a gap will be set up on the
intranet portal. Here, any user can report gaps anonymously by
completing the gap description form.
To
submit gaps using the online link:
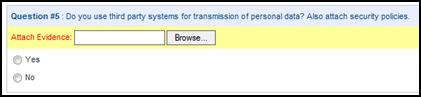
Step 1
Click on the
link provided on the intranet portal to bring up the questionnaire.
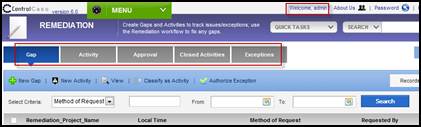
ControlCase
GRC enables Activity Manager to classify gaps into activities
based on their severity and to assign the activities to investigators
who will work to resolve them.
All
incoming gaps can be reviewed immediately by the Activity Manager
from hisRemediationheader tab.
To
view the reported gaps:
Step
1
Click
on theRemediationheader tab.
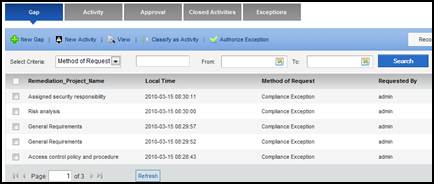
Step
2
Click
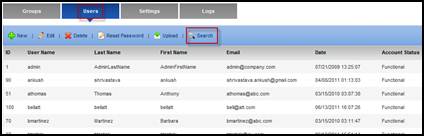
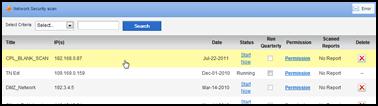
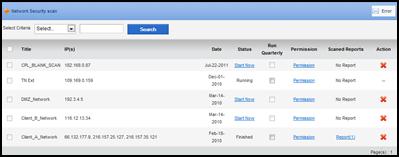
theGapspanel. Here, all reported gaps
are listed including the time and date each gap was reported and
the name of the person who reported it (if provided). Expand theGappanel
(if it is not already expanded). Here, you may also change the
number of gaps to be displayed per page. By default, fiftyGaps are displayed per page which
is the maximum limit; however, this number can be changed as per
requirements.
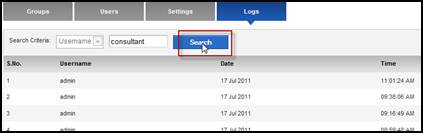
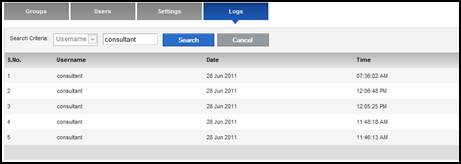
NOTE:
ThroughSearchbutton (shown in the above screenshot),
gaps can be filtered by,
Method of Request: (use words like
email, user or web)
Requested By: User id (to search
for gaps reported through email/web use the word ‘anonymous’;
for other gaps use the ‘user id’), or
Dates.
To
get all the gaps listed, you must click on Cancel.
The
details of all the reported gaps can be viewed by the users to
whom they have been assigned, for example, Activity Manager. After
having viewed the gaps, the user can decide whether to classify
it into an activity or send it for waiver approval.
To
view gap details:
Step 1
Click
on theRemediationheadertab.
Step 2
Click
theGappanel. Here, all reported gaps
are listed.
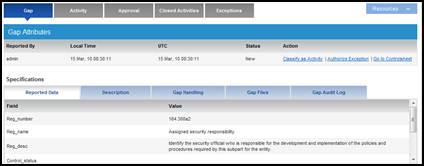
Step 3
Click
onView Gapnext to the gap to view its details.
The following screen appears that displays
the details of the selected gap.
NOTE: Here, the user can also document
additional details relevant to the gap.
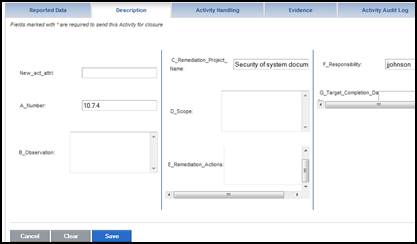
Before
classifying a gap into an activity, the Activity Manager can provide
more details about the reported gap. This further makes the gap
clearer.
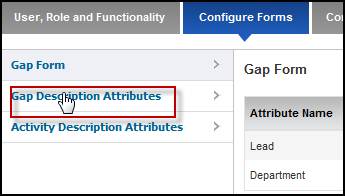
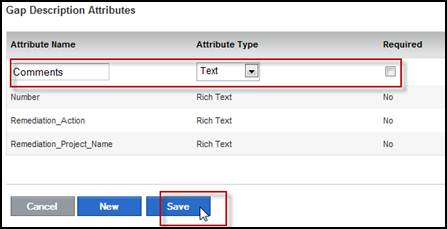
NOTE: To use this feature, theGap Description Attributesform has to be configured from
theRemediation Adminmodule. For more information
refer toConfiguring
Gap Description Attributestopic
under Remediation Section.
To
add gap description:
Step 1
Click
on theRemediationheadertab.
Step 2
Click
theGappanel. Here, all reported gaps
are listed.
Step 3
Click
onView Gapnext to the gap.
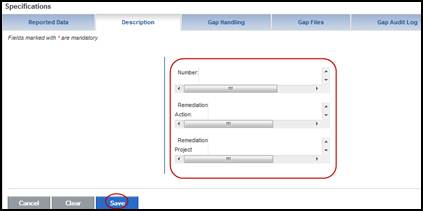
Step 4
Click
on theDescriptiontab present on theSpecificationspanel
at the bottom of the page.
Step 5
Enter
the Gap details in the cells provided and clickSave.
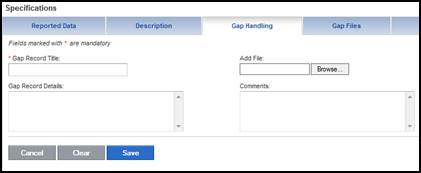
Whenever
a gap is reported, some preliminary investigation is done to resolve
it. The Gap Handling section allows the investigator to
document the results of the investigation.
To
add gap record and files:
Step 1
Click
on theRemediationheader tab.
Step 2
Click
theGappanel. Here, all reported gaps
are listed.
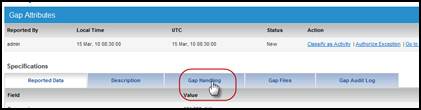
Step 3
Click
onView Gapnext to the gap.
Step 4
Click
on theGap Handlingtab present on theSpecificationspanel
at the bottom of the page.
Step 5
Add
details of the Gap in the cells provided.
Step 6
To
include files with the activity details, click theBrowsebutton
to browse to the required file.
Step 7
ClickSaveat
the bottom of the screen to save changes to the record.
NOTE: Once an investigation record has
been added, it will appear at the top of theGap
Handlingsection.
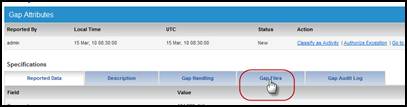
The
files included in theGap
Handlingsection can
be viewed and downloaded using theGap
Filessection for
reference. In addition, details such as Gap record title, file
name, hash, etc. are also displayed here.
To
view the gap handling files:
Step 1
Click
on theRemediationheader tab.
Step 2
Click
theGapspanel. Here, all reported gaps
are listed.
Step 3
Click
onView Gapnext to the gap.
Step 4
Click
on theGap Filestab present on theSpecificationspanel
at the bottom of the page.
This directs to a list of all files
that are associated with the Gap.
Step 5
To
download a file, click on it. A dialog box appears prompting to
open or save the file. Select the required option.
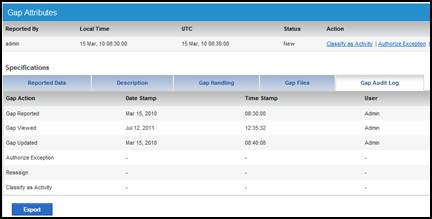
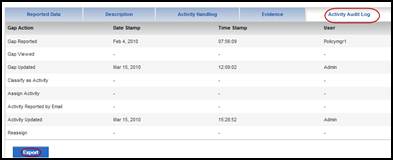
All
operations performed on a gap, such as, when it was reported,
viewed, updated, sent for waiver approval, reassigned, classified
as activity and who all did it is displayed here.
To
view the gap audit log:
Step 1
Click
on theRemediationheader tab.
Step 2
Click
theGapspanel. Here, all reported gaps
are listed.
Step 3
Click
onView Gapnext to the gap.
Step 4
Click
on theGap Audit Logtab present on theSpecificationspanel
at the bottom of the page. This displays the log associated with
the Gap.
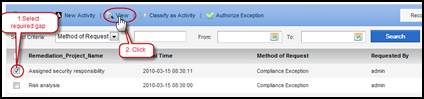
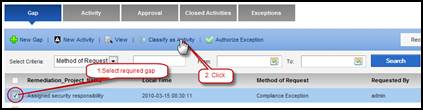
Once
the Activity Manager has reviewed a gap report and decides to
proceed with further investigation, it can be categorized as an
activity.
To
classify gap as activity:
Step 1
Click
on theRemediationheader tab.
Step 2
Click
theGappanel. Here, all reported gaps
are listed.
Step 3
Click
onClassify as Activityfor a particular Gap.
Step 4
Click
OK on the confirmation box.
Step 5
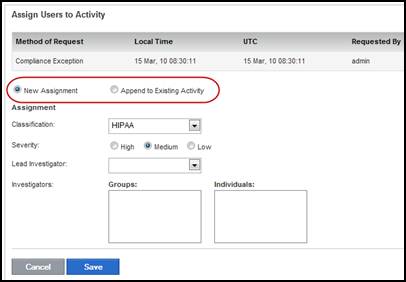
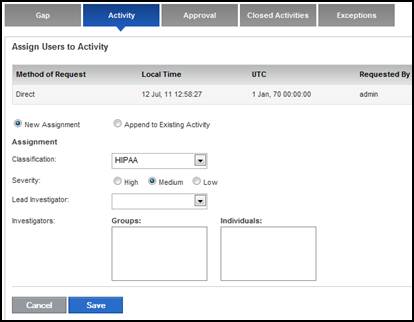
Select
one of the options.
·New Assignment:
Creates a new activity.
·Append to Existing Activity: Appends the activity to an existing
activity.
NOTE: If you select this option, you must
provide the Activity number to which the gap is to be appended.
In that case, the same investigators would handle this gap as
well.
Step 6
From
theClassificationdrop-down menu, select the type
of classification.
Step 7
Select
the appropriate severity level: High, Medium, or Low.
Step 8
From
the LeadInvestigator drop-down
menu, select the Investigator lead.
Step 9
From
the Investigators list, select the Group and Investigators
from that Group.
Step 10
ClickSaveat
the bottom of the page to save the changes. You are returned to
theRemediationheader tab where the assigned
gap is no longer on the list. The details of the activity then
appear on the assigned investigator’sActivitypanel.
If
a gap is not significant enough to be classified as an activity,
the Activity Manager can waive the gap to remove it from theRemediationheader tab and preserve the details.
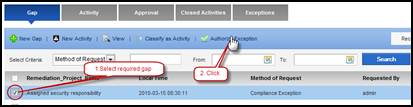
To
waive a gap:
Step 1
Click
on theRemediationheader tab.
Step 2
Click
theGappanel. Here, all reported gaps
are listed.
Step 3
Click
onWaiver Approvalnext to the desired gap.
Step 4
ClickOKon
the confirmation window to continue.
The user is directed to theRemediationheader tab where the selected gap is
no longer listed.
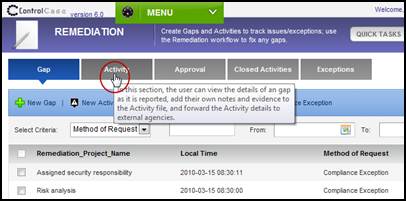
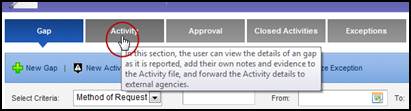
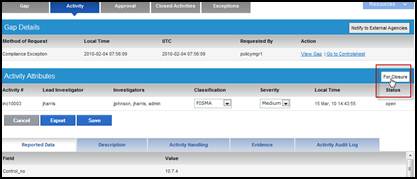
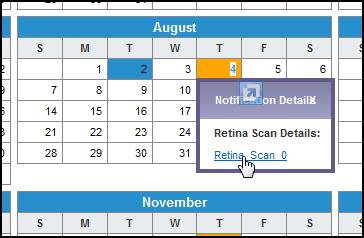
In
this section, the user can view the details of an activity and
its corresponding gap as it is reported. The user can further
add his own notes and evidence to the activity file, and forward
the activity details to external agencies such as US-CERT.
This
feature is available to any user with login access to ControlCase
GRC. Here, a user can directly create and assign activities without
the need of creating gaps.
To
submit activities via the Remediation header tab:
Step 1
Click
on theRemediationheader tab.
Step 2
ClickReport an Activity.
Step 3
Select
one of the options.
·New Assignment:
Creates a new activity.
·Append to Existing Activity: Appends the activity to an existing
activity.
NOTE: If you select this option, you must
provide the Activity number to which the gap is to be appended.
In that case, the same investigators would handle this gap as
well.
Step 4
From
theClassificationdrop-down menu, select the type
of classification.
Step 5
Select
the appropriate severity level: High, Medium, or Low.
Step 6
From
theLead Investigatordrop-down menu, select the activity
lead.
Step 7
From
theInvestigators list, select the Individuals from Groups.
Step 8
ClickSaveat
the bottom of the page to save the changes. The details of the
activity then appear on the assigned investigator’sActivitypanel.
Once
an activity has been created, it may be viewed from theRemediationheader tab of any user with the appropriate
access rights. This provides a detailed view to users who
have been assigned the responsibility of investigating or tracking
a particular activity.
To
view the listed activities:
Step 1
Click
on the Remediation header tab.
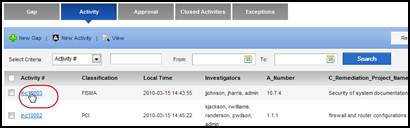
Step 2
Click
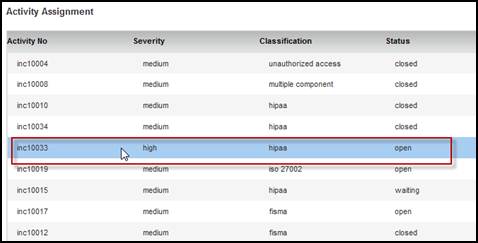
on the Activity panel (Expand it if it is not already expanded).
Here, every activity is listed with its classification, severity
level, the list of resource to whom it is assigned, the time and
date on which it was reported, and the name of the person who
reported it (if provided).
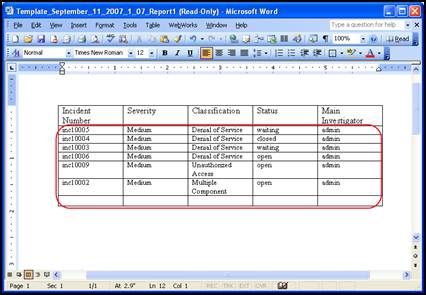
The screenshot above shows the list
of activities that have been assigned to resource. By default,
fiftyactivities are displayed
per page which is the maximum limit; however, this number can
be changed as per requirements.
NOTE: Through Search button (shown
in the above screenshot), Activities can be filtered by providing
Activity classification or severity or resource or dates. However,
you need to click on Cancel to get all the activities listed.
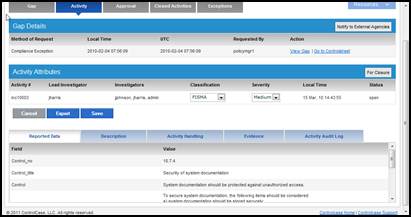
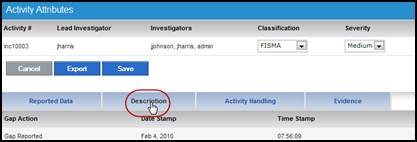
When
classifying a gap into an activity, additional information like
activity classification type, severity, date and time it was reported,
and the name of the user who reported it is associated with it.
This information can be viewed anytime by the investigator allocated
for that activity.
To
view reported data:
Step 1
Click on the
Remediation header tab.
Step 2
Click on the Activity panel.
Here, all activities are listed.
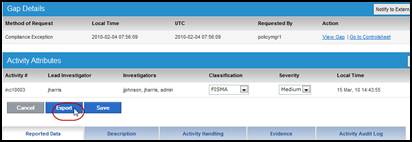
Step 3
To access the data recorded about the
assigned activity, click on the desired activity number.
The details of that activity are displayed
as shown below.
NOTE: The corresponding gap(s) details
can be seen via the View Gap link.
To save the activity details in a single
PDF document, click on the Export button.
All activities performed on an activity,
right form reporting a gap to closing it, are logged in a file.
This log can be viewed at any time to find out as to who performed
the activities and when they were performed.
To
view time and date stamps:
Step 1
Click on the Remediation header
tab.
Step 2
Click on the Activity panel.
Here, all activities are listed.
Step 3
Click on the desired activity number.
The details of that activity are displayed
as shown below.
Step 4
Click Activity Audit log.
NOTE: To save this audit log as a CSV file,
click on the Export button as seen in screen above.
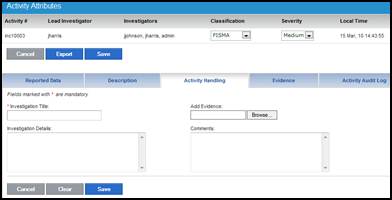
The Activity Handling section
allows the investigator to keep a record of the investigation
performed on a particular activity. This record can be referred
to when closing an activity.
To
add activity record and evidence:
Step 1
Click
on the Remediation header tab.
Step 2
Click
on the Activity panel. Here, all activities are listed.
Step 3
Click
on the desired activity number.
The details of that activity are displayed
as shown below.
Step 4
Click
on the Activity Handling tab present on theSpecificationspanel
at the bottom of the page.
Step 5
Add details of the investigation in
the cells provided.
Step 6
To include evidence files with your
activity details, click the Browse button to browse for
the required file.
Step 7
Click Save at the bottom of
the screen to save changes to the record.
NOTE: Once an investigation record has
been added, it will appear at the top of the Activity Handling
section.
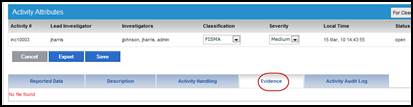
The files included in the Activity
Handling section can be viewed and downloaded using the Evidence
section that contains all the details (such as Evidence Number,
Evidence File, etc.) about the evidence obtained during the investigation.
To
view evidence:
Step 1
Click on the Remediation header
tab.
Step 2
Click on the Activity panel.
Here, all activities are listed.
Step 3
Click on the desired activity number.
The details of that activity are displayed
as shown below.
Step 4
Click on the Evidence tab. This
directs the user to a list of all evidence files that are associated
with the activity.
The Evidence tab displays other
information such as evidence number, evidence file, hash, date
and time the evidence was added, and also provides access to theEvidence
Chain of Custody.
Step 5
To download an evidence file, click
on it.
A dialog box appears prompting to open
or save the file.
The importance of keeping good track
of your evidence cannot be overstated. To organize
the activity management process, as well as for legal purposes,
the Evidence Chain of Custody has been built into ControlCase
GRC. This makes it possible to track evidence as it moves from
one person to another and, by employing SHA encryption, it is
ensured that the evidence file is not modified.
To
add evidence to the evidence chain of custody:
Step 1
Click on the Remediation header
tab.
Step 2
Click on the Activity panel.
Here, all activities are listed.
Step 3
Click on the desired activity number.
The details of that activity are displayed
as shown below.
Step 4
Click on the Evidence tab.
Step 5
Click on Evidence Chain of Custody.
Step 6
Add evidence handling details in the
cells provided and click Save.
NOTE: The saved details then appear in
a table at the top of the screen.
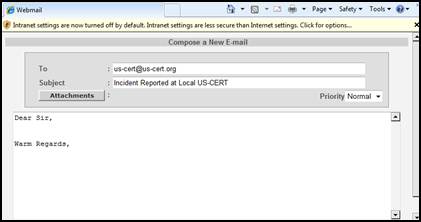
ControlCase GRC allows the investigator
to notify external agencies such as US-CERT and CC/CERT of activities
that have occurred in order to inform them about the activities
or to seek help from them.
To
notify an external agency of activities:
Step 1
Click
on theRemediationheader tab.
Step 2
Click
on theActivitypanel. Here, all activities are
listed.
Step 3
Click
on the desired activity to be reported.
The details
of that activity are displayed.
Step 4
From the upper-right corner of this
page, select the agency that is be notified of the activity.
Step 5
Enter the required details in the email
form provided.
NOTE: For convenience, ControlCase GRC
facilitates automatic pre-population of several data fields based
on the selected activity. These data fields can be set up using
theSetting
Emails Fieldslink
in the Remediation Admin module.
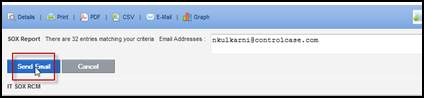
Step 6
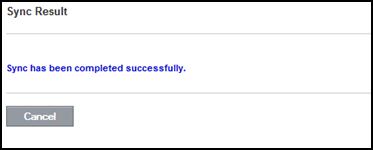
Click Send E-mail. After the
successful transmission of the email, a confirmation message is
displayed on the screen.
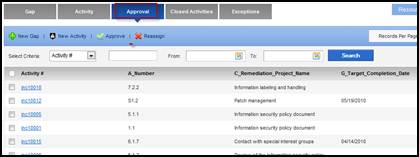
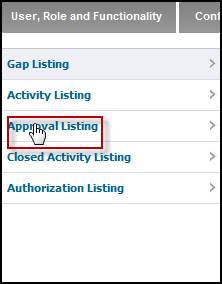
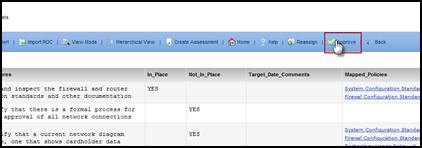
Once an investigator recommends an
activity for closure, the activity will appear on the Activity
Closer’s Approvals panel. The Activity Closer can then
review the same activity data that the investigator added. Once
the Activity Closer determines that the activity has been thoroughly
investigated and resolved, he can close the activity. If the Activity
Closer feels that the activity has not been thoroughly investigated
and resolved, he can reassign that activity. That particular activity
will then be available on the Activity panel.
To
close an activity:
Step 1
Click on the Remediation header
tab.
Step 2
Click on the Approvals panel.
This shows a list of all activities awaiting approval.
NOTE: Through Search button (shown
in the above screenshot), recommended activities can be filtered
by providing activity classification, severity, resource or dates.
However, you must click on Cancel to get all the recommended
activities listed again.
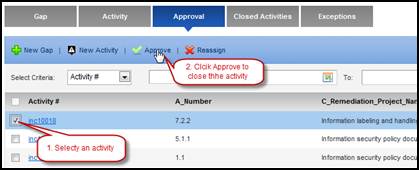
Step 3
Select the activity number to be reviewed.
The Activity Details screen will appear.
Step 4
Click Approve to close the activity.
NOTE: To reassign the activity, clickReassign.
TIP:
Alternately Activity Closer can return to theApprovalspanel
and selectApproveorReassignfor an appropriate activity number.
NOTE: List of closed activities can be
accessed via the Closed Activity panel.
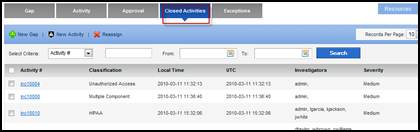
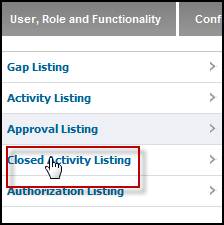
If at any point of time, the Activity
Closer finds that a particular closed activity has not been thoroughly
investigated and more investigation is possible or essential,
he can reopen that activity for reinvestigation. The activity
will then appear on the Activity panel of the assigned
Investigator.
To
reassign a closed activity:
Step 1
Click on the Remediation header
tab.
Step 2
Click on the Closed Activities
panel. This shows a list of all activities that have been approved
or closed.
NOTE: Through Search button (shown
in the above screenshot), approved activities can be filtered
by providing activity classification, severity, resource or dates.
However, you must click on Cancel to get all the approved
activities listed again.
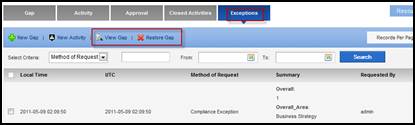
Gaps
that are waived can be accessed again for reviewing or adding
further details.
To
view waived gaps:
Step 1
Click on the Remediation header
tab.
Step 2
Click on the Waivers panel.
This shows a list of all gaps that have been waived.
NOTE: Through Search button (shown
in the above screenshot), waived gaps can be filtered by providing
dates. However, you must click on Cancel to get all the
waived gaps listed again.
Step 3
Click on the View Gap link.
NOTE: Further details can be added using
the Specifications panel. Clicking on the Restore Gap
link will move the gap back to the Gap panel and it will
no more be available on the Waivers panel.
The
Reporting module, as the name suggests, is used for reporting
purpose. Reports can be created for reported gaps, activities,
assessments, and reviews. In addition, the data in the reports
can also be used to create graphs.
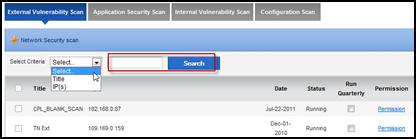
This
section deals with creation of reports from the reported Gaps
and Activities. Reports can be created using the search criteria
such as classification, type or resource or dates, provided within
the application. The created reports can be saved for later review.
Furthermore, graphs can also be created from the saved reports
that can then be placed on the dashboard of the desired user for
viewing.
This
sections deals with creating of gap reports. Reports can be created
for a single user or group of users or can be based on dates.
Once a report is created, it can be saved for viewing later; it
can be also exported in PDF or Excel format.
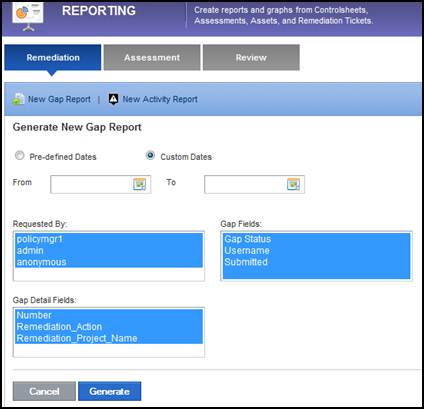
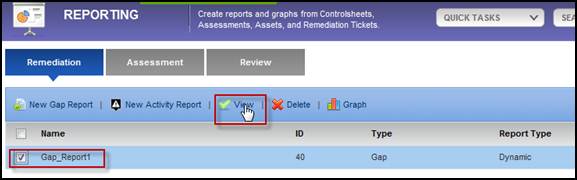
To
generate a gap report:
Step 1
Click
on the Reporting header tab.
Step 2
Click
on the Gap Reports link. The search criterion is displayed
as shown below.
It is divided into four sections:
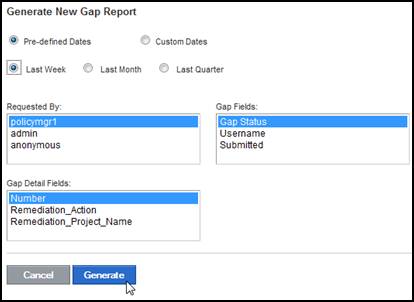
Time
Selection: Allows
selection of duration to search within. The Pre-defined Dates
option allows to search within last week, last month, and last
quarter while the Custom dates option provides to select
the duration by entering the starting and ending dates.
NOTE: While the Custom dates option
is selected, if only the From field is populated, gaps
reported from then till date will be displayed. If only the To
field is populated, gaps reported till the specified date will
be displayed. If none of the fields is populated, gaps reported
for entire duration will be displayed.
Requested
By: Allows selection
of users from all those who reported the gaps.
Gap
Fields: Allows selection
of gap fields to be displayed in the report.
Gap
Detail Fields: Allows
selection of gap description attributes to be displayed in the
report.
Step 3
Make
selections as per the requirements.
NOTE:If
you select ‘admin’ as the user, only those Gaps which were reported
by the admin will be displayed in the report.
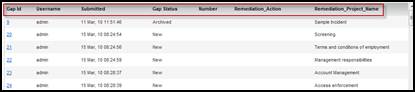
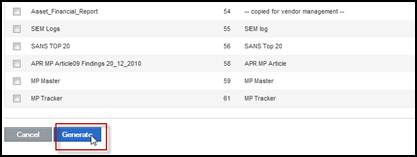
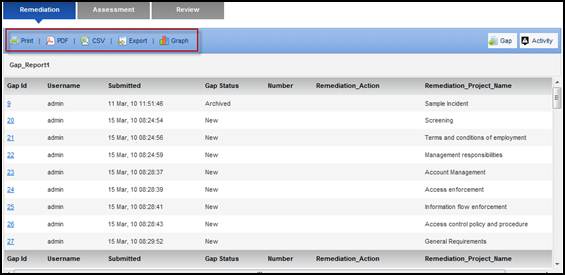
Step 4
Click
on Generate. The Gap Report with the required results is
displayed. Notice that the fields selected previously comprise
the various column headings.
NOTE: To view the details on a gap, click
on its corresponding Gap ID.
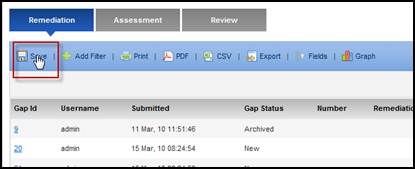
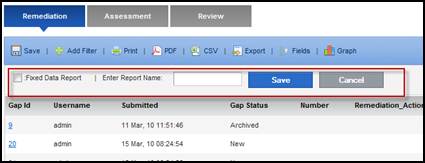
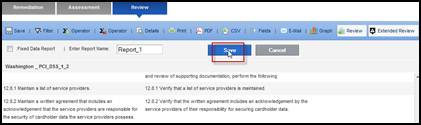
Step 5
To
save the report, enter the report name in the Enter Report
Name field and then click Save.
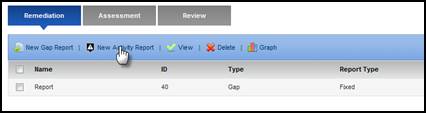
NOTE: The saved report can be viewed later
from the Run Saved Gap Report list. If the Fixed Data
Report check box is selected, the report is saved along with
its displayed content. If not selected, only the criteria for
report generation is saved; the content will change the next time
the saved report is run based on the then existing status. In
other words, the saved report can be made fixed or dynamic.
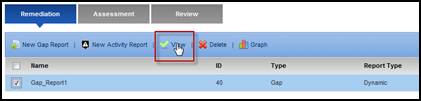
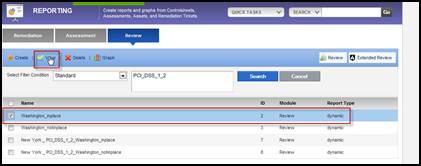
To view saved report:
Step 1
Click
on theReportingheader tab.
Step 2
Click
on theGap Reportslink. A list of saved reports
appears.
NOTE: The Run Saved Gap Report list
appears only if there is at least one saved report.
This
sections deals with creating of activity reports. Reports can
be based on users or on dates. Once a report is created, it can
be saved for viewing later; it can be also exported in PDF or
Excel format.
To
generate an activity report:
Step 1
Click
on theReportingheader tab.
Step 2
Click
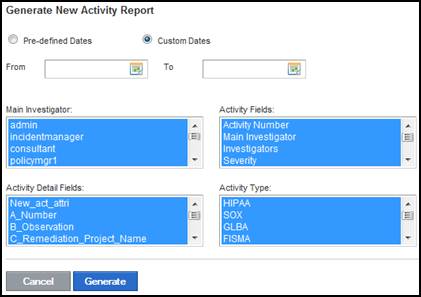
on theActivity Reportslink. The search criterion is
displayed as shown below.
It is divided into five sections. The
first four sections are similar to those described in the gap
reports section. The Activity Type section allows selection
of the type of activity.
Step 3
Make
selections as per the requirements.
NOTE:If
you select ‘admin’ as the user, only those activities reported
by the admin will be displayed in the report. If you select ‘Malicious
code’ as the type of Activity, only those activities of that type
will be displayed in the report. However, if you select both,
‘admin’ and ‘Malicious code’, the result will be the intersection.
Step 4
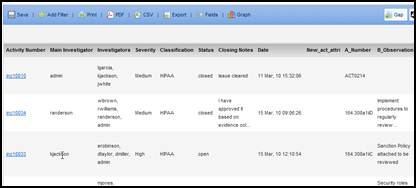
Click
onGenerate.The Activity Report with the
required results is displayed.
NOTE: To view the details of an Activity,
click on its corresponding Activity Number. Investigator(s) of
that activity can open the activity in write mode. However, other
users can only open it in read-only mode.
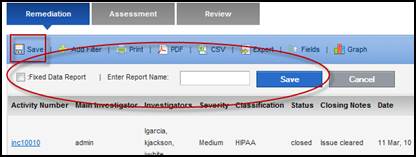
Step 5
To
save the report, enter the report name in theEnter Report Namefield and clickSave.
NOTE: The saved report can be viewed later
from the RunSaved
Activity Reportlist.
If the Fixed Data Report check box is selected, the report
is saved along with its displayed content. If not selected, only
the criteria for report generation is saved; the content will
change the next time the saved report is run based on the then
existing status. In other words, the saved report can be made
fixed or dynamic.
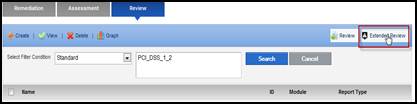
To view saved report:
Step 1
Click
on theReportingheader tab.
Step 2
Click
on theActivity Reportslink. A list of saved reports
appears.
NOTE: The Run Saved Activity Report
list appears only if there is at least one saved report.
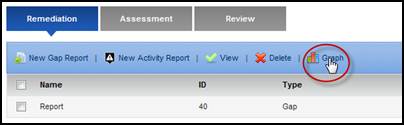
Graphs
can be created from saved reports to view gap or activity statistics.
Using graphs, data can be put together for examination or comparison
in more presentable manner. While creating the graph, its preview
can be viewed to find out how it will look like after its creation.
Once created, permission can be given to users so that the graph
will appear on their dashboards.
To
create a graph:
Step 1
Click
on the Reporting header tab.
Step 2
Click
on the Remediation Graphs link.
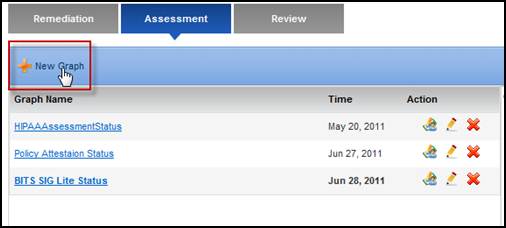
Step 3
Click
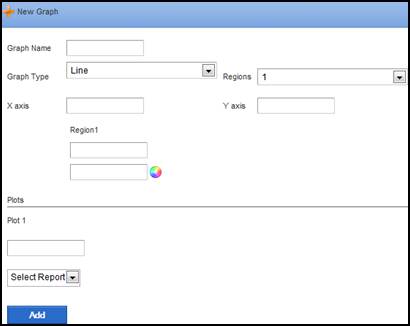
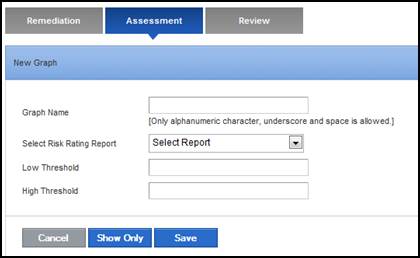
on New Graph. The following screen appears.
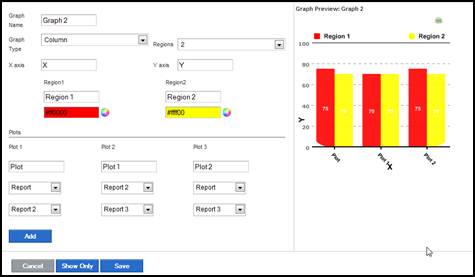
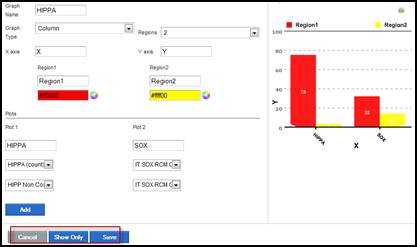
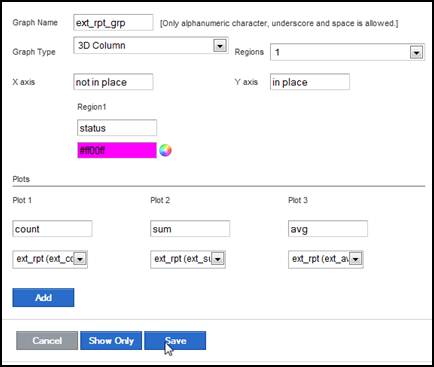
Step 4
Enter
the graph name, select graph type (Line, Column, 3D Column, Pie,
Bar, etc.), and regions (1, 2, 3).
Step 5
Enter
labels for the X and Y axis.
Step 6
Enter
labels for the regions and select colors in which they will be
displayed.
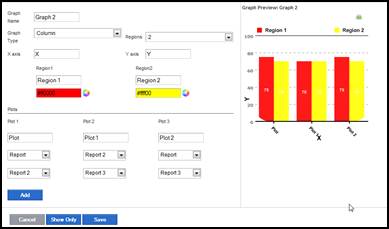
Step 7
Enter
the plot and select the report from the drop-down menu.
NOTE: The drop-down menu shows the list
of all saved reports. To add more reports click Add.
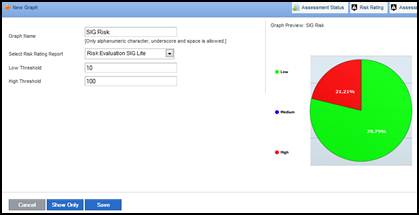
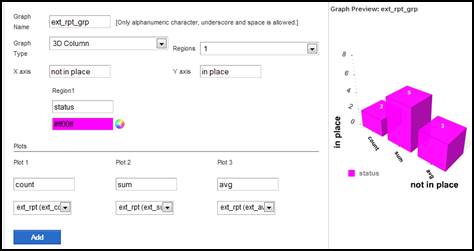
Step 8
Click
Show Only to view the preview of the graph.
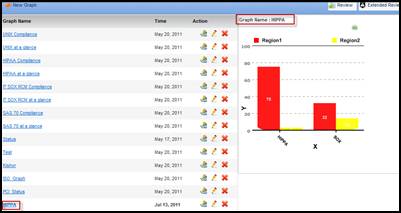
Step 9
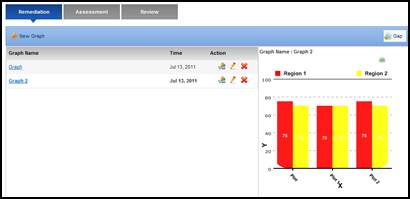
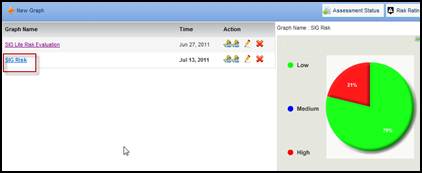
Click
Save once the desired output is set. The name of the saved
graph appears in bold in the list of graphs and the corresponding
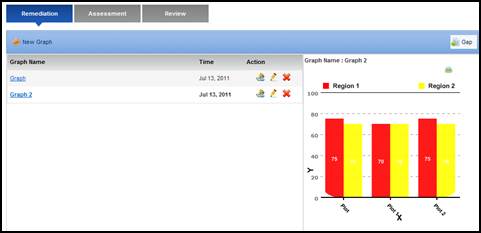
graph appears on the right side.
The
graph above shows two regions; Gap (blue) and Activity (red) with
plots Week1 and Week2. It represents the number of gaps and activities
reported in week 1 and 2.
NOTE: To delete the graph, click Delete
next to it.
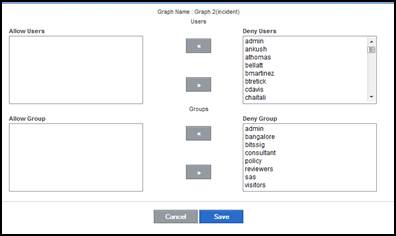
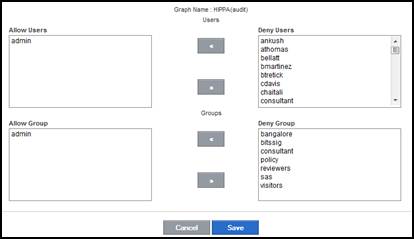
Step 10
To
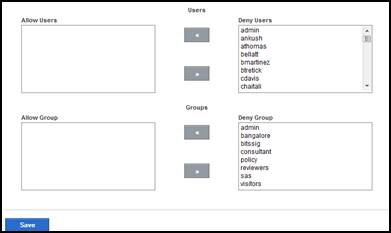
assign permissions for the graph, click Permission
button next to it. The Dashboard Permission for graphs
screen appears.
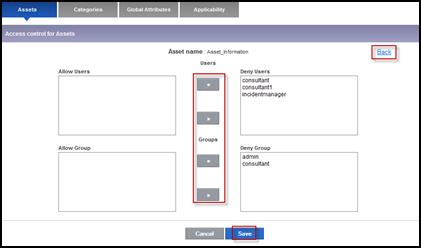
Step 11
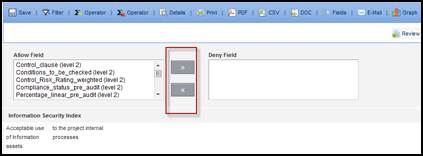
Allow or deny access to particular
users or groups using the arrow keys.
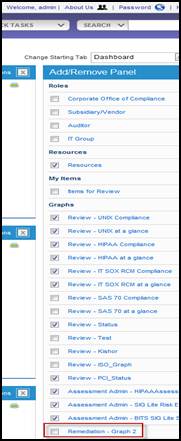
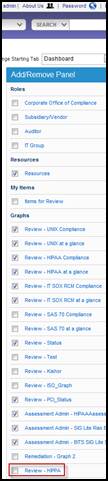
Step 12
Click
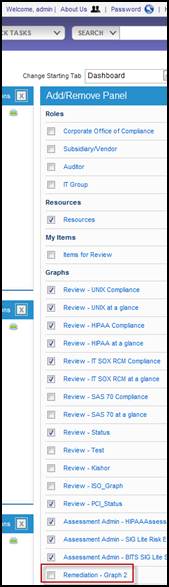
Save. The graph name will now appear under the Graphs section
in Add/Remove Panel on the Dashboard of the user
who has been assigned with the permission.
NOTE:
The graph can be viewed by selecting the check-box adjacent to
the graph name.
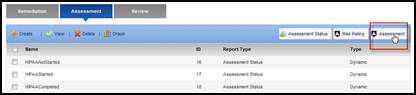
This
section deals with creation of assessment reports, like assessment
status reports for viewing user status, risk rating reports for
viewing associated risk, and assessment reports for viewing responses
for assessments. Furthermore, corresponding graphs can also be
created from the saved reports that can then be placed on the
dashboard of the desired user for viewing.
ControlCase
GRC allows checking status of open assessments. Once an assessment
is published, it becomes available for public use. The users can
opt to fill the assessment based on their access rights. At any
given time for any given user, the active assessment can be in
one of the three states:
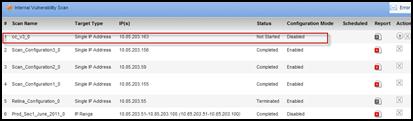
Not Started: User has not started the assessment.
Started: User has started the assessment
but has not yet completed.
Completed: User has completed and submitted
the assessment.
Based on the status, further actions
can be taken. For instance, if the assessment is filled by every
intended user, it can be closed; if it is not filled by any of
the intended user, he can be reminded of it by sending an email.
The assessment status report is based
on assessment, i.e. you can check the status of users for a given
assessment. You can select only one assessment and then one or
more users to whom the assessment is associated with. Reports
can however be generated of only private assessments.
To
generate an assessment status report:
Step 1
Click
on the Reporting header tab.
Step 2
Click
on the Assessment Status Report link.
It is divided into four sections:
Time
Selection:Allows
choice of a particular time slot for assessment status.
NOTE: If only the From field is
populated, assessment status from then till date will be displayed.
If only the To field is populated, assessment status till
the specified date will be displayed. If none of the fields is
populated, assessment status for entire duration will be displayed.
Assessment: Displays the list of active private
assessments. This is a single select field.
Users: Displays the list of intended users.
This is a multiple select field.
Status: Displays the list of available status.
This is a single select field.
Step 3
Make
selections as per the requirements.
Example: To check the status of ‘security_assessment’
assessment, select it from the list, select the users whose status
is to be checked, and then select the status.
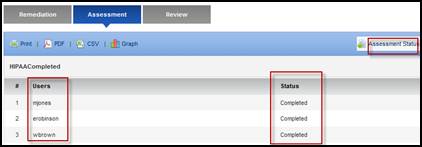
Step 4
Click
on Generate. The report with the required results is displayed.
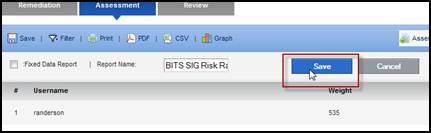
Step 5
To
save the report, enter a name in the Report Name field
and click Save.
NOTE: The report can be viewed later from
the Run Saved Assessment Status Report list. If the Fixed
Data Report check box is selected, the report is saved along
with its displayed content. If not selected, only the criteria
for report generation is saved; the content will change the next
time the saved report is run based on the then existing status.
In other words, the saved report can be made fixed or dynamic.
To view saved report:
Step 1
Click
on theReportingheader tab.
Step 2
Click
on theAssessment Status
Reportlink. A list
of saved reports appears.
NOTE: The Run Saved Assessment Status
Report list appears only if there is at least one saved report.
Saved assessment reports can be used to create assessment status
graphs. Using graphs, data can be put together for examination
or comparison in more presentable manner. While creating the graph,
its preview can be viewed to find out how it will look like after
its creation. Once created, permission can be given to users so
that the graph will appear on their dashboards.
To
create an assessment status graph:
Step 1
Click
on the Reporting header tab.
Step 2
Click
on the Assessment Status Graphs link and then New Graph
link.
Step 3
Enter
the graph name, select graph type (Line, Column, 3D Column, Pie,
Bar, etc.), and regions (1, 2, 3).
Step 4
Enter
labels for the X and Y axis.
Step 5
Enter
labels for the regions and select colors in which they will be
displayed.
Step 6
Enter
the plot and select the report from the drop-down menu.
NOTE: The drop-down menu shows the list
of all saved reports. To add more reports click Add.
Step 7
Click
Show Only to view the preview of the graph.
Step 8
Click Save
once the desired output is set. The name of the saved graph appears
in bold in the list of graphs and the corresponding graph appears
on the right side.
The
graph above shows three regions; NotStarted (red), Started (yellow),
and Completed (green) with plots for the assessment (security_
assessment). It represents the number of users who have not started,
started, and completed the security_assessment assessment.
NOTE: To delete the graph, click Delete
next to it.
Step 9
To
assign permissions for the graph, click Permission next
to it. The Dashboard Permission for graphs screen appears.
Step 10
Allow or deny access to particular
users or groups using the arrow keys.
Step 11
Click
Save. The graph name will now appear under the Graphs section
in Add/Remove Panel on the Dashboard of the user
who has been assigned with the permission.
NOTE: The graph can be viewed by clicking
on the Left arrow next to the graph name.
An
assessment may contain multiple choice questions, for example,
the one consisting of radio buttons or check boxes. The choices
to these questions can be assigned with some predefined marks
or weights. For instance, if a given question has three options
to select from as an answer, the first option will be assigned
5 marks; the second option will be assigned 20 marks, and the
third, 15 marks. When a user selects any of these options, he
is allotted the marks associated with that option. At the end
of the assessment, the marks of all the questions are summed up
which denote the risk associated with the user who gave the assessment.
Risk rating is important while making new improvements or taking
some crucial decisions. A survey can be conducted to collect responses
from the masses based on which the involved risk can be estimated.
To generate a risk rating report:
Step 1
Click
on the Reporting header tab.
Step 2
Click
on the Risk Rating Reports link.
Step 3
From
the Assessment list, select the assessment for which the
report is to be created. The Users list displays all the
intended users.
Step 4
Click
on Generate. The Risk Rating Report with the required results
is displayed. It displays the users along with their marks (weight).
Step 5
To
save the report, enter a name in the Report Name field
and click Save.
NOTE: The saved report can be viewed later
from the Run Saved Risk Rating Report section. If the Fixed
Data Report check box is selected, the report is saved along
with its displayed content. If not selected, only the criteria
for report generation is saved; the content will change the next
time the saved report is run based on the then existing status.
In other words, the saved report can be made fixed or dynamic.
To view saved report:
Step 1
Click
on theReportingheader tab.
Step 2
Click
on theRisk Rating
Reportslink. A list
of saved reports appears.
NOTE: The Run Saved Risk Rating Report
list appears only if there is at least one saved report.
Saved
risk rating reports can be used to create risk rating graphs.
Using graphs, data can be put together for examination or comparison
in more presentable manner. While creating the graph, its preview
can be viewed to find out how it will look like after its creation.
Once created, permission can be given to users so that the graph
will appear on their dashboards.
To
create a risk rating graph:
Step 1
Click on the Reporting header
tab.
Step 2
Click on the Risk Rating Graphs
link.
Step 3
Click
on New Graph. The following screen appears.
Step 4
In
the Graph Name box, enter the name for the graph.
Step 5
From the Select
Risk Rating Report drop-down menu, select the report.
Step 6
In the Low
Threshold and High Threshold boxes, enter threshold
values.
Step 7
Click
Show Only to view the preview of the graph.
Step 8
Click
Save once the desired output is set. The name of the saved
graph appears in bold in the list of graphs and the corresponding
graph appears on the right side.
The
graph above shows three regions; Low, Medium, and High. It represents
the percentage of assessments that fall below low threshold, above
high threshold, and between the two thresholds.
NOTE: To delete the graph, click Delete
next to it.
Step 9
To
assign permissions for the graph, click Permission next
to it. The Dashboard Permission for graphs screen appears.
Step 10
Allow or deny access to particular
users or groups using the arrow keys.
Step 11
Click
Save. The graph name will now appear under the Graphs section
in Add/Remove Panel on the Dashboard of the user
who has been assigned with the permission.
NOTE: The graph can be viewed by clicking
on the Left arrow next to the graph name.
Responses to surveys conducted can
be viewed by creating reports. Creation of reports proves useful
to analyze the responses from all the users using a single page.
Reports can be created to view all of the data for a given survey
or can be customized to view only selected data. This facilitates
easy examination of the required data.
To
generate an assessment report:
Step 1
Click on the Reporting header
tab.
Step 2
Click on the Assessment Reports
link. The following screen appears.
Step 3
From the Assessment drop-down
menu, select an assessment and click Go.
Step 4
Select the questions whose responses
should appear in the assessment report.
Step 5
In the Report Name field, enter
the name of the report.
Step 6
To define conditions for adding filters
in the response list, select the Include conditional report
check box and click Next.
NOTE: If filters are not to be applied,
do not select the check box.
Step 7
Click Next.
Step 8
Give appropriate filter conditions
to segregate the relevant information from the entire set of responses.
Filter conditions:
First,
enter the condition element, which differs for different question
type sets. For instance, it is a text string for text type or
essay type questions, an option selected for radio buttons, and
a set of selections for check box type questions.
Then
give the execution criteria in the drop-down at the right side
of each question content which can be ‘Result Must Contain’ (‘AND’
operation), ‘Result Can Contain’ (‘OR’ operation), or ‘Result
Must Not Contain’ (‘NOT’ operation). The condition can be selected
as per requirements to generate a report.
·Result Can Contain:This is the default selection if any
search criterion is not chosen. It generally searches for all
the responses.
·Result Must Contain:This selection allows you to specifically
search for responses containing a particular answer that you are
looking for. For example, if you enter ‘IT’ as seen in ‘Question
2’ in the screenshot below, the generated report would only bring
up responses which have ‘IT’ as the answer to ‘Question 2’.
·Result Must Not Contain: This selection allows you to specifically
search for reports which do not contain a particular answer (that
you want to exclude). For example, if you select ‘Wired’ as seen
in ‘Question 3’ in the screenshot below, the generated report
would not bring up responses which do have ‘Wired’ as the answer
to ‘Question 3’.
Step 9
Click on Generate Report to
generate the report with specified conditions.
Step 10
The following screen appears where
the questions constitute the column headings and the corresponding
responses constitute the rows.
NOTE: To export the report thus obtained,
into a CSV or PDF format, click on the corresponding icons placed
above the report table.
To view saved report:
Step 1
Click
on theReportingheader tab.
Step 2
Click
on theAssessment Reportslink. A list of saved reports
appears.
NOTE: The Run Saved Assessment Report
list appears only if there is at least one saved report.
This
section deals with creation of reports from controlsheets, extended
reports, and graphs.
Reports
can be generated from controlsheets i.e. reviews. Reports
can be created for a single controlsheet or set of controlsheets
that belong to the same standard. Conditions can also be applied
while creating reports so that only the required data is displayed
which facilitates easy examination of it. The created reports
can be saved for later review.
Extended
Reports can be created as reports on reports. Extended reports
can be created by generating one single report from multiple
reports.
Furthermore,
graphs can also be created from the saved reports that can
then be placed on the dashboard of the desired user for viewing.
NOTE: A couple of standard reports have
been saved in this module as examples.
This
section deals with creating of review reports (also referred as
base reports). Reports are created on one or multiple controlsheets
of same standard to get the desired output. Once a report is created,
it can be saved for viewing later; it can be also exported in
PDF, Excel or Word format.
For example: You have created and edited
data in controlsheets on various nodes of your organizational
tree. Each controlsheet consists of many columns. Now, you want
to segregate the information of any particular column from all
the controlsheets. So, you generate a report using all the controlsheets
on this particular column to get the desired output.
To
generate a review report:
Step 1
Click on the Reporting header
tab.
Step 2
Click on the Review Reports
link. The following screen appears.
Step 3
Select any filter condition from the
Select Filter Condition dropdown list.
For e.g. Select User Name as
a filter and select the Show All checkbox or the alphabet
with which the user name begins who has access to the review sheet.
Select checkboxes for all users to
display the list of the Controlsheets they have access to. The
list of all controlsheets will be displayed.
Step 4
Select the Controlsheet(s) for which
a report is to be created.
Step 4
From the Output entries where
drop-down menu, select the column on which you want to apply a
condition.
Step 5
From the is drop-down menu,
select the condition to be applied.
Filter options:
Equal
to: To search in a
selected column of a controlsheet for the exact word or phrase.
Not
equal to:To search
in a selected column of a controlsheet which does not contain
the word or phrase mentioned by you.
Contains:This is similar to the equal
to feature, but enhanced with the ability to search even by
entering a part of the word or phrase that you are looking for.
For example, entering ‘pre’ in the filter box, would search for
words such as ‘preview’, ‘preface’, etc.
Does
not contain: This
is similar to the is not equal to feature, but enhanced
with the ability to filter your search even by entering a part
of the word or phrase that you are looking to exclude.
Step 6
Enter the value to be searched for
in the Enter Value box, for example, ‘Yes’.
Step 7
Click on Generate to generate
the report. The report is generated as shown below.
Step 8
To save the report as a template for
future use, enter a name in the Enter Report Name box and
click Save.
Select
theFixed Data
Reportcheck box,
if you want the report to be static. This means report is saved
with the same content and every time you open this report, the
same content is displayed.
If you do not select this checkbox,
then only the criteria for report generation is saved; the content
will change the next time the saved report is run based on the
then existing status. In other words, the saved report can be
made fixed or dynamic.
The report can be viewed later from
the Run Saved Review Report list. Select the report and
click Run.
Example:
Consider the
following sample controlsheet:
The illustration below shows the creation of a base
report from the sample controlsheet:
To add Operators:
Operators
are incorporated in reports to generate sum, count and average values
of any given column, which can then be used in generating base and extended
reports / graphs. Every Operator applied has a name, which will become
the name of the column in extended report(s). This operator value can
be rolled up in the accounts and processes hierarchy to create extended
report templates which can thereafter be used to create extended / rollup
graphs. The detailed description of the feature is available in the subsequent
pages of the document.
1.Count – Counts the number of rows in the
report.
2.Sum – Gives the sum of all values in a
column.
3.Average – Gives the average of all values
in a column.
Step 1
Click
on the Add Operator button.
Step 2
Enter
an appropriate operator name, select the column on which operator
is to be applied, select Count / sum / average Operator and click
on Add button.
NOTE:
·Multiple Operators can be applied on
one column of controlsheet.
Step 3
The
result of the operator is displayed at the bottom of the column
on which the operator is applied.
Step 4
Click
on the Show Details link to view the details of Filters
and Operators used/applied in the report.
The list
of operators is displayed:
Enter the Report Name and click
the Save button to save the report.
The illustration below shows the use of an operator
in a report:
NOTE:The values of ‘Sum’ and ‘Average’ operators
are zero for non-numeric columns. Count operator considers only non-null
values for the selected column.
To Add Filters:
Filters
are added in reports to filter the records of the report based on specific
criteria. It filters the report to get the expected output. This filter
is actually the text for which it performs a search in entire report and
gives the resultant report. The detailed description of the feature is
available in the subsequent pages of the document.
Step 1
Click
on the Add Filter button.
Step 2
Select
the appropriate column name from Column dropdown list.
Select any of the following condition from the list:
•is equal to – Fetches all rows which
contain the text.
•is not equal - Fetches all rows which
do not contain the text.
•is like – Fetches all rows which are
like the text.
•is not like – Fetches all rows which
are not like the text.
Step 3
Enter
the filter text and click Add.
Step 4
The
result of the filter operation is displayed as the filtered report.
Step 5
Enter
the Report name and click Save to save the report.
The illustration below shows the use
of filters in a report:
To email report:
You
can mail a review report to any email address. Before sending the report,
you need to configure the SMTP settings. For more information, refer toSMTP settings. The template of this email is configured
atReview
Report Internalsection under
“Configure Emails”, “Activity Template”, and “Settings”.
Step 1
Click
on the E-mail Report button.
Step 2
Enter
the Email address and click the Send button.
Step 3
The
report is send as a PDF attachment to the email address.
To view saved report:
Step 1
Click
on theReportingheader tab.
Step 2
Click
on theReview Reportslink. Select the appropriate
filter condition and corresponding options to display the list
of saved reports.
NOTE: The Run Saved Review Report
list appears only if there is at least one saved report.
Extended reports are the reports that are
created from base reports as well as from other extended reports. These
are basically reports on reports and can be created for any number of
levels.
NOTE: In order to create extended reports,
you need to apply operators (Sum, Count, or Average) on the base report.
Without applying operators on base report, you cannot proceed to create
extended reports.
Step 1
Click the Extended Review Reports
link.
Step 2
Select the appropriate Base report.
It also displays the extended reports
of the “Leaf nodes” of the selected parent node.
Step 3
Select the Column name and Operators
from their respective drop down-lists. Enter the Name of
the Operator and click on Generate button.
Step 4
Enter the Report Name and click
on Save button to save the report.
Step 5
You
can add one or more operators on extended reports. These multiple
operators can be used to generate sum, count and average values
of any given column.
The
illustration below shows the creation of extended reports from base reports:
The general schema
for extended reports is as shown below:
Add existing
controlsheets to Reporting template
You can map reporting templates to the
already existing controlsheets. All the reports participating in template
will be created for the new controlsheet. Also the graphs created from
the template report will get updated or created depending on the nature
of the graph.
·Extended report created from base report
which again in turn created from same controlsheet can act as a Template.
This template can be applied to another controlsheet at the time of controlsheet
creation. For more details see the Create Controlsheet -> Create
Controlsheet section.
Saved review reports can be used to
create review graphs. Using graphs, data can be put together for
examination or comparison in more presentable manner. While creating
the graph, its preview can be viewed to find out how it will look
like after its creation. Once created, permission can be given
to users so that the graph will appear on their dashboards.
To
create a review graph:
Step 1
Click
on the Reporting header tab.
Step 2
Click
on the Review Graphs link.
Step 3
Click
on New Graph. The following screen appears.
Step 4
Enter
the graph name, select graph type (Line, Column, 3D Column, Pie,
Bar, etc.), and regions (1, 2, 3).
Step 5
Enter
labels for the X and Y axis.
Step 6
Enter
labels for the regions and select colors in which they will be
displayed.
Step 7
Enter
the plot and select the report from the drop-down menu.
NOTE: The drop-down menu shows the list
of all saved reports. To add more reports click Add.
Step 8
Click
Show Only to view the preview of the graph.
Step 9
Click
Save once the desired output is set. The name of the saved
graph appears in bold in the list of graphs and the corresponding
graph appears on the right side.
The
graph above shows two regions; InPlace(green), and NotInPlace(red)
with plots for the PCIDSS review. It represents the number of
rules that are in place and not in place.
NOTE: To delete the graph, click Delete
next to it.
Step 10
To
assign permissions for the graph, click Permission next
to it. The Dashboard Permission for graphs screen appears.
Step 11
Allow or deny access to particular
users or groups using the arrow keys.
Step 12
Click
Save. The graph name will now appear under the Graphs section
in Add/Remove Panel on the Dashboard of the user
who has been assigned with the permission.
NOTE:
The graph can be viewed by clicking on the Left arrow next
to the graph name.
To
create rollup graphs automatically:
You can get the graphs from the controlsheets
in one node automatically copied to the controlsheets created in other
nodes.
Step 1
First
create graphs for all levels of the accounts and processes hierarchy
by using both the base and extended reports.
Step 2
Now,
go to the Review tab and click the leaf node of the tree
for which the review sheet and associated graph is created and
then click the Configure Panel link.
Step 3
From
the Configure Panel select that graph and click the Save
button.
Step 4
The
graph is displayed in the Review Dashboard.
Step 5
Now
follow the step 3 through 4 for each level of Accounts and
Processes hierarchy in Review module and enable associated
graph against the respective node.
Step 6
Now
create a new Controlsheet from the same Controlsheet standard
on different leaf node.
Step 7
Select
the template, enter the Controlsheet name and click the Submit
button.
Step 8
Click
the Review tab and click on the nodes to view the automatically
created graphs in the Review Dashboard.
These rollup graphs are clickable. If you
click on any bar in the graph, it will take you to the associated sub-graph
until the leaf graph. If you click on the bar of leaf graph it will take
you to the associated report of respective accounts and processes node
To
create plot based graphs
If extended reports have more than one
operator, then the extended graphs are plot based.
Step 1
From
the Reporting tab, create extended reports and apply more
than one operator on it.
Step 2
Save
this extended report with an appropriate name.
Now, click the Review Graphs
link to display the Graph panel.
Step 3
Click
the New Graph link
Step 4
Enter
appropriate fields and select the extended reports and click the
Show Only button.
Step 5
This
displays the Plot base graphs.
NOTE:
The values of ‘Sum’ and ‘Average’ are zero for non-numeric columns.
Count operator now considers only non-null values for the selected
column.
As
the report is displayed in theGap/Activity
Reporting Section,
you will notice six options present above the report (as shown
below).
The options are ‘Add Filter’, ‘Print’,
‘Export to PDF’, ‘Export to Excel’, ‘Template’, and ‘Filter Fields’.
These options are explained as numbered in the figure above.
NOTE: These options are also present in
other reports too; however, depending upon the need, some options
might have not been made available.
Add Filter
The
‘Add Filter’ functionality allows the user to search through
all the Gaps/Activities (as per requirement) and displays only
those containing or leaving out a certain phrase or word you are
looking for or wanting to exclude, respectively.
Step 1
Click
on the Add Filter button. The following screen appears.
Step 2
From
the Column drop-down menu, select the column name to which
the filter is to be applied.
NOTE: Selecting All will apply the
filter to all the columns.
Step 3
Select
the condition for applying filter.
Filter options:
is
equal to:To search
for table cells in a selected column for the exact word or phrase.
is
not equal to: To search
for table cells in a selected column which do not contain the
word or phrase mentioned by you.
is
like: This is similar
to the is equal to feature, but enhanced with the ability
to search even by entering a part of the word or phrase that you
are looking for. For example, entering ‘pre’ in the filter box,
would search for words such as ‘preview’, ‘preface’, etc.
is
not like: This is
similar to the is not equal to feature, but
enhanced with the ability to filter your search even by entering
a part of the word or phrase that you are looking to exclude.
NOTE:The
other two options i.e. ‘Less than equal to’ and ‘Greater
than equal to’ are used when the data entered in the text
box is numeric; for example, Activity number (inc0015).
Step 4
Enter
the required or unwanted words into the text box.
Step 5
Click
Add. The filter is added and applied to the report.
Step 6
To
remove an added filter, click on the Remove Filter button.
Step 7
From
the Filter drop-down menu, select the filter that is to
be removed.
Step 8
Click
Remove.
NOTE: To remove all applied filters, click
on the Remove All button.
Print
This
functionality would simply execute the Print command for the generated
report.
Click
on the Print button to print the generated report.
Export to PDF
This functionality would export the
generated report into PDF format.
Step 1
Click on the Export to PDF button.
The report appears in the PDF format.
Step 2
You can now select to save the generated
report.
Export to Excel
This
functionality allows you to export the review in CSV format in
the local system.
Step 1
Click
on the Export to Excel button. A dialog box appears.
Step 2
Select
the required option.
Export using a Word Template
This
functionality allows you to export generated reports to a custom
Microsoft Word template, so that the exported reports can be saved
on the local system. The column headings (bookmarks or field names)
in the report will correspond to column headings in the Word template.
However, you need to create a table in Word template manually.
There are
two ways of fetching data from the reports:
Using
the available bookmarks in Template design
Using
special bookmarks in Template design
Both these ways are shown in detail
below.
Using the Available Bookmarks in Template Design:
This
is a simple way of fetching data from reports to Word template.
Step 1
Click on theTemplatebutton.
The following screen appears.
Step 2
Construct
a table in Word document. Enter the available bookmarks from the
list above as column headers.
NOTE: The column headers are case sensitive
and should be entered exactly as shown in the list above. The
output will not be generated even if there is a slight deviation
in the bookmark and the column headers.
Step 3
Close
the Word document after the construction of the template.
NOTE: If the document is not closed, the
application will give an error while exporting the report.
Step 4
Select
theUpload new Templateoption.
NOTE: To use any of the previously uploaded
templates, select theExport
using existing Templateoption
and click on the template from the list and click onExport.
Step 5
In
theFile Attachmentbox, enter the name of the created
template.
TIP: Alternately, click theBrowsebutton
to browse for the template.
Step 6
Click
onExportto upload the data into the template.
A new Word document containing the Exported data from the generated
report will be opened.
Data uploaded in the template.
NOTE: Save the document as per your requirement.
Using Special Bookmarks in Template Design (Applies
to Activities only):
In
case you have a numeric data field (as you might have entered
in the Activity Description Attributes), you can perform arithmetic
operations such as Sum and Average on the reported data. The following
steps explain as to how the ‘Special Bookmarks’ are used.
Step 1
Click
on theAdd Filterbutton.
Step 2
From
theColumndrop-down menu, select to apply
filter on a numeric field, for instance, ‘associated branches’.
NOTE:Two
additional options appear in the drop-down menu of the condition
criteria; namely, ‘Sum’ and ‘Average’.
Step 3
Select
the criteria, for example,Sumand enter a name in the text
box.
Step 4
Click
on theAddbutton.An
additional entry appears in the column you selected (i.e. ‘Incident_Branches’).
Step 5
Click
on theTemplatebutton.
The following screen appears.
NOTE: A bookmark appears in theOther Bookmarkslist.
Step 6
To
use this bookmark in Word template, while designing a template,
select a variable and bookmark it using the other bookmark selected
i.e. ‘Sum_incidentBranches’ in this case.
Step 7
From
theInsertmenu, clickBookmark.
The
following dialog box appears.
Step 8
InBookmark name, enter ‘Sum_incidentbranches’ as the
link and clickAdd.
Step 9
Save the changes in the template and
close it.
NOTE:
If the document is not closed, the application will give an error
while exporting the report.
Step 10
Select theUpload
new templateoption.
Step 11
In
theFile Attachmentbox, enter the name of the created
template.
TIP: Alternately, click theBrowsebutton
to browse for the template.
Step 12
Click
onExport. A new Word document containing the
Exported data from the generated report is opened. You would notice
that the variable to which the ‘Sum_incidentBranches’ value was
bookmarked to, is now replaced with the value.
NOTE: Save the document as per your requirement.
Step 13
To
use any of the previously uploaded templates, click on the template
from the list and click onExport.
NOTE:To remove any of the previously
uploaded templates, select the template and click onRemove.
Filter Fields
Using
this functionality you can select to display only the required
fields from the list of fields that you had chosen previously
in the search criterion.
Step 1
Click on theDisplay
Filter fieldsbutton.
The
following screen appears.
Step 2
To allow or
deny a field for being displayed, select it and click on the left
and right arrows depending on the requirement.
NOTE: Depending on the changes made, only
the allowed fields will be displayed in the report. However, you
cannot choose to hide the ‘Incident Number’ field.
Assessment
Assessmentmodule provides a collection
of Open Assessments, Private Assessments and Pending Assessments
to the logged-in user. Here, you can fill any public or private
assessment. You can also save partially-completed private assessments
and complete them later.
Click
on the assessment name in the left panel of the screen. The assessment
appears on the right.
Step 3
Answer
the given questions and click Submit at the end of the
assessment.
Navigating Through Assessment
You can navigate through the pages
by using Navigation buttons available at the bottom of each assessment
page.
To move to the next page, click Next
Page.
To move to the previous page, click
Previous Page.
To jump to any random page, select
the page number from the Page drop-down menu.
NOTE: Total number of pages in the assessment
is available at the bottom of the assessment form.
Understanding Skip Logic
The Assessment Administrator
can apply Skip Logic to option type questions; whenever a response
option of such questions is clicked, the skip logic applied to
that option (if any) is triggered, and the skipped questions get
disabled, as shown below:
For
the above screenshot Skip Logic is applied in such a way
that if Question 3’s option ‘No’ (i.e. Option 2) is selected then
Skip to Question 5. Hence, on selecting ‘No’ the Skip Logic
disablesQuestion 4. On the other hand, as there
was no skip applied on Option ‘Yes’, the Question 4 remains
answerable.
Understanding Preferred Answer Logic
Preferred answer is applied
on questions with multiple choices like checkboxes, option buttons,
drop-downs, etc.
It allows the assessment administrator
to add a custom message which
appears when you select some non-preferred
answer.
The User has the option to save an
assessment at any point, and fill the remainder of it as and when
it is convenient. However, only
Private Assessments can be saved for future reference.
Tosave
a‘partially-filled’ Assessment, click
on the Save button available at the bottom of every page
of the assessment.
NOTE: Once the assessment is ended and
submitted, even the partially filled assessments are submitted
as incomplete.
The saved assessments come under the
Pending Assessments Sub head in the left panel, with the date
and time of the last ‘save’ activity. The user can click on a
Pending Assessment name any time to complete it further.
The User Admin tasks include
the one-time tasks performed to set up the ControlCase GRC application
and certain maintenance-related functionalities that may change
on an ongoing basis. The administrative tasks are stated below.
This
feature allows the Admin to set the password policy for ControlCase
GRC users including attributes such as password strength, expiration,
and the number of failed login attempts allowed. Whenever a new
password is created, it has to adhere to this password policy.
To
set the password policy:
Step 1
Click
on the User Admin header tab.
Step 2
Click
the Edit button to edit the default password policy.
Step 3
Complete
the Set Security Policy form in accordance with the organization’s
security policy.
NOTE: The minimum number of seconds of
inactivity permitted is 10 seconds. In case the number of seconds
of inactivity defined is less than 10 seconds, it is automatically
set to 10 seconds.
Step 4
Click Save.
NOTE: If Password policy details are modified
then all users, when they log-in into ControlCase GRC, will be
asked to change their password adhering to new policy.
The User Management screen is
used to manage users. The administrator can add new users, edit
or delete existing users, or make a functional user account non-functional
as per requirements.
NOTE: Only the ‘Admin’ user of ControlCase
GRC has access to this section.
A
new user can be added to ControlCase GRC as and when needed. Once
a new user is added, they get default permission to access only
the Dashboard module. To permit them to access other modules,
they have to be given explicit rights to do so from the Module
Access module.
To
add a new user:
Step 1
Click
on the User Admin header tab.
Step 2
Click
on the User Management link on the left side of the page.
The current ControlCase GRC users, if available, are displayed
along with their account status.
Step 3
Click New to create a new user.
Step 4
Complete the Add User Information
form.
NOTE:Check
the Active box to make the ‘Account Status’of userFunctional.If
it is unchecked, the user account will be in Inactive status.
Also, if any user exceeds the number
of failed log-in attempts permitted (as set in Password Policy),
the account will be locked. The administrator will then have to
click on Unlock in the ‘Account Status’ column to reactivate
it.
TheUser
Namefield cannot
contain special characters or spaces.
Click
on theUser Managementlink on the left side of the
page. The current ControlCase GRC users, if available, are displayed
along with their account status.
Step 3
Click
on the user whose details you want to edit. The selected row is
highlighted in yellow (as shown below).
NOTE: Two more buttons Edit and
Delete appear at the bottom.
Step 4
Click
on Edit. As only the Admin is allowed to change any user
information, the next screen would prompt the admin to enter his
password for data security purpose.
NOTE: To delete the selected record, click
on Delete. By deleting a user, you would lose all the data
(such as events, activities, etc.) associated with that particular
user.
Step 5
Enter
the password for admin.
Step 6
Click Continue.
Step 7
Make the desired changes and click
Save.
NOTE: To block a user from using ControlCase
GRC, uncheck the ‘Active’ box.
Users can be added using the New
button. However, if the number of users is more the said way becomes
tiresome. To add large number of users, ControlCase GRC provides
an easy way. In this, the users to be added are stored in a .csv
file format. The file is then uploaded transferring the users
into the application.
To
create users from file:
Step 1
Click
on theUser Adminheader tab.
Step 2
Click
on theUser Managementlink on the left side of the
page. The current ControlCase GRC users, if available, are displayed
along with their account status.
Step 3
Click
onUpload Users.
Step 4
In
theFile (CSV)box, enter the file path of the
file containing the users.
TIP: To browse for the file, click theBrowsebutton.
Sample CSV file format:
The format of a sample CSV file is
as shown in the figure below.
The file contains two records separated
by a new line. Each record contains values separated by commas
(Comma Separated Values). The total values
in a record must match with the fields present on the form hence
additional commas are put in the middle of the records. If no
value is present between the two consecutive commas, then that
value is considered as blank and is saved in the corresponding
field as null
The values shown in the file are in
the following order:
Username, Last name, First name, null
values, Phone number, E-mail, and Password. It is mandatory to
maintain this order, else values may go in wrong fields. Finally,
the file has to be saved as .csv.
Step 5
From
theLanguagedrop-down menu, select the language
for application.
Step 6
From
theBelongs to Groupdrop-down menu, select the group
to be assigned for users.
Click
on theUser Managementlink on the left side of the
page. The current ControlCase GRC users, if available, are displayed
along with their account status.
Step 3
Click
onSearch.
Step 4
Fill
in the values to be searched for.
NOTE: You can search even by entering a
part of the word or phrase that you are looking for. For example,
entering ‘it’ would search for words such as ‘jwhite’, ‘rsmith’,
etc.
The Group Management screen
is used to manage groups. The administrator can define a new group,
edit or delete an existing group, or move users from one group
to another.
NOTE: Only the Admin user of ControlCase
GRC has access to this section.
Click
on theGroup Managementlink on the left side of the
page. The current groups, if available, are displayed.
Step 3
Click
on the group whose details you want to edit. The selected row
is highlighted in yellow (as shown below).
NOTE: Three more buttonsEdit,DeleteandEdit Membersappear at the bottom.
Step 4
Click Edit.As
only the Admin is allowed to change any group information, the
next screen would prompt the admin to enter his password for data
security purpose.
NOTE: To delete the selected group, click
on Delete.
Step 5
Enter the password for admin.
Step 6
Click Continue.
Step 7
Make the desired changes in the group
information and click
Save.
A
user can be moved between groups or belong to more than one group.
While adding a new user, admin has to select the group to which
the user being added will belong to. Only one group can be selected
at this time. If the added user plays a dual role, i.e. if the
user logically can belong to more than one group, this can be
done from here. The user can be moved from one group to any other
group or can belong to more than one group. If the user belongs
to more than one group, they inherit the rights of all the groups
they belong to.
To
add members to a group:
Step 1
Click on the User Admin header
tab.
Step 2
Click on the Group Management
link on the left side of the page. The current ControlCase GRC
groups, if available, are displayed.
Step 3
Click on the group to which you want
to add members. The selected row is highlighted in yellow (as
shown below).
NOTE: Three more buttons Edit, Delete
and Edit Members appear at the bottom. The Admin group
cannot be deleted, hence the Delete button is not available
in the above screenshot.
Step 4
Click Edit Members. As only
the Admin is allowed to change any group information, the next
screen would prompt the admin to enter his password for data security
purpose.
Step 5
Enter the password for admin.
Step 6
Click Continue. The following
screen appears. The users already present in the group are listed
on the right, and the users not currently in the group on the
left.
Step 7
From the Users Not in Group
list, select the user you want to add.
NOTE: To select multiple users press the
CTRL key on the keyboard.
Step 8
Click Add To Group. The users
are added to the list.
NOTE: To remove already existing members,
select them from the Members of Group list, and click Remove
from Group.
SMTP
Settings
To
report a gap via E-mail or to notify an external agency about
an activity, ControlCase GRC uses an SMTP E-mail account. The
POP and SMTP details are required for configuring an SMTP E-mail
account. The following steps describe how to configure the SMTP
settings.
To
configure SMTP settings:
Step 1
Click on the User Admin header
tab.
Step 2
Click on the SMTP Settings linkon the left side of the page.
Step 3
Click on Edit.
The users that are allowed access to
the User Admin module can see the current ‘simple mail
transfer protocol’ settings, and also edit them.
The following screen appears.
Incoming Email Settings:
Account
Name: Name for the
email account. By default, it is incident manager.
Activated: It displays the status of the account.
Select this box for activating the account.
MailserverType: Provides list of mail server types.
Select the appropriate server type.
POP3
/ Imap Host: Displays
the name of Pop3 / Imap host. Enter fully qualified domain name.
Non
default pop3/imap port:
Allows user to use non default port for pop3/imap. Enter port
value if the default port is not to be used.
Enable
SSL: Enables SSL for
encryption of messages.
Username
and Password: User
name with domain and password for accessing the account.
Delete
messages on server when deleting locally:
Allows user to keep or delete messages on the server. Select this
box to delete messages on server when corresponding messages are
deleted by users on local machine.
Outgoing Email Settings:
SMTP
Enabled: Displays
the status of SMTP. Select this box to enable users to send e-mails.
From
Name: Enter e-mail
address that is to be displayed in sent emails.
Reply-to
Address: Enter e-mail
address on which to get reply.
Signature: Add signature to emails.
HTML-Signature: Add signature to emails in HTML format.
SMTP
Host: Displays the
name for SMTP host. Enter fully qualified domain name.
Non
default smtp host:
Allows user to use non default port for smtp. Enter port value
if the default port is not to be used.
Pop-before-smtp: Select this box to fetch incoming
e-mails first and then send outgoing e-mails.
SMTP
needs authentication:
Select this box to authenticate users while sending e-mails.
Username
and Password: User
name with domain and password for accessing the account. These
are not required when SMTP needs authentication box is
not selected.
Step 4
Make any necessary changes and click
Save.
Step 5
To check the above settings, click
on Test. The message ‘Your settings are OK’ (as shown below)
will confirm the validity of the current settings. Click Cancel
to go back.
Step 6
Once the settings are confirmed (OK),
you can then receive the reported gaps via email.
NOTE: This would be the same email address
which had been set up earlier using the SMTP settings.
When gaps are reported through email,
the user to whom they are allocated can access them from the Refresh
button on the Remediation tab (as shown below).
Remediation Header Tab > Gap tab
> Refresh
As seen above, all the gaps reported
via email are listed.
For every user, the default starting
tab is Dashboard. This means, on logging on, the user will
be taken to the Dashboard module. This default behaviour
can be changed so that the user can log-in to their preferred
module by default.
To
change starting tab:
Step 1
Click on the User Admin header
tab.
Step 2
Click on the Change Starting Tab
link on the left side of the page.
Step 3
From the Change Starting Tab
drop-down menu, select the module that you would like to be the
starting point for your application.
Step 4
Select check boxes next to the users
for which you would like to make the selected tab as their starting
tab.
NOTE: To select / deselect all users click
the Check All / Uncheck All link. If a user doesn’t
have permission for the selected module then the check box is
deactivated.
Once the starting tab is changed, the
changes will be reflected the next time the user logs-in.
This
feature allows changing the logo that appears in the header of ControlCase
GRC and also in the PDF reports generated by the application. This helps
to customize ControlCase GRC to suit your own company’s requirement.
This
feature allows users to directly login ControlCase GRC without actually
entering username and password.
Step 1
Click on the User Admin header
tab.
Step 2
Click on the Direct Login link
on the left side of the page.
Step 3
Select the Allow user to give direct
portal access checkbox and click Save.
Step 4
The URL shown in the screen is the
one which is used to access ControlCase GRC. Once activated user
can directly access the application using the URL:
http://localhost:778/cccmv5/ccDirectLogin.php?name=<user
name>&pwd=<password encoded in base64>
NOTE:From the URL, the “<user name>”
should be replaced by the actual username and the “<password
encoded in base64>” should be replaced by the actual password
encoded in Base64.
Step 5
Copy and paste the URL in the browser
to automatically login ControlCase GRC.
This
feature allows viewing the track record of all user logins in ControlCase
GRC. You can also search for any specific user and trace its login details.
To
view the user track log:
Step 1
Click on the User Admin header
tab.
Step 2
Click on the User Log Track
link on the left side of the page.
Step 3
The track record of login details of
all users is shown as given below.
ControlCase GRC is comprised of modules
which are distinct components of the ControlCase GRC application.
ControlCase GRC allows for custom definition and restriction of
access to each different module.
NOTE: Module Access is available only for
admin user.
Defining
Module Access
Admin can allow or deny access for
a particular user to particular modules or parts of modules. This
helps in restricting users form performing activities they are
not authorized to do so.
To
define module access:
Step 1
Click
on the Module Access header tab. The following screen appears.
On the left side, you can view the
various modules present within the ControlCase GRC application.
Each module has its own Module Access page which is used
to define access control for users and groups. The right side
shows the current Allow / Deny Access for modules to various users
and groups.
NOTE: Users and groups can be created using
the User Management and Group Management links under
the User Admin header tab. By default, a newly created
user will have access to the Remediation header tab.
Step 2
To change the access rights for a module,
for example, theRemediation
Adminmodule, click
on it, and then on the Access Module page.
From the Access Module page,
theadministrator
can define the access
for the selected (i.e. Remediation
Admin) module.
TIP: Alternatively, you can search for
the page and then click on Object next to it.
Step 3
Allow or deny access to particular
users or groups using the arrow keys.
Step 4
Click Save when done.
NOTE:The
administrator can use the above described method to define access
control for all other modules.Once
the access rights are modified and saved, you need to log out
and log-in to get the changes reflected.
This functionality facilitates admin
to view access rights for a particular user. A case may arise
when admin wants to check access rights for a user for modules
or a particular module. He can avoid searching for a user in the
list of users by selecting to view access rights only for the
selected user.
To
view access rights for a particular user:
Step 1
Click on the Module Access header
tab.
Step 2
To view rights for a user in a particular
module, click on the module.
NOTE: By default rights will be shown for
all modules.
Step 3
From the drop-down menu at the top,
select the user whose access right you want to view.
Step 4
Click Show Only. Access rights
only for that user are shown.
NOTE: To view access rights for all users
along with the selected user as highlighted, click on Highlight.
The module tree on the left side of
the page can be reduced to display only particular module. The
reduced tree can then be expanded to view the original tree as
and when required.
This is where the organisation hierarchy
is defined. Here, you candefine
the organizational accounts and processes to be reviewed for risk
assessment /audit / compliance in a tree structure format based
on locations, sub locations etc.
ControlCase GRC provides with the default
ABC organization hierarchy along with its departments. Here, the
organization forms the root node and the departments within the
organization form the child nodes. The name and description of
the nodes can be changed to represent your organization.
To
change node information:
Step 1
Click on the Accounts and Processes
header tab. It displays an organisational tree for which the hierarchy
can be defined.
Step 2
Select the business unit that you would
like to define. E.g. ABC.
Step 3
Click Edit.
Step 4
Change the data in the Label
and Description fields, for example, change the organization
name which is presently ‘ABC’, and also the description.
Step 5
Click Save to save the changes.
NOTE: Similarly, by selecting the assets
of the organization, e.g. Controls, IT_Data, etc., you can edit
the name and description of this sub-unit.
Once the root node is made to represent
your organization, you can add sub-nodes or sub-units to that
node. The sub-nodes will represent various departments within
the organization.
To
add a sub-unit:
Step 1
Click on the Accounts and Processes
header tab. It displays an organisational tree.
Step 2
Select the organisation, for example,
ABC.
Step 3
Click Add Sub-unit.
Step 4
Add a new label and description under
the ABC Organization hierarchy .e.g. Management; Board of Directors.
NOTE: The Description field is not
mandatory.
Step 5
Click Save.The
new sub-unit is seen at the bottom of the organization tree as
shown below.
NOTE: Similarly under each sub-unit, further
sub-units can be added to organize the hierarchy of assets within
the organization as shown in figure.
·Root Node:
The topmost node in the hierarchy. There can be only one Root
node in any given hierarchy.
·Parent Node:
A node that has one or more nodes as its Child nodes.
·Child Node:
A node that has some node as its Parent node.
NOTE: Root node always is a parent node
but vice-versa may not always be true. A
parent node can be a child of another parent node.
If
you select a….
You
can perform actions on….
Standard definition
database
The entire contents of Standard definition
database (including files in root and child nodes).
Root Node
The entire contents of an individual
root node (including files in child node).
Child Node
The entire contents of child node.
Actions Allowed:
On selecting a child node, the following
operations can be performed on it,
·Modifying contents of the node
·Adding child to each node
·Deleting the node
·Adding a child node
·Adding a new field
·Deleting a field
NOTE: The same operations can also be performed
on the root node except that it cannot be deleted.
Tips:
Always make sure that all nodes in
astandardare named as per organization assets.
While creating astandarduse add child to each node rather
than add node.
Field names should be selected in such
a way that it is displayed in the graph.
Expanding and
Collapsing Items
To expand a node, click on the ‘+’
sign next to it. Similarly, to collapse a node, click on the ‘–’
sign next to it.
Step 1
Click the Standards header tab.
It displays the Create New Standardscreen as shown below.
There are four standard definition
options available:
·Create Standard
·Edit Standard
·Copy and Edit Standard
·Copy and Edit Standard Subset
·Import Standard
NOTE: Your actions on these options are
allowed as per access control definitions.
Creating
a Standard
This
feature allows the user to create or develop and customize a new
in-house standard. Once a standard is created, it is
available for mapping with an organization. A need to create a
new standard arises when an entire newstandardis required or and existing standardfails
to suffice the requirements.
To
create a standard:
Step 1
Click the Standards header tab.
Step 2
Click on the Create Standard
link.
Step 3
Enter thestandardname and title, and click Save.
A newstandardis created as shown below.
NOTE: This is the root node of the standard.
Tip:Always
make sure that all nodes in astandardare named as per organization
assets.
Once
a standard has been created, the user can edit it later for further
modifications. Depending on the access rights, the user can modify
the contents of a node, add child to each node, delete a node,
add a child node, add a new field, and delete a field.
To
edit an existing standard:
Step 1
Click the Standards header tab.
Step 2
Click on the Edit Standard link.
Step 3
Select a standard by selecting the
adjacent checkbox, for example, ‘cosco payroll’.
Step 4
The standard is displayed as shown
below. The root node is shown circled below.
The child nodes of the root are shown
circled below.
A control element comprises of fields
created to hold data within it. A user can edit these fields either
to add data or modify existing data.
To
edit contents of a control element:
Step 1
Select a control element to be modified
and click on the Edit link.
NOTE: In the figure below Control label
and Control objectives are specific to ‘IT Enterprise model’ therefore
no changes are needed. Modification can be done if control label
and control objectives need to be customized as per organizations
policies and procedures.
Step 2
On clicking Edit, the following
screen appears.Make required
modifications and click Save.
Suppose, there is a hierarchy with
three levels and you want to add a new node at the fourth level
across the hierarchy. The obvious way is to reach each node at
the third level and add the new node. However, this process is
more time consuming. To avoid this, ControlCase GRC provides a
feature of adding a child node across the hierarchy. Using this
feature, a same child node can be added to all the nodes present
on the same level as that of the node where the new node is actually
added. However, this operation cannot be performed for nodes that
have sub-nodes.
To
add child to each control element:
Step 1
Select a control element to which a
child control element is to be added and click on the Add child
to each control element link.
Step 2
To add extra fields, enter the number
in the Give the Number of fields box and click Save.
NOTE: If no extra fields are to be added,
directly click Save. The system, however, generates three
fields (‘primary_id’, ‘label’ and ‘parent_id’)
and add them to the node automatically.
Step 3
Enter the
field name, field type, and field length for all the fields and
click Save.
Step 4
Enter
the label for the node and descriptions for the remaining fields
and click Submit.
This
allows you to add a child control element to the root control
element, parent control element or another child control element.
When a child control element is added to an existing child control
element, then that child control element becomes the parent control
element of the added child control element.
To
add a child control element:
Step 1
Select acontrol
elementto which a childcontrol elementis to be added and click on theAdd acontrol elementlink.The system generates three fields
(‘primary_id’, ‘label’ and ‘parent_id’) that
get added automatically.
Step 2
Enter
the ‘Label’ (name) for the new child node, e.g. ‘IT_Security’,
and click Save.
Creation
of new control element does not always bring up all the required
attributes. To add more
attributes to the control element, use this feature. The user
can add a new attribute to the root control element or child control
elements.
To
add a new attribute:
Step 1
Select a control element to which a
new attribute is to be added and click on the Add a new attribute
link.
Step 2
Enter the attribute name, attribute
type, and attribute length, (e.g. IT_Controls, char, and 255)
and click Save.
NOTE:Attribute
names should be selected in such a way that they are displayed
in the graph.
Attributetypes
are used to hold and store data. They act as a container for the
data that user enters. To facilitate the various needs of data
storage, ControlCase GRC provides as many as 10 different field
types which can be divided into two major categories: basic and
advanced.
Both the field types are explained
below.
Basic field types
These are
the basic field types supported by the application.
Attribute Type
Description
char
Stores fixed length character type
data.
varchar
Stores variable length character type
data. This is similar to char type, the only difference
being the storing technique. For instance, if an eight character
word is stored in 10-sized char and varchar fields,
then char will store the eight character word and extra
space to make the count of 10 characters, whereas, varchar
will store only the eight character word thus saving the storage
space.
int
Stores integer type data.
text
Stores text type data.
Date
Stores date type data.
blob
Stores large objects binary file.
longblob
Stores large objects binary file that
is too large for blob to handle.
Advanced attribute types
These are
a little advanced attribute types that use basic types as its
base.
Attribute
Type
Description
drop-down
This attribute type is used to store
a pre-defined list of values. In controlsheet, this field will
appear as a drop-down list showing all the stored values in the
list and allowing users to select one of them.
NOTE: The values should be entered in comma
separated format as shown in the figure above. Also, they will
appear in the exact order as they are entered in the field.
formula
By using this attribute type, a user
can configure the application to perform calculations or operations
on the data available in the existing fields. The six types of
operations that can be performed are:
Operation
Symbol
Example
Addition
+
5 + 2 = 7
Subtraction
-
5 – 2 = 3
Multiplication
*
5 * 2 = 10
Division
/
5 / 2 = 2.5
Modulus
%
5 % 2 = 1
Brackets
( )
(5 + 2) * 2 = 14
NOTE: Only int type fields are supported
for performing calculations. In the example above, Rating
is of type drop-down which store values of type int
and Count is also of type int.
translation
This attribute type is used to get
a graphical representation of a value. It takes a field as its
argument and displays a graphics that has been selected by you
on meeting a particular condition. This could be better explained
with an example.
In the figure shown above, the Severity
field, which is of type translation, takes the TotalRisk
field as its argument, evaluates conditions, and displays colored
circles based on the values in the field.
The snippet for this field type is
as shown below.
field:::x==1:color=violet,
1<x<50:color=orange,
50<=x<100:color=red,
x>100:color=green
·The variablefieldrepresents
the column or field whose value is to be represented in graphical
format.
·The expressionx==1represents
the condition that is to be evaluated.
The following conditions can be used:
Condition
Description
==
Equal to
!=
Is not equal to
<
Less than
<=
Less than or equal to
>
Greater than
>=
Greater than or equal to
·The expressioncolor=violetrepresents
the action to be taken when the specified condition is met. Here,
the color violet will be displayed on meeting the condition.
The following colors are available
for use:
Color
Sample
Violet
Indigo
Blue
Green
Yellow
Orange
Red
To use this field type, copy paste
the above snippet in the FIELD LENGTH box, and then modify its
content to suit your needs.
ControlCase
GRC is a flexible application whereby it allows users to configure
itself to suit their needs. A simple concept, like the one explained
below, can come in handy in risk evaluation.
By using the various field types to
configure a standard, a user can create a controlsheet that can
help in the evaluation of risk.The
three fields, viz drop-down, formula, and translation, of the
ten available fields play a major role in this.
Consider the controlsheet shown below.
It shows five fields as explained below:
No.
Field
Type
Description
1.
RiskID
varchar
A unique ID used to identify a particular
risk.
2.
Rating
drop-down
The degree of threat that the risk
carries with it.
The drop-down type contains pre-defined
values which prevents users from creating their own ratings.
3.
Count
int
The number of instances of a risk present
in an organization under consideration.
4.
TotalRisk
formula
The total amount of risk the organization
faces because of the risk.
This is the product of Rating
and Count. It is a dynamic field and changes automatically
on changing one of the operands.
5.
Severity
translation
Graphical representation of the total
amount of risk or the TotalRisk field.
This represents the total risk in a
graphical format. Total risk of 1 is shown in green and is the
lowest risk that can be ignored.
Total risk between 1 and 50 is shown
in yellow and is a moderate risk that needs less priority.
Total risk between 50 and 100 is shown
in orange and is a high risk that needs immediate attention.
Total risk above 100 is shown in red
and is the highest risk that needs the utmost attention.
The most interesting feature of this
controlsheet is that the calculation and the graphical representation
of values are done dynamically which does not require additional
processing at user end.
One
of the many features of ControlCase GRC is reuse. The structure
of an existing standard can be used to create a new standard.
Consider a case where a new standard is to be created which is
almost similar to an existing standard. Instead of creating the
standard all over again, the user can take the structure of an
existing standard and do modifications to it. This saves lots
of time and energy required in recreation of the standard. However,
the user should have appropriateaccess
rights for creating it. Thestandardcan be further modified as per
the requirements.
To
create a new standard by modifying an existing standard:
Step 1
Click the Standards header tab.
Step 2
Click on the Copy and Edit Standard
link.
Step 3
Select a standard from the drop-down
menu, e.g. ‘IT Enterprise Model’.
Step 4
Click Submit.
Step 5
Enter the standard name,standardtitle, and click Save. This will
create a new standard database using the selected standard from
Step 3 and can be used to create a review.
Creating
a new standard by modifying an existing standard feature facilitates
reuse of an existing standard at the root level. Suppose, if a
new standard is to be created not at the root level but somewhere
in the middle of the hierarchy; then, the above feature fails
to achieve reusability of an existing standard. To avoid such
problem, ControlCase GRC has provided another feature for creating
a standard in the middle of the hierarchy. Using this feature,
the user can create a standard at any parent or child node which
will then be considered as the root node of the new standard.Thestandardcan be further modified as per
the requirements.
To
create a new standard by modifying a portion of an existing standard:
Step 1
Click the Standardsheader
tab.
Step 2
Click on the Copy and Edit Standard
link.
Step 3
Select a standard from the drop-down
menu.
Step 4
Click Submit.
The tree structure of thestandardwill
then be displayed as shown in the screen below.
Step 4
Select one child node (e.g. Management
Level, above).
NOTE: Selecting root node will create a
new standard including all child nodes. You can then modify, add
or delete the nodes as described in ‘Modifying an existing standard’.
Step 5
Enter the name and title for the standard
and click Save. A new standard with that child node as
the root node is created.
Creating
a new standard by uploading an excel file (.CSV format) facilitates creating
your own standard in an excel sheet. Then you can import selective number
of rows from the excel file.
NOTE:
Before using this feature, you need to create an empty standard using
the Create Standard link.
Step 1
Click the Standards header tab.
Step 2
Click on the Import Standard
link.
Step 3
Select the newly created Standard
from the drop-down list,
for example, ‘PCI_DSS_1_2’.
Step 4
Click the Browse button.
Step 5
Select a .CSV file and enter the Number
of Rows to import which you want to import from the excel
file.
NOTE:Leave the Number of Rows
to import field blank, if you want to import all rows.
This module deals with creating and
deleting controlsheets.
Controlsheet
-A controlsheet is
a mapping between organizational accounts and the defined standard.
Once mapped, the controlsheet will create a complete set of control
objectives based on the standard. It is similar to an excel file
with a data of control objectives which can be edited, viewed,
and populated after performing any scan.
NOTE: Only one controlsheet can be created
on one node of the organizational tree.
Create
a Controlsheet
Controlsheets can be created across
the entire hierarchy or part of the hierarchy. Once a controlsheet
is created it can be viewed by users within the organisation.
Users can also document within the controlsheet.
To
create a controlsheet:
Step 1
Click on the Create Controlsheet
header tab.
Step 2
Select the standard to be used from
the drop-down menu, for example, ‘COSO Payroll’.
Step 3
Click on Create.
Step 4
Select an asset with which you would
like the standard to be mapped, for example, COSO Payroll.
Step 5
Select the specific sub- standard to
be applied, for example, ‘Business Controls’.
Step 6
Enter a title for the controlsheet
you are creating and click Submit.
If you had created reports in ControlCase
GRC, then you get an additional option of mapping that reporting
template to the new controlsheet.
All the reports participating in template
will be created for the new controlsheet. Also the graphs created
from the template report will get updated or created depending
on the nature of the graph.
NOTES:
There are 2 different types of reports
that can act as a template.
·Report directly created from the base
report which again is created from the same controlsheet.
·Report directly created from the base
report which again is created from the different controlsheet
but all the Filters and Operators are same as in the base reports.
Step 7
Click
on Continue.
Step 8
Now, the user access rights have to
be set through the Controlsheet Access module for the created
controlsheet. Once this is done, this controlsheet can be accessed
by the corresponding users through the Review module.
A controlsheet can be deleted if it
is not required anymore.
To
delete a controlsheet:
Step 1
Click on the
Create Controlsheet header tab.
Step 2
Click on the
Delete a controlsheet link.
Step 3
Select the controlsheet from the drop-down
menu.
Step 4
Click on Delete.
NOTE: Deleting any controlsheet will delete
the corresponding reports and graphs for that controlsheet.
Controlsheet
Access
Functionality:
This module allows the administrator
to allocate controlsheet access to various users. A user can be
provided with access to an entire controlsheet or part of the
controlsheet depending on the requirements. Once access is provided,
users can only access the controlsheets they are given permission
to.
Generallevel access provides controlsheet
based access control. In this, a user or group of users is provided
with read or write access rights on a particular controlsheet.
Once the rights are assigned, only those controlsheets become
visible to the users.
NOTE: If the number of users is more, provide
access using the General type.
To
provide General level access rights:
Step 1
Click on the Controlsheet Access
header tab.
Step 2
From the Access Level group,
select the General option.
Step 3
Select the controlsheet from the drop-down,
for example, ‘PCI DSS Review’.
Step 4
Click on Get Access Tree.
Step 5
Using the Left and Rightarrows, assign the Read Access rights under the Read
Access section.
Step 6
Using the Left and Rightarrows, assign the Write Access rights under the Write
Access section.
Step 7
From the drop-down menu above, select
the appropriate option.
NOTE: If a user is given General
level write access to a controlsheet, along with the Column
level write access, then the Column level write access
overrides the General level write access i.e. if there
are five columns in a controlsheet, and Column level write
access is given to only two columns, then the user will have write
access to only those to columns. The remaining columns can be
selected to display in read only mode or to hide using the drop-down
menu provided under the WriteAccess section.
Step 8
Click Save at the bottom of
the page once the access rights are finalized.
Columnlevel access provides column
based access control. In this, a user or group of users is provided
with write access rights on a particular column or a set of columns.
Once the rights are assigned, only those controlsheets become
visible to the users.
NOTE: The Column type cannot be
used independently. It has to be used in combination with either
of the other two types.
To
provide Column level access rights:
Step 1
Click on the Controlsheet Access
header tab.
Step 2
From the Access Level group,
select the Column option.
Step 3
Select the controlsheet from the drop-down
menu, for example, ‘PCI DSS Review’.
Step 4
Click on Get Access Tree.
Step 5
From the left side of the page, select
the column for which you want to provide access.
Step 6
Using the Left and Rightarrows, assign the Write Access rights under the Write
Access section.
NOTE: If a user is given General
level write access to a controlsheet, along with the Column
level write access, then the Column level write access
overrides the General level write access i.e. if there
are five columns in a controlsheet, and Column level write
access is given to only two columns, then the user will have write
access to only those to columns. The remaining columns can be
selected to display in read only mode or to hide.
Step 7
Click Save at the bottom of
the page once the access rights are finalized.
User
Level Access
User level access provides user based
access control. In this, a user can be provided with read and
/or write access rights on a particular controlsheet or set of
controlsheets. Once the rights are assigned, only those users
can visible to the assigned controlsheets.
NOTE: If the number of controlsheets is
more, provide access using the By User type.
To
provide User level access rights:
Step 1
Click on the Controlsheet Access
header tab.
Step 2
From the Access Level group,
select the By User option.
Step 3
From the left side of the page, click
the username.
Step 5
From the right side, select the controlsheet,
then by using the Left and Rightarrows,
assign the Read Access rights under the Read Access section.
The selected controlsheet moves in
the Allow panel of the Read Access section.
Step 6
Using the Left and Rightarrows, assign the Write Access rights under the Write
Access section.
NOTE: If a user is given General
level write access to a controlsheet, along with the Column
level write access, then the Column level write access
overrides the General level write access i.e. if there
are five columns in a controlsheet, and Column level write
access is given to only two columns, then the user will have write
access to only those to columns. The remaining columns can be
selected to display in read only mode or to hide.
Step 7
Click Save at the bottom of
the page once the access rights are finalized.
Step 8
Click Level1 or Level2
links to assign user access to that level of the controlsheet.
Step 9
From the right side, select all nodes
of the controlsheet for which you want to give the access, and
then by using the Left and Rightarrows,
assign the Read Access rights under the Read Access section.
ControlCase GRC allows administrators
a great deal of flexibility in the manner with which they can
administer the users and the tasks assigned to them. The administrator
retains full privileges to create roles, generate functionality,
assign functionality to the roles, and manage resources using
the Remediation Admin module.
NOTE: The Remediation Admin header
tab is accessible only to the users that have been assigned access
to it by the Admin, via the Module Access module. Therefore,
only the Admin and those with administrative privileges have access
to the Remediation Admin pages.
ControlCase GRC provides role based
access control, astandardin which roles are created with
some functionalities assigned to each role. The role is then assigned
to various users or members of an organization. This provides
them with all the functionality of the assigned roles. A user
can also be assigned with more than one role.
ControlCase GRC has built-in roles
such as Investigator, Incident Admin, Incident Manager, and Incident
Closer which can be assigned to users. However, the administrator
can also create additional roles if the existing roles do not
suffice the requirements.
To
create a new role:
Step 1
Click on the Remediation Admin
header tab.
Step 2
Click on the Create Role link
and then clickNew.
This
displays a screen showing the current roles which are already
created (i.e. default).
Step 3
Select
the Remediation module using the drop-down menu and complete
the Role Name and RoleDescription fields.
When the number of rolesturns out to belarge,
it becomes difficult for a user to search for a particular role.
For this reason, ControlCase GRC provides the search functionality
that allows searching for a role within the available roles.
To
search for a role:
Step 1
Click on the Remediation Admin
header tab.
Step 2
Click on the
Create Role link.
Step 3
Click Search.
Step 4
Enter
the role name, select module, and enter role description in the
boxes provided.
NOTE: It is not necessary to enter
data in all the fields. However, data must be entered in at least
one field. The entered data can be an entire string or substring
(part of string) you want to search, for example, if you enter
‘ad’ (substring) instead of ‘admin’ or ‘administrator’ (strings
to be searched for), then the search result will display all records
containing ‘admin’, ‘administrator’, and or other strings of which
‘ad’ is a substring. Data is not case sensitive.
Step 5
Click
Run to execute the search command. The result is
displayed as shown below.
NOTE:
To cancel the search, click the Cancel button.
A role can be deleted if it is not required any more.
NOTE: An activity can only be assigned
to users who are given the role of an investigator. Therefore,
the default role ‘Investigator’ cannot be edited / deleted.
To
delete a role:
Step 1
Click on the Remediation Admin
header tab.
Step 2
Click
on the Create Role link.
Step 3
Click
on the role that is to be deleted. The row is highlighted in yellow
(as shown below).
NOTE: Two more buttons Edit and
Delete appear at the bottom.
The
Role Mapping feature enables the administrator to assign
roles to various users or groups of users. An existing role or
a newly created role can be mapped to a particular user or group
of users. Onmapping the
role, the users with that particular role get permissions and
can perform the operations that are assigned to that role.
Individual users can be assigned to
a single group or to multiple groups and given specific roles
within ControlCase GRC. A user who belongs to more than one group
is given all of the privileges assigned to each group.
To
map a user role:
Step 1
Click on the Remediation Admin
header tab.
Step 2
Click on the Role Mapping link. This directs you to the page where
roles to individual users andgroups
within the organization can be delegated.
Step 3
Select a particular role from the list
provided above. The particular role becomes active and is highlighted
in yellow.
Step 4
Select which Users or Groups
should be allowed or denied access to that particular role by
using the left and right arrow buttons.
NOTE: The Role assigned to Users
box displays the users that are members of groups that have been
added in the Allow Group box.
Step 5
Click Save at the bottom of
the screen to save the changes.
Functionality can be assigned to each
and every role. ControlCase GRC provides with seven basic functionalities:
1.Categorizing gaps into activities
2.Recommending activities for closure
3.Closing activities
4.Reassigning activities
5.Waiving gaps
6.Creating and viewing reports
7.Creating and viewing graphs
If a particular functionality, for
example, reassigning activities, is mapped with a particular role,
then the users who are playing that role can reassign the closed
activities back to the resource for re-examination.
To
assign functionality to a role:
Step 1
Click on the Remediation Admin
header tab.
Step 2
Click on the Functionality Mapping
link.This displays a
screen where functionality can be delegated to each role that
has been created.
Step 3
Click
on a role to add functionality to it. The selected role then becomes
active and is highlighted in yellow.
Step 4
Use
the Left and Right arrows to allow or deny the desired
functionality.
Step 5
Click Save at the bottom of
the page to save the changes.
Functionalities in brief:
To comprehend
the roles and functionalities in a better manner, consider a typical
scenario. A user is assigned the Activity Admin role, and
the role is then assigned the following functionalities:
Categorize
Gaps into Activities
The user
can now classify a gap into an activity and assign it to an investigator
or waive it if he finds it insignificant. Moreover, he can provide
further details of the gap in the Specifications panel
present while viewing a gap.
My
Activities
User can
view reported activities and recommend those Activities for closure.
My
Activities to be closed
User can
view Activities recommended for closure and can select to close
or reassign them.
Closed
Activities Access
User can view closed activities and
can select to reassign them.
My
Approved Waivers
User can
view archived gaps.
Reports
User is able
to create custom reports or view built-in reports (such as Display
Incident by Investigator, Incident Resolution time, etc.) which
represent the gap or incident information that has been collected.
Graphs
User can
create custom Graphs (such as pie charts, bar graphs, etc.) which
represent the gap or incident information that has been collected.
The figure
above shows the Gaps, Activities, Waivers, Reports, and Graphs
panels. These panels appear on the Remediation header tab
of the user who has been given access rights to the above mentioned
functionalities. If an additional functionality is assigned to
that role, the corresponding tab to that functionality will be
displayed. Similarly, if the user is denied access to an existing
functionality, then corresponding tab to that functionality will
be removed.
The administrator can assign the responsibility
of investigating and tracking activities to individual users as
well as to groups. This allows multiple users to work on the same
activity simultaneously. The delegated activity may
be viewed by users from their respective Remediation header
tabs.
To
assign activities to users or groups:
Step 1
Click on the Remediation Admin
header tab.
Step 2
Click on the Activity Assignment
link.
Step 3
Select a particular activity from the
list provided above. The activity becomes active and is highlighted
in yellow.
Step 4
Use
the left and right arrow buttons to select which
Users or Groups should be allowed or denied access
to that particular activity.
Step 5
Click Save at the bottom of
the screen to save the changes.
Step 6
On
saving theread-only
accessrights, the
activities appear in theRead
Only Viewsection
as shown below.
NOTE: TheRead
Only Viewsection
appears only if there is at least one activity to be displayed.
Gap
Formis a form used
to report gaps. This form contains attributes used to get reported
gap data. ControlCase GRC allows the user to customize this form
to get the expected or required data from the end users.
Adding
a New Attribute
Initially there are no attributes present
on the GapForm. Hence, the message Gapreporting
form has not been configured yet is displayed when you click
on Report a New Gap under the Remediation header
tab. It is therefore mandatory to add at least one attribute to
report the gap data. Attributes help store basic details of a
gap.
To
add a new attribute:
Step 1
Click on the Remediation Admin
header tab.
Step 2
Click on theGap
Formlink.Here,
you can view the attributes of the Gap Form.
Step3
Click New.
Step4
Enter the attribute name, choose the
attribute type from the drop–down menu, and choose whether it
is a required field.
NOTE:The
attributes on the GapForm may or may not be set
as required fields as per the requirement. This is done by checking
or unchecking the Required check box.
Any of the
added attributes can be deleted if they are not required anymore.
To
delete an attribute:
Step 1
Click on the Remediation Admin
header tab.
Step 2
Click on the Gap Form link.
Here, you can view the attributes of the Gap Form.
Step 3
Select the attribute that is to be
deleted. The attribute becomes active and is highlighted in yellow.
NOTE: Two more buttons Edit and
Delete appear at the botom.
Step 4
Click Delete. A warning message
appears.
NOTE: To edit the selected attribute, click
Edit.
Step 5
Click OK.
Configuring
Gap Description Attributes
ControlCase
GRC provides a gap creation form for gap reporting. Administrators
have the ability to customize the formusing
theGap Description
Attributeslink on
the panel.
There is a possibility that the end
user who has reported the gap may not have necessary information
or proper knowledge about the gap which may result in poor documentation
of the gap. To overcome this problem, Gap Description attributes
can be used. Using these attributes, activity manager can add
more accurate details about the gap.
A reported gap may be classified as
an activity or sent for waiver approval. While taking any of these
actions, it is necessary for the activity manager to document
the reason in support of his action.
The Gap Description
Attributes link facilitates creation of additional gap description
attributes to be filled by users who have access to the Categorize
gaps into activities functionality, for example, activity manager.
This helps the activity manager to provide further information
related to the reported gap. The newly created attributes will
appear in the Description tab in the Gap Details panel.
To
add a new attribute:
Step 1
Click on the Remediation Admin
header tab.
Step 2
Click on the Gap Description Attributes
link.
Step 3
Click New.
Step 4
Enter the attribute name, choose the
attribute type from the drop-down menu, and choose whether it
is a required field.
ControlCase GRC provides for the creation
of an Activity Description form for activity reporting.
Once a gap is classified as an activity, it appears on the Activity
panel of the investigator to whom it has been assigned. The investigator
then examines the activity and documents his findings on the Description
form for that activity. This helps the investigator to provide
further details about the activity and also to support his actions.
Adding
a New Attribute
ControlCase GRC provides for the creation
of an Activity Description form for activity reporting.
Users can create their own activity description attributes as
per the requirements. The selected attributes will appear in the
Description tab in the Activity Details section.
To
add a new attribute:
Step 1
Click on the
Remediation Admin header tab.
Step 2
Click on the
ActivityDescription
Attributeslink.
Step 3
Click New.
Step 4
Enter the attribute name, choose
the attribute type from the drop-down menu, type the attribute
parameter, and choose if it is a required field.
NOTE: Depending on the type of attribute
selected, the user may be prompted for attribute parameter details
(For example, if the user selects the ‘Drop Down’ attribute type,
user is required to enter the options to provide in the drop-down
menu).
Example: If ‘Formula’ attribute type is chosen,
then the user can type-in a mathematical expression under Attribute
Parameter using the eligible attribute names provided. In
the following screen, a formula End Date – Start Date is
entered to compute the difference in days.
Step 5
Click
Save.
NOTE: You can add multiple attributes without
the need to save after adding each attribute and then save them
together by clicking Save.
The
activity description attribute fields can be re-arranged in any
order, as per your convenience. Sequence plays an important role
in case of proper documentation. Improper order of the attributes
may confuse the activity manager. Hence, functionality is provided
wherein the attributes can be arranged in proper logical sequence.
Once the desired order is set, these attributes will appear in
that chosen order on theDescriptiontab in theActivity
Detailssection.
To
rearrange attributes:
Step 1
Click
on the Remediation Admin header tab.
Step 2
Click
on the Activity Description Attributes link.
Step 3
Select the attribute that is to be
rearranged. The attribute becomes active and is highlighted in
yellow.
Step 4
Use
the Up and Down arrows to move it in either direction.
NOTE: Repeat the steps, if required, for
reordering other attributes.
Certain
activity type may not be applicable to a particular Activity Description
attribute. For this reason, ControlCase GRC provides an option
of associating activity types with activity description attributes.
When an activity is classified as that activity type, depending
on the settings the attribute may or may not appear on theDescriptiontab.
To
associate activity types with attributes:
Step 1
Click
on theRemediation
Adminheader tab.
Step 2
Click
on theActivity Description
Attributeslink.
Step 3
Select
the attribute you want to associate the classification with. The
attribute becomes active and is highlighted in yellow. Lists of
activity types appear at the bottom.
Step 4
Use
the left and right arrow buttons to modify the applicable
activity types.
NOTE: This association of activity description
attributes to activity types can also be set through theActivity Classificationlink.
The Remediation header tab contains
the following panels: Gaps,Activity, Approvals, Closed Activities,
and Waivers. These panels display the available gaps across
their life cycles using some standard fields that are relevant
to the current phase of gaps. A user can continue to view these
standard fields or configure the Remediation panels to
view custom fields or the combination of both as per the requirements.
The Gaps panel on the Remediation
header tab can be configured to display the fields of your choice.
By default, the Gaps panel displays
onlythe standard gap
fields. To view the custom fields or details of a gap, a user
has to click the View Gap link next to it. Imagine that
there are about 10 gaps and you want to view the custom fields
for all these gaps. You will need to click the View Gap
link for each of the 10 gaps and search for the information of
your interest. These series of unwanted actions will definitely
slow down your surfing speed and waste your precious time. To
avoid this unnecessary overhead, you can configure theGapspanel
to display only those fields you are interested in thus, enhancing
your surfing experience.
Here, you can also select a field to
be propagated across the life cycle of a gap. Once selected, the
field, apart from being displayed on the Gaps panel, will
also be displayedon all
the other panels (Activity, Approvals, Closed
Activities, and Waivers) displaying information about
that gap. It is, therefore, recommended to select the most relevant
field for propagation.
To
configure the Gap panel:
Step 1
Click on the Remediation Admin
header tab.
Step 2
Click on the Gap Panel Display
link.
Step 3
Select the fields you would
like to be displayed on the Gap panel using the left
and right arrow buttons.
NOTE: The fields displayed are the combination
of the standard gap fields and the custom fields created using
the Gap Form and the Gap Description Attributes
sections.
If no fields were selected, the standard
gap fields will be displayed on the Gap panel.
Step 4
Click Save. The Propagate
this Gap field drop-down list changes to display the fields
you selected to be displayed on the Gap panel.
Step 5
Select the field you would like to
be propagated across the life cycle of a gap and then click Save.
NOTE: This field will be displayed on all
the other panels (Activity, Approvals, Closed
Activities, and Waivers.) It is, therefore, recommended
to select the most relevant field.
The Gap panel now displays only
the selected fields.
NOTE: The Action field will always
be displayed irrespective of the fields you select.
The Activity panel on the Remediation
header tab can be configured to display the fields of your choice.
By default, the Activity panel
displays onlythe standard
activity fields. To view the custom fields or details of an activity,
a user has to click on the activity. To avoid this unnecessary
overhead, you can configure theActivitypanel to display only those fields
you are interested in thus, enhancing your surfing experience.
To
configure the Activity panel:
Step 1
Click on the Remediation Admin
header tab.
Step 2
Click on the Activity Panel Display
link.
Step 3
Select the fields you would
like to be displayed on the Activity panel using the left
and right arrow buttons.
NOTE: The fields displayed are the combination
of the standard activity fields and the custom fields created
using the Activity Description Attributes section.
If no fields were selected, the standard
activity fields will be displayed on the Activity panel.
Step 4
Click Save.
The Activity panel now displays
only the selected fields.
NOTE: The Activity # field will
always be displayed irrespective of the fields you select.
The Approvals panel on the Remediation
header tab can be configured to display the fields of your choice.
By default, the Approvals panel
displays onlythe standard
activity fields. To view the custom fields or details of an activity,
a user has to click on the activity. To avoid this unnecessary
overhead, you can configure theApprovalspanel to display only those fields
you are interested in thus, enhancing your surfing experience.
To
configure the Approvals panel:
Step 1
Click on the Remediation Admin
header tab.
Step 2
Click on the Approval Panel Display
link.
Step 3
Select the fields you would
like to be displayed on the Approvals panel using the left
and right arrow buttons.
NOTE: The fields displayed are the combination
of the standard activity fields and the custom fields created
using the Activity Description Attributes section.
If no fields were selected, the standard
activity fields will be displayed on the Approvals panel.
Step 4
Click Save.
The Approvals panel now displays
only the selected fields.
NOTE: The Activity # and the Action
fields will always be displayed irrespective of the fields you
select.
The Closed Activities panel
on the Remediation header tab can be configured to display
the fields of your choice.
By default, the Closed Activities
panel displays onlythe
standard activity fields. To view the custom fields or details
of an activity, a user has to click on the activity. To avoid
this unnecessary overhead, you can configure theClosed Activitiespanel to display only those fields
you are interested in thus, enhancing your surfing experience.
To
configure the Closed Activities panel:
Step 1
Click on the Remediation Admin
header tab.
Step 2
Click on the ClosedActivity
Display link.
Step 3
Select the fields you would
like to be displayed on the ClosedActivities panel
using the left and right arrow buttons.
NOTE: The fields displayed are the combination
of the standard activity fields and the custom fields created
using the Activity Description Attributes section.
If no fields were selected, the standard
activity fields will be displayed on the ClosedActivities
panel.
Step 4
Click Save.
The ClosedActivities
panel now displays only the selected fields.
NOTE: The Activity # and the Actions
field will always be displayed irrespective of the fields you
select.
The Waivers panel on the Remediation
header tab can be configured to display the fields of your choice.
By default, the Waivers panel
displays onlythe standard
gap fields. To view the custom fields or details of a gap, a user
has to click the View Gap link next to it. To avoid this
unnecessary overhead, you can configure theWaiverspanel to display only those fields
you are interested in thus, enhancing your surfing experience.
To
configure the Waivers panel:
Step 1
Click on the Remediation Admin
header tab.
Step 2
Click on the Archived Gap Display
link.
Step 3
Select the fields you would
like to be displayed on the Waivers panel using the left
and right arrow buttons.
NOTE: The fields displayed are the combination
of the standard gap fields and the custom fields created using
the Gap Form and the Gap Description Attributes
sections.
If no fields were selected, the standard
gap fields will be displayed on the Waivers panel.
Step 4
Click Save.
The Waivers panel now displays
only the selected fields.
NOTE: The Action field will always
be displayed irrespective of the fields you select.
ControlCase
GRC provides a resource library for reference while the users
investigate the activities. The users can use these online resources
to get information about the latest standards. They can also add
new resources to the list.
ControlCase GRC provides with five
pre-defined types of classifications: Multiple Component, Inappropriate
Usage, Unauthorized Access, Malicious Code, and Denial of Service.
When a gap is classified into an activity, it has to be provided
with its classification type. This allows for grouping of all
activities according to their classifications. The selected classification
can be changed later.
Certain
Activity Description attributes may not be applicable to a particular
classification. For example, if the selected classification type
is ‘Inappropriate Usage’, then the attribute like ‘Virus Name’,
does not make any sense. Hence you can select not to associate
this attribute with that classification type, so when that classification
type is selected, that field will not appear on the Description
tab.
To
associate attributes with classification types:
Step 1
Click
on the Remediation Admin header tab.
Step 2
Click
on the Activity Classification link.
Step 3
Select
a classification you want to associate the attributes with. The
particular classification becomes active, is highlighted in yellow
and applicable activity description fields appear below.
Step 4
Use
the left and right arrow buttons to modify the activity
description fields.
NOTE: This association of description attributes
to activity types can also be set through theActivity Description Attributeslink.
A
classification can be deleted if it is not required anymore.
To
delete a classification:
Step 1
Click
on the Remediation Admin header tab.
Step 2
Click
on the Activity Classification link.
Step 3
Select
a classification you want delete. The particular classification
becomes active and is highlighted in yellow.
NOTE: Two more buttons Edit and
Delete appear at the bottom.
Step 4
ClickDelete.
A warning message appears.
NOTE: To edit the selected classification,
click Edit.
Step 5
Click
OK.
Assessment
Admin
ControlCase GRC allows creation of
assessments, a great means of collecting data from groups of people.
Besides creating assessments, additional functions like opening
or closing them for public use, and providing access rights are
also possible. The user can also send a notification to mass populations,
specific groups, and individual users as required to collect assessment
responses and view the responses in a controlsheet format. A number
of surveys have been created as examples and can be found in this
tab.
Creating
an Assessment
Assessments, created in the form of
questionnaire, are used to conduct surveys and get responses from
survey participants. Participants are provided with an online
questionnaire which they have to fill. Two types of questions
may exit in assessments: Closed and Open. Closed questions provide
users with options as responses and have to select from among
them. Open questions allow users to provide responses in their
own words.
Assessments can also be created in
languages other than English. For more information refer to:
·Arabic
Supportsection
under “Appendix B: Multilingual Input”
To
create an assessment:
Step 1
Click on the AssessmentAdmin
header tab. The following screen appears.
The Create Assessment page contains
six tabs, namely, General, Questions, Order,
SkipLogic, Preview, and Finish.
The ideal way to create an assessment
is to go through all the tabs in sequence. However, it is possible
that a user may not use all the six tabs. Click on the tabs shown
above to learn more.
The General tabis used to fill in the general information
about the Assessment.
NOTE: The Assessment Filename and
Title are mandatory fields (as shown with the *).
Step 1
From the Language drop-down
menu, select the language the assessment would be in.
NOTE: Currently supported languages are
English and Arabic; English being the default language.
If Others option is selected, the language defaults to
English.
The Language drop-down menu
is available only if Multilingual Input is enabled form
Settings header tab. It appears disabled otherwise.
For more details on creating assessments
in Arabic, see Appendix B.
Step 2
Enter a name for the assessment in
the Assessment Filename field.
Step 3
Enter title in the Title
field and any additional information in the Additional Info
field.
NOTE: These fields will be used in
the creation of the header for the final survey.
Step 4
On the Confirmation Page section,
enter the message heading and message body for this page.
NOTE 1: Alternatively, you can enter a Web
address (i.e. URL) where the browser will be redirected after
filling the assessment online.
NOTE 2: The Confirmation Page is the
page that appears after filling out the Assessment online.
Step 5
Click Continue to proceed to
the Questions tab.
NOTE: Alternatively, the user can also
directly click on the Questions tab at the top.
Questions
Tab
The Questions tab is used to
create questions. The user can create any number of questions.
NOTE: Question Title, Type and Question Text
are mandatory fields.
Step 1
Enter the question title.
NOTE:It
is just a short-form for a question. For example, if the question
text is “What is your Name?”, then the objective or title of the
question can be ‘Name’.
Step 2
Enter the question in the Question
Text field, e.g. what is your favorite color?
Step 3
Choose the typeof response
for the question. Since different types may have parameters to
change the way they behave, you can consult the chart below for
the use of parameters.
NOTE: If a response type question with
options is chosen, fill in one answer option per line on the bottom
half of the form. If more lines are needed, click on Add New
Answer Choices.
The question types with answer options
are:
·Check Boxes
·Dropdown Box
·Radio Buttons
·Rate
For check boxes and radio buttons,
you may enter "!other" on a line to create a fill in
the blank option. An ‘Other’ box defaults to using the prompt
Other:, but is configurable by using the format:
!other=prompt text
Step 4
Click on Save to save the current
question and add another question.
Step 5
After adding all the questions, click
Continue to proceed to the Order tab.
NOTE: Alternatively, the user can also
directly click on the Order tab at the top.
The Types
of Questions:
Yes/No
·Explanation
Use this for questions that require
a basic yes/no answer.
·Example:
Yes
No
Text
·Explanation:
Use this for questions that require
a one line answer.
·Example:
Essay
·Explanation:
Use this for questions that require
an answer in essay format.NOTE:
The column and row width of the essay area can be set be using
the Columns and Rows fields.
·Example:
Radio
Buttons
·Explanation:
Use radio buttons for questions that
have a set of possible answers, but only one can be selected.
·Example:
Option 1
Option 2
Checkboxes
·Explanation:
Use check boxes for questions that
have a set of possible answers out of which multiple can be selected.
·Example:
Option 1
Option 2
Dropdown
Box
·Explanation:
Use this to drop down a list of possible
selections. For example, ‘what state are you from?’ The drop-down
menu would then produce the list of states.
·Example:
Rate(scale 1...n)
·Explanation:
Use this for questions that require
a rating. You can have a rating scale of 1 to n, set by the length
box. Multiple options can also be added to the rating block as
seen below.
·Example:
Date
·Explanation:
Use this for responses that require
users to submit a date.
·Example:
(e.g.
4/21/2002)
Numeric
·Explanation:
Use this for questions which only require
a numeric answer.NOTE: All non-numeric responses are discarded.
·Example
Answer
Required(If selected)
makes the current Question mandatory.
Accept
File Attachment(If
selected) Adds a file input control to the question as shown below.
Answer
Preferred:This Option
works only with following types of questions:
·Check boxes
·Radio Buttons
·Dropdown Boxes
For question types such as Check boxes,
Radio Buttons and Dropdown Boxes, the number of choices can be
up to the ‘nth’ level.
NOTE: The choice list is taken from the
first to the last ‘not-null’ choice content, independent of total
answer choices controls added.
The Order tab allows the user
to change the order in which the questions will appear in the
survey. Some questions should logically be in sequence. E.g. Consider
the following two questions:
·What is the name of your company?
·Are you employed?
Logically speaking the second question
should come before the first. As if a person is not employed,
how can he enter the name of his company. All such changes are
made from the Order tab.
Besides changing the order, the user
can also delete questions and insert section
breaks. A section break divides the assessment into multiple pages.
(This is helpful for long assessments).
Step 1
Select the question of which the order
is to be changed.
Step 2
Use the Up and Down buttons
to move the questions up and down respectively. The movement is
wraparound.
A question
can be deleted if it is no more required in the assessment.
To
delete a question:
Step 1
Select the question.
Step 2
Click on Remove Question.
Paginating Large Assessments:
If number of questions in an assessment
increases, the assessment becomes too large. To break
down the assessment in parts, you can insert section breaks. Insertion
of section breaks is up to the user who is creating the assessment.
It can be put after a certain number of questions or to separate
questions that logically go together. Questions present between
two consecutive breaks will appear on a separate page. This will
also facilitate easy navigation to a particular question by directly
jumping to the page on which it is present.
To paginate
large assessments:
Step 1
Click on Add Section Break button.
A ‘-----Section Break-----’ will appear at the bottom of the question
list.
Step 2
Select this ‘-----Section Break-----’
and move it below the question where a page break is required.
Step 3
Click Continue to proceed to
the Skip Logic tab.
NOTE: Alternatively, the user can also
directly click on the Skip Logic tab at the top.
The Skip Logic tab is used to
design skip logic for a set of questions.
Sometimes question types like ‘Yes/No’
or ‘Radio’ are conditional in nature i.e. they can decide
the relevance of some other questions. For
example, if “Are you above 21 years of age?” is a question, then
questions like “What is the name of your school?” or “In which
standard you study?” etc. become irrelevant.
TheSkip
Logictab provides
the user with flexibility to skip such irrelevant questions and
jump directly to nth question (where current question
< nth question <= total no. of questions) when
a particular option is clicked.
Step 1
Select the option button.
Step 2
From the Skip to drop-down menu
in the right corner, choose the question to jump to. A prompt
box appears as shown on screen informing about the skip setting
being ‘Saved’.
NOTE: Skip logic is flushed (i.e. reset)
when you access the Order tab (i.e. the previous tab) once
the skip has been set. Hence, you must avoid going back to the
Order tab after setting the skip logic for the assessment.
Step 3
Click Continue to proceed to
the Preview tab.
NOTE: Alternatively, the user can also
directly click on the Preview tab at the top.
ThePreview
Taballows the user
to preview the assessment that is being created or edited. The
user can switch to this tab at any time to see what the assessment
will ultimately look like. If any changes are to be made, the
user can go back to the appropriate tab and do that.
NOTE: The Next Page,Previous
Page and Continue Survey buttons are inactive in the
preview mode.
To preview the various Sections
(i.e. pages) of the assessment, click on the corresponding section
number located on top of the page.
When satisfied with the assessment,
click Finish to proceed to the Finish tab.
NOTE: Alternatively, the user can also
directly click on the Finish tab at the top.
TheFinishtab acknowledges the successful
completion of assessment creation. It displays the URL that the
user can use or distribute in order to access this assessment
publicly.
Assessment can be copied for producing
multiple copies of it. One use of copying an assessment is to
create another assessment similar to an existing assessment which
requires little or no modifications to it. Another use is to edit
an assessment that is already in active mode. As mentioned earlier,
an assessment in active mode cannot be edited. Under such circumstance,
if modifications are to be made to it then the only option is
to make a copy of that assessment and then edit that copy by choosing
the Edit Assessmentlink.
To
copy an assessment:
Step 1
Click on the AssessmentAdmin
header tab.
Step 2
Click on the Copy Assessment
link. An assessment list appears.
Step 3
Select the assessment that is to be
copied.
Step 4
Enter a name for the new assessment
and click Copy.
NOTE: If another assessment with the same
name pre-exists, the system suffixes a counter to the assessment
name automatically to identify it uniquely.
Publishing
an Assessment
The reason behind creating an assessment
is to get response from public. Once an assessment has been finalized,
it is made available online (i.e. published) for public use.
To
publish an assessment:
Step 1
Click on the AssessmentAdmin
header tab.
Step 2
Click on the Change Status of Assessment
link. An assessment list appears showing status of each assessment.
Step 3
Select the checkboxes next to the Assessments
and click Activate.
You can also click the Activate
link next to each Assessment.
NOTE: Once the Assessment has been
activated, you can no longer edit it. However, it can be
copied and then can be edited as a new assessment.
Action in Detail:
·Activate:Transitions an assessment into
active mode. The assessment is then open for production use, and
it may also be put online. However, no further editing of assessment
is permitted.
·End:Transitions an assessment into
end or finished mode. The assessment then can neither be edited
nor can be opened for production anymore. Nevertheless, the results
are still viewable through mechanisms like Assessment Reports.
·Delete:Deletes or discards the assessment
from the list. Thought it is still stored in the database, no
further interaction is allowed. The user cannot even view the
responses of an archived assessment.
Step 4
A warning appears. Click OK
to continue.
Step 5
To access the active open assessment
use the following URL (which is also shown in Finish tab
while creating the assessment).
By default all assessments are publicly
accessible, i.e. any user belonging to any group can access it.
However, the administrator can choose to restrict access to any
assessment to a set of intended users by changing its access permissions.
To
change access settings:
Step 1
Click on the AssessmentAdmin
header tab.
Step 2
Click on the Change Access to Assessment
link.
Step 3
To make an assessment private, click
on Make Private under ‘Action’.
NOTE: Once that is done, the current assessment
is now private and is accessible only to the ControlCase GRC users.
Step 4
Click on the Assessment Name
to grant permissions for accessing it. The following screen appears.
NOTE: Assessments can be granted permission
at group level only (as shown).
Step 5
Select the group to which the permission
has to be granted.
Step 6
Give the number of maximum responses
a group can submit, i.e. the total number of times the group member
can take the survey.
Step 7
Check
the ‘Save/Restore’ option to allow the group members to save the
incomplete assessments which they can complete later at their
convenience.
Step 8
Check the ‘Back/Forward’ option to
allow or disallow the users to navigate among pages while filling
the responses.
Step 9
Click on Add button to save
the permission.
NOTE: The permission of a group can be
revoked at any time by clicking Remove in the corresponding
row of the group.
Responses to surveys conducted can
be viewed by creating reports. Reports can show all of the data
in the survey or can be customized to show only selected data.
To
create or view assessment reports:
Step 1
Click on the AssessmentAdmin
header tab.
Step 2
Click on the Create/View Assessment
Reports link. The following screen appears.
Step 3
From the Create New Report dropdown
menu, select an assessment and click Go.
Step 4
On the Select Questions page,
select the questions whose responses should appear in the assessment
report.
Step 5
In the Save Report Settings
field, enter the name of the report.
Step 6
To define conditions for adding filters
in the response list, select the Include conditional report
check box and click Next.
NOTE: If filters are not to be applied,
do not select the check box.
Step 7
On Condition Selection page,
give appropriate filter conditions to segregate the relevant information
from the entire set of responses.
Filter Conditions:
First,
enter the condition element, which differs for different question
type sets. For instance, it is a text string for text type or
essay type questions, an option selected for radio buttons, and
a set of selections for check box type questions.
Then
give the execution criteria in the drop-down at the right side
of each question content which can be ‘Result Must Contain’ (‘AND’
operation), ‘Result Can Contain’ (‘OR’ operation), or ‘Result
Must Not Contain’ (‘NOT’ operation). The condition can be selected
as per requirements to generate a report.
·Result Can Contain:This is the default selection if any
search criterion is not chosen. It generally searches for all
the responses.
·Result Must Contain:This selection allows you to specifically
search for responses containing a particular answer that you are
looking for. For example, if you enter ‘USA’ as seen in ‘Question
2’ in the screenshot below, the generated report would only bring
up Assessments which have ‘USA’ as the answer to ‘Question 2’.
·Result Must Not Contain: This selection allows you to specifically
search for reports which do not contain a particular answer (that
you want to exclude). For example, if you select ‘Yes’ as seen
in ‘Question 3’ in the screenshot below, the generated report
would not bring up Assessments which do have ‘Yes’ as the answer
to ‘Question 3’.
If you provide a report name in Save
Report Settings, then the current condition selection
will get saved and can be accessed later from Saved Report
Section of Create/View Assessment Report.
Step 8
Click on Generate Report to
generate the report with specified conditions.
Step 9
The following screen appears where
the questions constitute the column headings and the corresponding
responses constitute the rows.
NOTE: To export the report thus obtained,
into a CSV or PDF format, click on the corresponding icons placed
above the report table.
ControlCase GRC has a special provision
to view responses to questions for which preferred answer is expected.
This feature proves useful in viewing as to which responses agree
to preferred answer and which do not.
To
view preferred answer report:
Step 1
Click on the Assessment Admin
header tab.
Step 2
Click on the Create/View Assessment
Reports link.
Step 3
From the View Preferred Answer Reports
drop-down menu, select the report to be viewed.
NOTE: The menu displays the list of all
assessments that have at least one preferred answer.
Step 4
Click Go. The following screenshot
explains how preferred answer report looks like.
NOTE: To export the report into a CSV or
PDF format, click on the corresponding icons placed above the
report table.
Whenever an assessment is published,
it is important to notify the intended users about it so that
they can take up the assessment. The process of notification can
beautomated to periodically
remind users through email.
One or more users can be notified at
a time about an active assessment. Users can be notified
to take up an assessment for one time or on a weekly, bi-weekly,
monthly, quarterly, or yearly basis. For every reminder, the application
creates a new schedule which can be edited or deleted later.The template of this email is
configured atEmail
Notification on Assessment Completionunder
“Configure Emails”, “Actvity Template”, “Settings”.
To
notify users about an assessment:
Step 1
Click on the AssessmentAdmin
header tab.
Step 2
Click on the Email Notification
link.
Step 3
From the Assessment drop-down
menu, select the assessment for which you want to add reminder.
Step 4
In the Schedule Name box, enter
a meaningful name for the schedule.
Step 5
In the Email ID box, enter email
ids of the users to whom you want to send notification.
TIP:You can also upload a .csv
file containing email ids.
Step 6
In the Send date box, enter
the date on which you want to send the reminder using the calendar
button.
Step 7
From the Frequency drop-down
menu, select how often you would like to send the reminder.
Step 8
Click Save to add the reminder.
The new reminder is added as shown.
Step 9
To view, edit, or delete a reminder,
select the reminder from the Scheduled Reminder drop-down
menu and then click the appropriate button.
Create
Reviews
An assessment can be mapped into a
controlsheet. Once mapped, the question titles in the assessment
will form the column headings in the controlsheet. Mapping, however,
copies only the skeleton of the assessment, i.e. the responses
to the assessment are not copied into the controlsheet. A new
activity can be created later to copy responses from the assessment
to the controlsheet. Creation of controlsheet displays the responses
to the assessment in a tabular form which facilitates easy view
of responses.
To
create review from assessment:
Step 1
Click on the AssessmentAdmin
header tab.
Step 2
Click on the Create Reviews
link.
Step 3
Select the organization node in the
left side panel for which the review has to be created.
Step 4
Select an active assessment from the
active assessments list in the right side panel of the form.
Step 5
Enter a title for the review to be
created and click Submit.
NOTE 1: After creating the review of a given
assessment, the access rights can be set through theControlsheet Accessmodule.
NOTE 2: To
automate the process of populating assessment response data into
review, visit theSettingsmodule
section (help).
When the list of assessments is too
large, it becomes difficult to search for a particular assessment.
To help with this, ControlCase GRC offers the search functionality
that searches for assessments based on the entered keywords. More
to the point, ControlCase GRC also offers the search functionality
to search for questions within the assessments containing the
keyword.
To
search for assessments:
Step 1
Click on the AssessmentAdmin
header tab.
Step 2
Click on the
Search Assessment link.
Step 3
Select the
required option for search.
Search Options:
·Search in Assessment:Searches for the keyword in the content
of assessments, for example, question titles, question contents,
etc. On finding a match, the result displays the assessment name
along with the question number, title and the question itself
in which the keyword is present.
·Search for Assessment:Searches for the keyword in assessment
base schema like assessment name, assessment title, or additional
information.
NOTE: Selecting both the options gives
combined results.
Step 4
Enter the
keyword in the Search Text field and click Go.
NOTE: Search keyword is not case sensitive.
Clicking on the assessment name in the search result will take
the user to that particular assessment.
This module deals with activities and
settings. Here, activities can be created, viewed, managed, etc.
You can also edit many settings in this section which gets affected
in other modules.
NOTE: It is very similar to the “Settings”
section of Windows operating system.
Mapping of an assessment into a controlsheet
copies only the skeleton of the controlsheet without any data.
Transferring of data requires creating an activity rule which
will govern how and when the data will be transferred.
NOTE: Before creating an activity rule,
you need to create a review using the Create Reviews link
on the Assessment Admin header tab and then provide access
rights to it form the Controlsheet Access header tab.
To
map assessment data to controlsheet:
Step 1
Click on the Settings header
tab.
Step 2
Click on the Activity Templates
link.
Step 3
Click on Map Assessment Data To
Controlsheet.
Step 4
In the Activity Name box, enter
the name for the activity.
Step 5
From the Transfer Data from Assessment
drop-down menu, select the assessment.
Step 6
From the To Controlsheet drop-down
menu, select the controlsheet into which the data is to be transferred.
NOTE: This drop-down menu shows all the
applicable controlsheets for the selected assessment.
Step 7
From the When section, select
when the data will be stored in the controlsheet.
·Each Response is saved:On selecting this box, the details
would be entered into the controlsheet as and when a response
is saved.
·The assessment is ended:On selecting this box, the details
of all the responses received are stored in the controlsheet when
the Assessment Administrator ends the assessment.
Step 8
Click Save.
Deleting an Activity:
An activity can be deleted if it is
not required anymore.
Step 1
Click on the Settings header
tab.
Step 2
Click on the Activity Management
link.
Step 3
Select
the activity that is to be deleted. The activity becomes active
and is highlighted in yellow.
g
NOTE: Three more buttons Edit, Delete,
and Copy appear at the bottom.
Mapping of an assessment to controlsheet
allows you to map one or more assessments against one or all of
the controls within a given controlsheet. Once mapped, the data
in the assessments becomes available against the respective controls
in the controlsheet in the Review header tab.
To
map assessment to controlsheet:
Step 1
Click on the Settings header
tab.
Step 2
Click on the Activity Templates
link.
Step 3
Click on Map Assessment To Controlsheet.
Step 4
From the Select the controlsheet
drop-down list, select the controlsheet to map the assessment
with and click the Next Page button.
Step 5
Select the check box next to the control
against which the assessment is to be mapped.
NOTE: To select more than one control,
select the respective check boxes. To select all the controls,
select the check box next to Assessments in the top left
corner.
Step 6
From the Select Assessment list,
select one or more assessments you would like to map against the
control and click the Save button.
The selected assessment gets mapped
as shown
The assessment data now becomes available
in the corresponding controlsheet in the Review header
tab.
Controlsheets can be created across
the entire hierarchy or part of the hierarchy. Once a controlsheet
is created, it can be viewed and edited (if rights are given)
by users within the organisation. Controlsheet group is a collection
of two or more controlsheets created from the samestandard.
This helps in achieving data consistency.
Consider the following scenario:
One controlsheet is created at the
top management level and the other controlsheet, using the samestandardfrom
which the first controlsheet was created, is created at the lower
management level. If changes are made at the lower level, these
changes will not be reflected at the top level; and hence, the
top level will not receive proper updates or both the controlsheets
will be inconsistent. To avoid this inconsistency, both the sheets
can be clubbed together into a group so that the changes made
in one sheet will also be reflected into the other sheet and vice
versa.
To
make Controlsheet group:
Step 1
Click on the Settings header
tab.
Step 2
Click on the Activity Templates
link.
Step 3
Click on Make
Controlsheet Group.
Step 4
Select the controlsheets from the Controlsheet
list and move them to the New Group list using the left
and right double arrows.
NOTE: Controlsheets to be moved should
belong to the same standard.
Step 5
In the Group Name box, enter
a suitable name for the group.
Step 6
Click the Save button. A new
group will now be created and appear in the Groups list.
The controlsheets that belong to that group will appear in the
Groups Member list.
NOTE: Once a new group is created, the
controlsheets belonging to that group will no longer be available
in the Controlsheet list. Hence, no more groups can be
created using these controlsheets. To make these controlsheets
available again, you need to delete the group.
NOTE: To delete the group, click the Reset
button.
The portal created for each k-box is
protected using security features. To access the portal, a user
needs to have an account and a certificate. Without certificate,
the user will not be able to access the server. And without an
account, the user will not be able to log-on to the k-box.
The Send Invitation Mail functionality
does three tasks:
1.Creates users in the specified group
2.Creates certificates
3.Sends emails
When an invitation is sent to a user,
the application creates a user in the specified group with the
same permissions as the user who sent the invitation. It also
sends two automated emails containing the log-in credentials and
SSL certificate to the user.
To
send invitation mail:
Step 1
Click on the Settings header
tab.
Step 2
Click on the Activity Templates
link.
Step 3
Click on Send Invitation Mail.
NOTE: Sending invitation mail needs special
permissions. You will get permission error (as shown below) if
you do not have permissions to send invitation mail.
Step 4
From the Group Name drop-down
list, select the group the to-be created users will belong to.
Step 5
In the Email Id box, enter the
email ids of the users to whom you want to send the invitation
to.
NOTE: If more than one email id is present,
separate them using space, comma, or new line.
Step 6
Click the Send button. A customized
invitation will be sent to all the email ids mentioned in the
box.
NOTE:Each
user will receive two emails, one with attachment and other without
attachment. The first email is the one without attachment. It
contains the link to the portal, the username, the password, and
the client SSL certificate password. The second email contains
the certificate and the start-up manual.
Populating a controlsheet
automatically requires a rule or set of rules to be applied against
one or more controls in the controlsheet. Applying a compliance
signature instructs or configures the compliance scanner to populate
the controls against which the compliance signature is applied
at the end of the scan process.
For user convenience,
this application comes with two controlsheets with already mapped
controls (PCI DSS 1.1 and PCI DSS 1.2.) One can use these controlsheets
directly or create another controlsheet from the samestandard and
then copy existing mapping from these controlsheets to the newly
created controlsheets.
Tomap compliance signature
to controlsheet:
Step 1
Click on the Settings
header tab.
Step 2
Click on the Activity
Templates link.
Step 3
Click on Map compliance
signature to controlsheet.
Step 4
From the Select
the controlsheet drop-down list, select the controlsheet which
contains the controls that need to be pre-populated.
NOTE: The drop-down list
displays only those controlsheets which have the read or
write access rights. If the required controlsheet is not
displayed, change its access rights from the Controlsheet Access
header tab.
NOTE: To copy existing
mapping, select the source and destination controlsheets and then
click the Copy button.
Step 5
Click the Next Page
button.
Step 6
To add a new rule against
a control, click the Add New Rule link next to the control.
A popup appears next
to the link that is clicked.
Step 7
From the Tool
drop-down list, select the tool to be used to perform the scan.
Step 8
From the vulnerability
drop-down list, select the vulnerability that the selected tool
should search for.
NOTE: This list updates
itself on changing the tool to display the vulnerabilities corresponding
to the tool selected.
Step 9
Click the Add
button. The newly added rule is displayed at the top of the cell.
NOTE: To delete a rule,
click the close button next to it.
Step 10
The default values
for controlsheet columns can be set for specific conditions. These
settings are done in this section.
This section contains
following columns:
·Column name:The list of all
columns in the controlsheet.
·Condition: The condition in
which the default values are to be set.
·Column default value: The values that get
filled in the cell of the controlsheet at the specified condition.
Step 11
Select a condition
from the drop-down list. The conditions are as follows:
·When signature returns
true:True
·When signature returns
false:
False
·When signature returns
none:
Blank (empty)
NOTE: If you do not specify
any condition, it takes the entire information in the controlsheet
cell as it is.
Step 12
Select the Column default
value.
·Yes- Yes
·No- No
·None– Blank
·Signature output– Takes the entire
information in the controlsheet cell as it is.
Synchronizing a local
controlsheet with a remote one involves copying the contents of
a local controlsheet (including attachments) to the remote controlsheet
thus increasing mobility of the application. It is mainly useful
for consultants who can work locally and then synchronize their
work with the remote server.
This process requires
two controlsheets, one on local (client) machine and the other
on remote (server) machine with the condition that both are created
from the samestandard. A user can work on the local controlsheet,
add, delete, modify or do any other sort of editing to the contents
of this controlsheet. Once done with the job, the user can synchronize
the updated content with the server. The user is absolutely free
to synchronize the content at his convenience; however, he cannot
select to skip any of the updates from being reflected on the
server. Hence, the user has to be cautious while making the desired
changes.
Only one client can
be configured for synchronization with the given controlsheet
in the given instance on the server at a given time. If client
A has been configured for synchronization with controlsheet
S in instance I on server X then client B
cannot be configured for synchronization with controlsheet S
in instance I on server X. Client A holds
an exclusive lock over this controlsheet which will make this
controlsheet unavailable (although visible) to other clients.
Currently, the synchronization
is unidirectional and only from client to server. That is, changes
made to the client controlsheet will be reflected on the server
controlsheet but those made on the server controlsheet will not
be reflected on the client controlsheet. It is, therefore, strongly
recommended not to make any relevant modifications directly on
the server controlsheet as it holds fairly high probability of
getting overwritten from the client.
Synchronizing a local
controlsheet with a remote one is a two-step process. Step one
involves specifying the client and server side controlsheets for
synchronization along with the login credentials for server. This
is a one-time step. Step two involves actually activating the
synchronization process. This step can be executed as and when
required or can be scheduled to run on daily, weekly, monthly,
or quarterly basis.
Tosynchronize
a local controlsheet with a remote one:
Step 1
Click on the Settings
header tab.
Step 2
Click on the Activity
Templates link.
Step 3
Click on Sync To
Controlsheet.
Step 4
In the Master Server
URL field, enter the address of the server on which the instance
resides along with the instance name.
Step 5
In the Username
field, enter user name for accessing the server instance.
NOTE: Account for this
user should exist on the server instance.
Step 6
In the Password
field, enter the corresponding password.
Step 7
Click Next.
The screen expands to list the available controlsheets on the
systems, the client as well as the server.
Step 8
From the Server
Side Controlsheet drop-down list, select the controlsheet
on the server you would like to synchronize with the local controlsheet.
Step 9
From the Client
Side Controlsheet drop-down list, select the controlsheet
on the local machine with which you would like to synchronize
the server controlsheet.
Step 10
From the Sync Frequency
drop-down list, select how often you would like this sync process
to be run automatically.
The following options
are available:
Daily: Runs every day at
the time the entry is made.
Weekly: Runs after every
7 days
Monthly: Runs after every
30 days
Quarterly: Runs after every
90 days
NOTE: If you do not want
this sync process to be run automatically, select the Stop
Sync option.
Step 11
Click Save.
The newly added record is displayed at the top of the screen.
It includes the following
fields:
·Master Server URL: The URL of the server
along with the server instance
·User: The user name for
accessing the server
·Master Controlsheet: The server side controlsheet
·Client Controlsheet: The client side controlsheet
·Added By: The user who added
this record
·Added On: The date on which
the record was added
·Last Sync Date: The date on which
the controlsheets were last synchronized
·Last Sync Result: Result of the last
synchronization
NOTE: To delete a record,
click the Delete link available at the end of the row.
To schedule a non-scheduled
process or to reschedule an already scheduled process, click the
Schedule link available at the end of the row.
From the Frequency
drop-down list, select the appropriate option and click the Save
button.
Step 12
To synchronize the
controlsheet, click the Sync link next to it (on the Review
header tab.)
NOTE: You can now view
the results of the last synchronization as show below (on the
Settings header tab.)
Email notification
for Remediation is all about notifying users about the raised
compliance exception via email. By default, whenever a compliance
exception occurs, the exception is visible in the Remediation
module to all the concerned users who have appropriate access
rights to view it. The email notification feature goes one step
ahead and informs the concerned users about the raised exception
and changing states of activities via email.
An email is sent to
concerned users when:
·A gap is classified
as activity
·An activity is sent
for closure
·An activity is closed
or reopened
This relieves the concerned
users from constantly checking the portal for activity management.
Users can also be notified
in case of compliance exception. In Review module, whenever
a compliance exception is thrown, the event will also be notified
to the control owner(s). The control owner(s) can be assigned
in Settings module. Now once assigned for a controlsheet,
when someone changes the drop-down value of Exception column from
No to Yes, emails will go to the control owner(s).
Toenable email
notification for Remediation:
Step 1
Click on the Settings
header tab.
Step 2
Click on the Activity
Templates link.
Step 3
Click on Email Integration
Settings.
Step 4
Select the Enable
email notification for Remediation check box.
NOTE: This step will enforce
email notification for remediation. To enforce email notification
for controls, continue the remaining steps.
Step 5
From the Select
the controlsheet drop-down list, select a controlsheet as
source of compliance exceptions.
Step 6
Click the Next Page
button
Step 7
Select one or more
controls as source of exceptions.
NOTE: To select all controls,
select the top check box.
Step 8
From the Select
Users list, select the users who will be notified about exceptions
on selected controls and then click Save. The controls
display the users to be notified thereafter.
Merchant management
(or Vendor Management) is a different concept altogether. The
portal when configured for the same, it makes ControlCase GRC
to behave differently.
In typical merchant
management system, a bank hosts and/or manages an instance of
ControlCase GRC application. Any merchant (synonym vendor) associated
with or draws services from this bank registers on this portal.
On registering, they are provided with a space on portal to upload
and maintain compliance related data and evidences. The bank can
then directly check the compliance status of its merchants.
For registering, a
merchant has to fill in the merchant registration form which captures
necessary merchant related details like, namely, merchant name,
id, level, number of terminals, number of transactions per year,
etc. However, this form is customizable and can be changed from
time to time based on the conditions set by the bank.
ControlCase GRC maintains
a list of registered merchants and a defaultstandard
from which a new controlsheet is
created for every newly registered merchant. Upon registering,
it appends the newly registered merchant to the list of merchants,
creates a controlsheet from the default standard,
and performs additional tasks like publishing self-assessment
questionnaire based on the option selected while registering,
assigns access rights to them, etc.
On successful registration,
the merchant can log on the portal, fill up and submit assessments
published on the Assessments header tab. The assessment
responses get attached against the appropriate controls in the
controlsheet. The bank can now easily fetch the compliance details
of the merchants to whom they provide service.
Before enabling merchant
management, you have to create a new Standard and a new Assessment
and carry out following tasks.
Step 1
Create a new standard
from the Standards tab. For further information, refer
to:Create
a new Standard,
under Standards section.
Step 2
Add minimum two attributes
namely: response and attachments at the last level.
It can also have an optional attribute named question.
Step 3
Create a new Assessment.
For further information, refer to:Create a new Assessment, under Assessment
Admin tab.
NOTE: The Assessment’s
question titles must match with the standard’s attribute
labels created in Step 2.
Step 4
After creating the
assessment, activate it and make it private. For more information,
refer to:Publishing
an Assessment,Change
Access settingstopics
under Assessment Admin section under Assessment Admin tab.
Toenable merchant management:
Step 1
Click on the Settings
header tab.
Step 2
Click on the Activity
Templates link.
Step 3
Click on Merchant
Management.
Step 4
Select the Display
Registration link on login page check box. This enables all
fields on this page.
Step 5
Select thestandard for
mapping the Assessment.
Step 6
Select the node of
Accounts and Process tree for mapping.
Step 7
Select the assessment(s)
that would be made available for filling in by the merchant.
NOTE: Only active assessments
are displayed here irrespective of private/public access levels.
Step 8
Click Save.
Step 8
Select the controlsheet
that maintains merchant information, for example, merchant_registration
(a controlsheet created from a sample standard designed to capture
merchant details.)
NOTE: On changing the controlsheet,
the table below changes to display table fields. Each field has
two special attributes associated with it: Visible and
Required.
The fields in this
controlsheet shall appear as part of the merchant registration
form.
Step 9
To make a field visible/invisible
in the controlsheet, select/deselect the Visible check
box.
Step 10
To make a field mandatory,
select the Required check box.
Step 11
Click Save.
Step 12
Logout from ControlCase
GRC. The Register link now appears on the logon page which
can be accessed by merchants for registering themselves.
Step 13
Click Register.
It displays the Vendor Registration form.
You will notice that
the fields in Company Login Details section are mandatory.
Step 14
Fill up all details
in the form and click Save. This username and password
will be used to login ControlCase GRC by the merchant.
Step 15
Click the Please
click here to redirect to the login page link.
Step 16
It directs to the login
page of ControlCase GRC. The merchant can login with the
username and password which had entered in Step 14.
Step 15
The merchant upon registering
gets appended to the list of merchants. The corresponding controlsheet
can be viewed or edited by clicking the View or Edit
link next to it.
The registration form
details can be accessed by clicking View or Edit
next to the controlsheet selected in step 4 of the Merchant/Vendor
Management page.
The details are displayed
as shown below.
Configure
Emails
This feature allows configuring and customizing
email templates/settings that are used while sending emails in various
events triggered in ControlCase GRC.
Here, you can edit the email body and subject
of the email template which is used to send intimation to the vendors
and stakeholders about the open assessments.
Step 1
Click on the Settings
header tab.
Step 2
Click on the Configure
Emails link.
Step 3
Click on the Email
Notification To vendors link.
Step 4
Edit the Mail Subject
and Mail Format for both the sections namely:
·Assessment email notification
to vendors
·Assessment email notification
CC to auditors
Step 5
Click the Save
button.
Email
Notification on Assessment Completion
Here, you can configure email body and
subject of the email template which is used to send assessment completion
notifications to the stakeholders / auditors.
Step 1
Click on the Settings
header tab.
Step 2
Click on the Configure
Emails link.
Step 3
Click on the Email
Notification On Assessment Completion link.
Step 4
Edit the Mail Subject
and Mail Format and click Save.
Review
Report Internal
Review reports are sent through email.
The template settings of this email are done here.
Step 1
Click on the Settings
header tab.
Step 2
Click on the Configure
Emails link.
Step 3
Click on the Review
Report Internal link.
Step 4
Edit the Mail Subject
and Mail Format and click Save.
The issues which do not get resolved within
a stipulated period of time can be automatically escalated to stakeholders.
You can edit this email template here.
Step 1
Click on the Settings
header tab.
Step 2
Click on the Configure
Emails link.
Step 3
Click on the Remediation
Escalation Email link.
Step 4
Edit the Mail Subject,
Mail Forma, Mail Recipient and Days To Escalate fields
and click Save.
Assets
Email Notification
This template is used to send emails if
there are any updates in assets listed under any Search criteria of Assets
tab.
Step 1
Click the
Settings tab.
Step 2
Click
the Configure Emails link.
Step 3
Click
the Assets Email Notification link.
Step 4
In
the Mail Subject box, enter the subject of your mail. In
the Mail Format box, enter the mail description. Select
an appropriate email address from the Mail Recipient list
and click the Save button.
NOTE: By default, text matter is provided
in the above boxes. You can modify it as per your requirement.
This feature allows cell by cell mapping
of controlsheets. Whenever you fill data in the cell of first
sheet, it automatically gets copied in the mapped cell(s) of other sheet.
To
perform controlsheet mapping:
Step 1
Click on the Settings
header tab.
Step 2
Click on the Activity
Templates link.
Step 3
Click on the Controlsheet
Mapping link.
Step 4
Select the Source controlsheet
from the Source dropdown list.
Step 5
Select the Destination
controlsheet from the Destination dropdown list.
Step 6
Enter a name in Mapping
Name box and click Next Page.
Step 7
Select a cell from
the Source sheet and then click on the cell(s) from the Destination
sheet which are to be mapped with each other and click Save.
NOTE: You can map a single
cell from the Source sheet to multiple cells of the Destination
controlsheet but not vice versa.
Step 8
After mapping the source
cell becomes green in color.
Step 9
Now, when you enter
data in the Source controlsheet from the Review -> Edit mode,
the same data is copied in the mapped cells of the Destination
controlsheet.
This feature facilitates
assessment creation in different languages. Once activated, you
can create assessments and fill them in selected language. Reporting
in the selected language is also available. However, multilingual
input need not be activated while creating reports. As of now,
only English and Arabic are the supported languages.
For more information refer to:
·Arabic
Supportsection
under Appendix B: Multilingual Input
To
enable multilingual input support:
Step 1
Click on the Settings
header tab.
Step 2
Click on the Activity
Templates link.
Step 3
Click on Multilingual
Input.
Step 4
Select the Allow
multilingual inputs while creating and filling assessments
check box and then click the Save button.
Assessments can now
be created in languages other than English.
NOTE: To disable multilingual
input support, deselect the Allow multilingual inputs while
creating and filling assessments check box and then click
the Save button.
Application
Security Scan Setting
NOTE: This setting is exclusively
handled by the support team. Please contact technical support to use this
feature.
Before
proceeding, you need to give permission settings to setup Appscan server
details. Allow access to particular users from the Add Server URL
link under AppScan setting, under Settings. For more information
refer to:
NOTE: If you do not select
this option, the Application Security Scan link will not
be displayed under Security Scans tab.
Step 5
Select any of the following
scan options:
·XSS Only – Scans only
Cross-site scripting vulnerabilities.
·Full Scan – Scans all
types of vulnerabilities.
Step 6
The URL of Appscan
server is specified here.
Step 7
Click the Save
button.
Map
Reporting Template to Controlsheet
This
feature is purposely added to map reporting templates to the already existing
controlsheets. While creating new controlsheets, we have the same functionality
wherein we can map reporting templates.
This section is associated with the
Security Scans module, a module used to scan IP addresses.
By default, a user is permitted to add only three IP addresses
that need to be scanned. This maximum limit can be changed using
this section if more number of addresses needs to be scanned.
NOTE: Changing limit of IP addresses needs
special permissions which can be assigned to a user from the Module
Access header tab.
To
change the limit of IP addresses:
Step 1
Click on the Settings header
tab.
Step 2
Click on the Number of Scan
link.
NOTE: Changing the limit of IPs needs special
permissions. You will get permission error (as shown below) if
you do not have permissions to change the limit.
Step 3
In the Number Of Scan field,
enter the number of IP addresses you would like to scan.
ControlCase GRC allows scanning of
IP addresses, websites, and web applications of merchants for
vulnerabilities. The Security Scans module deals with vulnerability
scanning and generating reports of scan.
Click the Perform Network Security
Scan link to add a scan record.
Step 3
In the Title field, enter a suitable
title for the scan.
NOTE: Only numeric values are not allowed
as title. Title may contain alphanumeric values but no special
symbols and spaces.
Step 4
In the IP Ranges field, enter a single
IP or a range of IP addresses to be scanned.
NOTE: If a range is entered, separate the
IP addresses using hyphen. Ranges should be of same domain, for
example, 192.168.2.0-192.168.2.3. No special symbols are allowed
in this field.
Step 5
Click the Add button. A message box
appears stating the number of IP’s that are lined up for scanning
in this scan record. If the number is more than that set by the
admin, none of the entered IPs is lined up for scanning.
The record gets added to the list of
IP addresses to be scanned.
NOTE: Adding an IP address to the list
does not instigate the scan process. You can delete the record
if you do not want to scan the entered IP address.
Adding an IP address for scanning does
not instigate the scan process but merely holds the records or
IP addresses. The advantage is that you can delete the records
if you do not want to scan the entered IP address.
To
instigate the scan process:
Step 1
Click on the Security Scans
header tab. A list of records appears as shown below.
Step 2
Click the Start Now link next
to the record for which you want to instigate the scan process.
The scan process is instigated. You
will now notice the following:
1.The Status for that record now
changes to Running. Once the scan process is over, this
status changes automatically to Finished, based on
the result of the scan process. If a dead or an invalid IP address
is entered, the status will always remain as Running and
no reports will be generated.
2.The Run Quarterly check box
becomes accessible. If this check box is selected, the scan process
is scheduled to run four times a year (i.e. at the end of March,
June, September, and December) apart from running for the first
time.
3.The Delete button no more exists.
This means that the record cannot be deleted once the scan process
is instigated.
A user who adds IP addresses for scanning
can notify other users or groups of this by assigning view permissions
to them. Once the permission is assigned, the scan record becomes
available to that user or group of users on their corresponding
Security Scans header tabs. The assigned users can now
view the status of the process but cannot modify it in anyway.
They can download the generated report.
To
assign view permissions:
Step 1
Click on the Security Scans
header tab. A list of records is displayed as shown below.
Step 2
Click the Permission link next
to the record for which you want to assign permission to.
Step 3
Allow or deny access to particular
users or groups using the arrow keys.
Step 4
Click Save. The record is now
set to appear on the Security Scans header tab of the user
who has been given access.
NOTE: The user is only allowed to view
the record. No other modifications such as starting the scan process,
running quarterly scan, deleting the record, or changing permissions
are allowed to the user.
As the number of recordsturns out to belarge, it might become difficult to locate
the required record.For
this reason, ControlCase GRC provides the search functionality
that allowssearching
for records based on the title of scan or the IP addresses.
To
search for a record:
Step 1
Click on the Security Scans
header tab.
Step 2
From the Select Criteria drop-down
menu, select the search criteria.
Step 3
Enter a name or IP
address that you want to search based on the selected criteria
and click the Search button.
NOTE: The data entered
can be an entire string or substring (part of string) you want
to search, for example, if you enter ‘2’ (substring) instead of
‘152.117.0.202’ (string to be searched for), then the search result
will display all records containing ‘2’. Data is not case sensitive.
A report can
be deleted if it is not required anymore. However, a point to
remember is that both the reports,Executive
Summaryand Detailed
Report, will be deleted.
To
delete a report:
Step 1
Click on the Security Scans
header tab.
Step 2
Click on the Report link next
to the record whose report is to be deleted.
NOTE: You cannot delete a record that contains
reports. To delete the record, first the reports need to be deleted.
Step 3
Select the check box next to the report
name and click Delete.
NOTE: If two or more reports are present
and you want to delete all the reports, select the check box next
to Date and click Delete.
This feature is used to
perform web vulnerability scan using Appscan and can view the reports
in PDF and TXT format. AppScan has been integrated with ControlCase GRC
ina simple and easy to use interface
for users to give web URL’s that are to be scanned. Almost any web application,
website can be scanned using this tool.
On completion of
the scan process, a report is generated depicting the vulnerabilities
found during the scan process.
Before
proceeding, you need to provide the path of Appscan server details. For
more information refer to:
This feature is used to
scan range of IP addresses using Retina® Network Scanner and generate
reports. It has been integrated with ControlCase GRC ina
simple and easy to use interface. On completion of the scan process, a
report is generated depicting the vulnerabilities found during the scan
process.
NOTE: Retina Network Security Scanner is not
shipped with the product. It has to be installed separately. For download
information, please contact your system administrator. If you are unable
to contact them, e-mail us atsupport@controlcase.com.
Before
proceeding, you need to provide the path of Retina scan server and other
details. For more information refer to:
The module aims at
automating the task of populating the controls in a controlsheet.
As per the traditional approach, a user (typically a QSA) needs
to examine firewall configuration files, separate out or identify
the zones and interfaces, examine various vulnerability scan reports
for vulnerabilities, and examine databases, drives for cardholder
data. To simplify these time consuming tasks, the entire process
has been automated; whereby, a user has to feed valid inputs to
the compliance scanner and be assured that the right results are
obtained.
Here, a user has to
provide input parameters, such as firewall configuration files,
vulnerability scan reports, database credentials and network shares
upon and using which the compliance scanner will perform some
complex manipulations to provide accurate and reliable results.
Apart from the above inputs, the user also has to provide the
scanner with a controlsheet for dumping the output or the findings
of the scan process. This is a regular controlsheet with a set
of rule-sets added against one or more controls. On successful
completion of the scan process, the controlsheet will be populated
automatically.
The configuration process
comprises of 15 steps; however, not all steps are mandatory. A
user can skip a step which is not applicable to the scan depending
on the requirements.
NOTE: Before starting the
scan process, Settings have to be mapped to the controlsheet.
See “Mapping
Compliance Signature to Controlsheet”
under “Activity
Templates”,
“Settings”.
This is the starting
point of the compliance scan process.
The Interview Wizard
displays the default scan name selected by the application for
the scan process. The name is in the format (Scan_dd/mm/yyyy).
The user can select the default name or change it as per convenience.
This will be the permanent name for the process and is not changeable
at any point of time.
Step 1:
To start with the scan
process, click the Next Page button.
NOTE: Since this is the
first and mandatory step, user is not allowed to move on to other
steps without clicking the Next Page button.
Here, the user specifies
the controlsheet required to store or hold the results. The results
generated from the scan process need to be stored in a controlsheet
at the end of the scan. This page displays all the available controlsheets
for the user to select the required one.
Step 1
From the Select
Controlsheet drop-down list, select the appropriate controlsheet
and click the Next Page button.
NOTE 1: You can select only
one controlsheet for the entire process. If a wrong controlsheet
was selected, click the Previous Page button in step 3
to go back to the previous page and change the controlsheet.
NOTE 2:Only those controlsheets
in the drop-down list will appear which have Settings mapped.
The mapping can be
done in Settings module under Activity TemplateàMap compliance signature
to controlsheetlink.
To change the controlsheet,
from the drop-down list, select the correct controlsheet and click
the Next Page button. The controlsheet is changed to the
new selection.
Here, you need to enter IP addresses to
be evaluated in the scan process. You need to install Nmap utility on
your machine to run this feature. The IP addresses can be entered individually
or by Class A, B or C ranges. It scans the IP(s) to check the hosts available
on the network, services (application name and version) these hosts are
offering, operating systems (and their versions) they are running, type
of packet filters/firewalls are in use etc.
Example:
·To scan a single IP, enter the single IP
address. For e.g.10.85.203.163.
·To scan multiple IP(s), enter 10.85.203.32,
10.85.203.33, 10.85.203.163.
·To scan entire IP range. For Class A, input
10.0.0.0-255.0.0.0 or 10.0.0.0/8. For Class B, input 172.16.0.0-255.255.0.0
or 172.16.0.0/16. For Class C type of subnet input 192.168.1.0-255.255.255.0
or 192.168.1.0/24.
Step 4 (Firewall
Configuration File/Firewall)
Here, you need to enter
firewall details along with the firewall configuration file. The
firewall configuration file comes in handy for getting interfaces,
IP addresses, and IP range on the network. Scanning operations
are performed on this list of IP addresses.
NOTE: If you do not want
to perform firewall analysis, you can skip this step.
Step 1
In the Firewall
Name box, enter the name for the firewall.
NOTE: In case of uploading
two or more configuration files, each firewall name should be
different form the rest.
Step 2
From the Firewall
Type drop-down list, select the appropriate firewall type.
The supported firewall
types are:
·Cisco Pix
·Netscreen
·FWSM 4.0
·Fortinet
Step 3
In the Firewall
Configuration File box, enter the name of the firewall configuration
file.
TIP:
You can also click the Browse button to locate the file.
Step 4
In the Description
box, enter short description for the firewall.
Step 5
If you want to enter
more than one configuration file, click the Add button
or click the Next Page button to move on to the next step.
NOTE: To delete an uploaded
firewall configuration, click the Delete link next to it.
Here, you need to map
available interfaces with the network for which they are available.
The scanner scans the
uploaded firewall configuration file for available interfaces.
However, it does not associate them with any of the networks.
The association has to be done manually and is necessary for the
scanner to take right decisions during the scan process.
NOTE: If you do not want
to perform firewall analysis, you can skip this step.
Step 1
From the Interface
drop-down list, select the appropriate interface.
Step 2
From the Network
Type drop-down list, select the type of network with which
you want the interface to be associated.
Step 3
Click the Add
button and then the Next Page button to move on to the
next step.
NOTE: You can add more
than one interface association.
NOTE: You can delete an
association by clicking the Delete link next to it.
Here, you need to enter
IP addresses or range of IP addresses to be evaluated in the scan
process. By default, the scanner extracts all the IP addresses
from the uploaded firewall configuration files and displays it
based on the type of network. You can select to keep the same
list of addresses, to add new ones, or delete from the list depending
on the requirement. These addresses will be subjected to the evaluation
process.
NOTE: If you do not want
to perform firewall analysis, you can skip this step.
Step 1
From the Firewall
Name drop-down list, select the required firewall.
On selecting the firewall
name, the different network types are displayed.
This displays a list
of networks along with the IP addresses that fall in this category.
All the listed IPs is subjected to the scan process.
Step 2
If you want to add
additional IPs or delete one or more from the available list,
you can do it here and then click the Save or Next Page
button.
Here, you can view
the consolidated list of networks and IP ranges to be evaluated
in this compliance scan. You can manually add or remove IP zones/ranges
that you would like to include and/or exclude from the evaluation.
By default, the scanner
scans only well know ports on the selected IP range to find out
open ports. You can change this default operating mode and force
the scanner to scan each and every port (1-65535) on all the selected
IP range so that applications running on the non-default port
will also be detected. This can be done by selecting the Enable
Slow Scan checkbox. This operating mode requires more than
usual scan time and may last for more than a day or two.
If you want to add
additional IPs or delete one or more from the available list,
you can do it here and then click the Save or Next Page button.
Here, you can exempt
a port or service from being evaluated by the compliance scanner.
As per the business
needs, specific ports should be open or services should run on
a system or network. However, if this is against the compliance
policy, the scanner will evaluate it as a gap. To avoid such ports
or services from being evaluated, you can exempt them so that
the scanner will not treat them as a gap.
NOTE: If you do not want
to perform firewall analysis, you can skip this step.
Step 1
From the Source
Network Types drop-down list, select the source network for
the service or port.
Step 2
From the Destination
Network Types drop-down list, select the destination network
for the service or port.
Step 3
In the Ports/Services
box, enter the port number or the service comma separated that
you want to exempt from evaluation for the given source and destination
network types.
Step 4
If you want to enter
more than one exemption rule, click the Add button or click
the Next Page button to move on to the next step.
NOTE: To delete the record
click the Delete link next to it.
Here, you need to upload
Acunetix scan report. The compliance scanner extracts all the
relevant vulnerabilities form the report and maps them to the
controlsheet.
NOTE: If you do not want
to perform compliance test based on Acunetix results, you can
skip this step.
Step 1
In the Vulnerability
Report box, enter report name or click the Browse button
and locate the report.
NOTE: You can upload the
report in the .xml format.
Step 2
If you want to upload
more than one report, click the Add button or click the
Next Page button to move on to the next step.
NOTE: To delete a record,
click the Delete link next to it.
Here, you have to enter
database credentials using which the scanner will search for the
presence of card holder data within the databases. During the
scan process, the scanner uses these credentials to log in to
the specified database on the specified machine. It then searches
for card holder data within the tables and populates the controlsheet
accordingly.
NOTE: If you do not want
to perform compliance test based on database scanning, you can
skip this step.
Step 1
From the Database
Type drop-down list, select the type of Database.
Supported database types:
·SQL server
·Oracle
·MySQL
·SYBASE
For
database specific details, see Appendix A.
Step 2
From the Authentication
Type drop-down list, select the type of authentication.
Supported
authentication types:
SQL
Authentication:
The native authentication mechanism available with all commonly
used database packages.
Windows
Authentication:
Allows Windows domain based user to connect to the database using
their Windows domain username and password.
Trust
Authentication:
In this, every connection to the database is identified as trusted
connection and no password is required in such authentications.
Step 3
In the Username
box, enter username that will be used to connect to the database.
Step 4
In the Password
box, enter the password.
Step 5
In the Non-Default
Port Number box, enter port number if it is anything other
than the default one.
Step 6
In the IP Addresses
box, enter the comma separated IP Addresses on which you want
to search for the cardholder data.
NOTE: You can also upload
the scan results in the .csv or .dmp format.
In the Scan Result
box, enter file name or click the Browse button and locate
the file.
Step 7
If you want to upload
more than one file, click the Add button or click the Next
Page button to move on to the next step.
NOTE: You can delete an
entry by clicking the Delete link available at the right
corner of each row.
Here, you have to enter
UNC’s for scanning network drives or local drives for the presence
of cardholder data. During the scan process, the scanner searches
for card holder data within the network drives and populates the
controlsheet accordingly.
NOTE: UNC is Universal
Naming Convention used to specify and map network drives in a
network. It is supported by almost all operating systems. This
removes the dependency creating network shares on local machine
(e.g. X$, Y$, Z$ etc.). Please note that appropriate login credentials
will be required to access the network machine.
NOTE: If you do not want
to perform file system scan for sensitive data, you can skip this
step.
Here, you can select
to:
Scan Network Drives:
Step 1
With the UNC Details
box selected, enter the list of UNC’s in the UNC Name text
box.
Step 2
In User Name
textbox, enter a valid User name which is used to log on that
UNC machine.
Step 3
In the Password
text box, enter the corresponding Password.
NOTE:Multiple UNC’s are to be separated by commas.
If you are entering
multiple UNC’s, all UNC machines should have the same Username
and password.
Step 5
If administrator/user
of any machine on which you wish to perform the scan do not wish
to allow others to access his machine, then he has to share those
particular drives/folders to all.
NOTE: This way user not
only protects his machine from any unwanted access but also protects
his Username/Password.
In such situations
enter the UNC details and just select the Connect as anonymous
checkbox. This disables the User name and Password
fields.
Step 6
If you want to add
more than one record, click the Add button or click the
Next Page button to move on to the next step.
Scan Domain Network Drives:
Step 1
Select the Domain
Details box.
Step 2
In the Domain Name
box, enter the domain name.
Step 3
In the User Name
box, enter a valid username needed to log on to the domain.
Step 4
In the Password
box, enter the corresponding password.
Step 5
In the IP Addresses
box, enter the IP addresses of all the systems that are to be
scanned.
TIP:
You can also click the Browse button to locate the .csv
file containing the IP addresses.
Step 6
From the Select
Drives list, select the drives that you want to search for
cardholder data.
NOTE: To select multiple
drives, hold the CTRL key and click the drives. To select a range,
hold the SHIFT key and click the drives.
Step 7
If you want to add
more than one record, click the Add button or click the
Next Page button to move on to the next step.
Upload result file of already conducted scan
Step 1
Select
theUpload
Scan Resultbox.
Step 2
In the Manual Scan
Result box, enter the file path of the result file.
Step 3
If you want to upload
more than one file, click the Add button or click the Next
Page button to move on to the next step.
NOTE: You can delete an
entry by clicking the Delete link available at the right
corner of each row.
Here, you have to enter
the domain credentials using which the scanner attempts to fetch
the organizational units (OUs) along with the entities available
in the active directory of that domain controller.
The OUs list all the
entities available in the domain. It provides the following information:
·Domain: Name of the domain
·OU: Organization units
and/or sub-units
·Name: Names of the entities
that belong to the mentioned OU
·Type: Type of the entity
·Member of: The group the entity
belongs to
·Status: Whether the entity
account is active or disabled
·Password: Whether the password
expires or not
·GPO ID
Step 1
In the Domain Name
box, enter the domain name.
Step 2
In the Domain Server
IP Address box, enter the IP address of your domain controller.
Step 3
Click the Next Page
button to move on to the next step.
The application now
tries to map organizational units.
NOTE: You can delete an
entry by clicking the Delete link available at the right
corner of each row.
As soon as the application
maps OUs, the link OU Mapping becomes clickable thus permitting
addition of application name(s) against every OU. The entities
can now be fetched based on the categories available in AD or
you can provide application names against every OU to fetch entities
based on the application names. A .csv file is created
for every application name you entered which contains all the
entities belonging to that OU.
Step 1
Against every OU, enter
the name of an application.
Step 2
Click the Next Page
button to move on to the next step.
Sample Output
You can see that a
.csv file is created for every application name entered
above.
Here you can add your own users whom you
want to give the same access and rights as the CCCM application users
of the actual domain.
Step 1
Click on the app_<application
name>_user_list link.
Step 2
Click the Save button and save
the app_Development_User_list.csv file on any desired location.
Step 3
Open
this .csv file in Notepad or any other text editor.
NOTE: This is a sample file which already
contains a sample list of User Ids and User names separated by
commas.
Step 4
Edit and add your own User Ids and
User names in the same format given in the file and save it.
Step 5
Enter
the path of this file in Location Of Application Userlist
textbox and click Next Page.
Step 6
This
displays the list of conflicted Application Users and AD
Users.
Step 7
To
resolve a user name that is not present in AD Users list, select
it from the left dropdown box and match it with the user in the
AD Users box. Click Resolve button to save the changes.
Step 7
The name gets deleted from the Application
Users list and remaining conflicted users will be flagged
in the controlsheet.
Step 8
Repeat
Step 6 for all conflicted users to remove all conflicted users
from the Application Users list.
Step 9
Click
Next Page button to proceed for the next step.
Here, you can schedule
the scanner to run on weekly, monthly, or quarterly basis. Once
scheduled, the scanner executes the scan process with the set
configuration as per the schedule and generates reports automatically.
It can also forward the reports to a specified user.
If the scan process
is already in progress at the beginning of a scheduled scan, you
can select to continue the existing scan process or force to stop
the scan process so that the scheduled scan process will be instigated.
You can also configure
the scheduler to instruct it what action to take if there is an
ongoing scan process at the beginning of another scheduled scan.
In such cases, the scanner can continue with the ongoing scan
process or stop it forcefully to start with the scheduled scan
as per the settings done here.
Step 1
From the Perform
this compliance test section, select how often you would like
this compliance test to be performed automatically, for example,
Every Month.
The following options
are available:
·Every Week: Runs after every
7 days
·Every Month: Runs after every
30 days
·Every Quarter: Runs after every
90 days
Step 2
From the Select
day drop-down list, select the day of a month on which you
would like this test to run.
Step 3
From the Select
Months section, select/deselect the months for which you would
like this test to run/not run.
Step 4
If you want the scheduled
scan to override the ongoing scan process, select the Force
stop existing running scan checkbox.
Step 5
In the Email report
to box, enter the email address of a user to whom the reports
will be sent after the completion of the scan process.
Step 6
Click the Next Page
button to move on to the next step.
NOTE: To delete a record,
click the Delete link next to it.
Here, you need to enter
folder paths for various configuration files and reports. For
example, you can place firewall config files in Firewall folder,
Qualys report in Qualys folder, and so on and then enter those
paths here. The scanner, if scheduled, searches for the related
files in these folders and, if found, processes them as part of
the scheduled scan; if not, the scanner considers the files that
were uploaded on the corresponding pages.
Step 1
Enter folder paths
for one or all of the parameters in the respective boxes.
This page gives a glimpse
of all the settings you have chosen for configuring the scan process.
If the settings are proper, you can continue with the scan process
or else you can go back to the previous pages and correct the
settings. After a while (depending upon the no of scan items),
the status will be updated for each of the scan items (see the
list above for applicable items). If an item is failed due to
wrong path or credentials the status will come as ‘Failed’ and
‘Ignore’ link will appear for that. User can either edit the settings
to correct it or simply ignore the item.
After ‘Ignoring’ the
failed items, the Run button appears.
To start the scan process,
click the Run button.
To go back to the previous
pages click the Previous Page button until you reach the
desired page OR
Click the appropriate
link on the left side of the page to reach the desired page.
NOTE: You can check the
scan process status at any time on the Interview Wizard
page (step 1.)
You can view the controlsheet
by clicking the Compliance Details link and scan details
by clicking the Scan details link.
The Scan Details
section shows all the processes along with the individual status.
If the status is Failed and the scan process is still running,
the scanner lists the possible cause for the failure along with
the options to retry the process or ignore the error.
On successful completion
of the scan process, the Status changes to Completed;
and Percentage, to 100%.
To disable scheduling,
click the Disable link.
To view scan configuration details,
click a particular scan record. On clicking, the record ishighlighted in yellow. Click
the Show Details button.
To view the scan reports,
click the Compliance Details link.
This will show the
controlsheet from the Review tab in the Review Edit mode.
Scroll down the controlsheet
and check the comments in the Target_Date_Comments column.
It will show if any vulnerability is found in the scanning process.
Click on the Attachment
link of the corresponding rows from the last column.
Click the Attach
and View Files link.
It displays two links
to open two types of files namely: a PDF file and a CSV file.
Click on any one of
the link.
It displays the report
containing the scan details.
Assetsare the IP addresses, databases, machine
names, ports, etc. that are scanned using the Compliance Scanner
and contain any vulnerability, open port, or card holder data. After a
scan is successfully performed from Compliance Scanner, the assets get
listed in the Assets tab. This provides a direct overview to gain significant
information at one single tab. Furthermore, you can group these assets
and classify them in an organizational environment.
A new asset can be
added manually as and when needed.
To
add a new asset:
Step 1
Click
the Add Asset link.
Step 2
This
displays the Add Asset panel.
Step 3
Enter
data and click the Save button to save any changes made
to the Assets.
Step 4
The
newly added Asset is displayed in the Assets list
To
upload Assets from a file:
Assets can be added using the Add Asset
link. However, if the number of Assets is more then said way becomes tiresome.
To add large number of Assets, ControlCase GRC provides an easy way. In
this, the Assets to be added are stored in a .csv file format. The file
is then uploaded transferring the Assets into the application.
To
create Assets from file:
Step 1
Click
the Add Asset link.
Step 2
This
displays the Add Asset panel.
Step 3
Click
the Browse button.
Step 4
Select
the .csv file containing the Assets list and click the Open
button.
Step 5
The
selected path will be displayed in the Upload Assets box.
Click the Save button.
Step 6
The
assets will get added in the Assets tab
To
download the sample file:
The format of sample
.csv file can be downloaded.
Step 1
Click
the Download Sample link.
Step 2
Click
the Save button.
Step 3
Double-click
and open the sample_asset_list.csv file.
Step 4
The
format of a sample CSV file is as shown in the figure below.
The file contains two lines. The first
line contains values separated by commas (Comma Separated
Values). The total values in a record must match with the
fields present on the form hence additional commas are put in
the middle of the records. If no value is present between the
two consecutive commas, then that value is considered as blank
and is saved in the corresponding field as null.
The second
line contains the sample values.
The values
shown in the file are in the following order:
IP Address, Host-name, Description,
Standards. It is mandatory
to maintain this order; else values may go in wrong fields. Finally,
the file has to be saved as .csv.
“Tagging” is nothing but grouping of assets
based on a specific criteria. “Tags” are essentially the groups of these
assets. (For e.g. In an organization, you can group assets
and create tags based on each department). There are 2 types of tags:
·Pre-defined tags–
Tags which are created by user.
·User-defined tags–
Tags which are pre-defined by the system.
The Search utility allows following types
of search: searching the tags as well as assets. It also allows saving
the search criteria to use them in future.
Search
Tags –Search
the user-defined tags.
Search
–Search
entire content from the Assets details.
You can search any content from the entire
Assets details list. So, you can search any text in IP addresses, Host
names, Asset Status, Description, etc.
Search:
Step 1
In
the Search box, enter the keyword you want to search for.
NOTE: The search functionality supports
auto-complete feature. For example, to look for the
word ‘Preview’, even if the user enters ‘Pre’, ‘re’, ‘view’, etc.
in the search box, all the related words with the word ‘Preview’
would be brought up as well.
As you go on entering the search text,
the dropdown list will go on populating the result.
Step 2
Click
the Search button to get the result.
Step 3
Enter
the search name and click the Save button to save the search.
Step 4
This
search name will be displayed in the left panel under the Search
History link.
Step 5
Next
time, when you want to search for the same criteria, just click
the appropriate link.
Email
notification:
Whenever results of an asset are updated,
a notification email is automatically sent to the user. For example, if
you have an IP address (10.85.203.163) as an asset saved under a search
name. Now, if another user scans the same IP address, the scan results
gets updated. These results are updated in the asset of your saved search
also. So, when you view the details of this asset, the controlsheet contains
the updated data.
The update notification is sent to the
email address of the user. The email address you have to configure from
the Compliance Signature tab.
ControlCase GRC provides the pre-defined
search options. These options are directly mapped with the various scan
types in Compliance Scanner. You can select one of the options
available in the dropdown and your assets will be filtered as per the
option you have selected; for example, “Network vulnerabilities” option
will list all the assets found through the Qualys and Nessus scan.
To use
the pre-defined filters:
Step 1
Select
any option from the Select Criteria drop-down list and
click the Search button. The following options are included
in the list:
·Network Vulnerabilities– Assets found by using the Network
scan (Qualys and Nessus scan).
·Web Vulnerabilities– Assets found by using Web scans (Acunetix
scan).
·Card Data–
Assets listed from database scan and search tool.
·Compliant–
Assets which are compliant to PCI standards.
·Port List–
Ports which are found using the NMap tool.
·Manual–
Manual search using the search text option.
Step 2
The
assets subsequent to the selected criteria will be displayed.
Business
Assetsfor an organization
can be Personnel, Hardware Assets, Software Assets, Information assets,
etc. This module helps the organization to categorize their assets and
define them with the help of attributes. This will help the organizations
to perform threat and vulnerability assessment for the defined assets.
This tab displays the existing Global
Attributes defined by the user and the attribute’s details. It
also gives the option of adding a new Global Attribute.
Step 3
Enter
required name of the attribute in the Attribute Name
Step 4
Select
required Attribute Type from the drop-down list provided with
the Attribute type field
The formula option in the Attribute
Type can be only used for MAX () operator. MAX operator will give
you maximum of the values recorded for the related attributes.
Same is applicable to Assets and categories.
Step 5
Click
Save to save the attribute.
Global attributes will be applicable
to all the assets.
The newly created global attribute
will be displayed in the list of attributes.
This tab displays the existing Global
Attributes defined by the user and the attribute’s details.
Step 3
Click
corresponding cross icon button for the attribute that should
be deleted
A message window will pop up with the
message stating that deletion of the selected global attribute
will delete all the dependent attributes, formula with its data
related with assets and category.
Step 4
Click
OK button if the deletion of attribute is required
Categories
are different types of business assets that can be found in an organization.
The categories defined in this tab can be aligned with many assets.
While
adding a business asset category the regulation should have following
fields:
Level_of_threat
Vulnerabilities
Existing_control
Existing_iso_controls
Likelihood
_of_threat
Risk_impact_rating
The regulations are the standard that will
be defined in the Standards module. So the standards which have above
mentioned fields will be displayed in the regulations drop-down box. One
regulation, that is standard, can be used to create one category.
Select
the Asset for which a local asset will be added
Step 4
Click
View Asset Attributes button
Step 5
Enter
attribute name in the Attribute Name field
Step 6
Select
attribute type from the drop-down box of Attribute Type field
Step 7
Enter
parameter values for the attribute in the Attribute Parameter
field
Step 8
Click
Save
The newly
created local attribute is displayed in the Asset Attributes Details
pane of the page.
The user
can edit the Attribute Value of an attribute. To edit attribute
value the user can click on pen icon button and the attribute
value becomes editable.
However the
change in attribute value of any Asset Attribute will be only
applicable for that attribute. This means that change in attribute
value of any global attribute or category attribute
will not be replicated anywhere else than the selected asset.
In this module users can upload and store
policy documents under user defined policy groups. Version control is
supported for the documents. The administrator controls for this module
include managing policy groups, approving/hiding/deleting policy documents;
distribute policies to portal users for review via email and mapping policies
against controls of available standards. All the above actions are role
based and users can be given access from Module Access tab.
On the Policies tab users can view the
available policies and download them. The left navigation bar lists all
the policy groups and on clicking on those displays available policy documents
for the group. The status column describes whether the document is waiting
for approval, approved or checked out for modification. The Mapped to
column shows the standard names to which the documents are mapped. On
clicking the links, it’ll display the controls on which the document is
mapped.
New documents can be uploaded with the
+ button. User needs to provide the path to the document and name of the
document. The system will upload the document and flag it for approval.
This document will be listed in the system but can’t be downloaded or
reviewed until approved.
To upload
a policy document:
Step 1
Select
Policies from the Menu
Step 2
Click
required group’s name from the Policies list
Step 3
Click
Upload new policy document button
Upload
new policy document page is displayed.
Step 4
Enter document
name in the Policy document name field
Step 5
Upload the
dowument by clicking Browse button of the Select Document field
Step 6
Click Save
The
uploaded document will be listed in the plolicy document list.
This document needs approvement from the requested user to become
active link in the respective Policy group.
On the Email Templates
tab under Settings module, a new link “Distribute Policies Template” is
added to define the template for policy distribution emails.
To distribute
a policy:
Step 1
Select
Policies from the Menu
Step 2
Click
required group’s name from the Policies list
Step 3
Click
distribute policies button
Distribute
Policies page is displayed.
Step 4
Select
required policy document from the Policy Document field
Step 5
Select
required Attestation template from the Attestation template drop-down
box
Step 6
Select
the users to whom the policies will be distributed from the Users
field
Step 7
Click
Send
The
page displays the message for the confirmation of the plocy distribution.
Click
required group’s name from the Policies list
Step 3
Click
Policy document version button
Policy
document version page is displayed.
Step 4
Click
Check out hyperlink
The
Action option for the policy document, which is being edited,
changes to check in.
The
other users will not be able to edit the selected policy document
till the current user completes the edits and changes the status
of the document to check out.
Step 5
Click
Check in hyperlink once the edits to the policy document are completed
The
check in policy document page is displayed.
Step 6
Enter
name for the updated document in the Policy document name field
Step 7
Upload
the updated file by clicking Browse button for the Select document
field
Step 8
Select
Major Version checkbox if applicable
This means that if the updates to the
document is a major and need to increment the version by one number
than a decimal.
Step 9
Enter
description about the changes and updates to the document
Step 10
Click
Save
The uploaded document will go for approval.
Once the document is approved the latest document will be listed
in the Policy document version.
In this module users create review plans
for auditing. The user can create a review plan and assign it to the auditor
and approver. Also this module can be used for leave management of the
client.
The user can review scheduled review plan
by clicking the Review Calendar link.
Report builder enables user to create customized
report for Assessment, Remediation and review based on SQL queries. The
user who will be creating these customized reports may need some knowledge
of the SQL queries.
The user will have all the functionality
provided in Reporting module for e.g. saving report, viewing report, creating
graph, etc.
This section provides
instructions on configuring database connections prior to scanning.
As mentioned in “step 11” under “Configuring New Scan” section
of Compliance Scanner module, the compliance scanner searches
for the presence of card holder data within the databases. Although
it supports several databases, it requires connection to be established
between the scanner and the database. While most of the databases
support implicit connection (no extra configuration), two databases
(Oracle and Sybase) need explicit connection.
Click
the Start menu, point to Oracle – OraHome92, Configuration
and Migration Tools, and select the Net Configuration Assistant
submenu to open the Oracle Net Configuration Assistant
dialog box.
Step
2:
Select
the Local Net Service Name configuration option and click
the Next button.
Step
3:
Select
the Add option and click the Next button to start
creating a new service name.
Step
4:
Select
the Oracle 8i or later database service option and click
the Next button.
Step
5:
Enter
the Service Name to connect and click the Next button.
Step
6:
Select
the appropriate network protocol and click the Next button.
In normal scenario it should be TCP network protocol.
Step
7:
Enter
the Host Name and mention the port number in “Use another
port number” option, if the service is running on some non-default
port. Otherwise use the standard port number 1521 and click the
Next button.
Step
8:
Select
the Yes, perform a test option to check the connectivity
between Oracle Client and Oracle server and then click the Next
button.
Step
9:
If
the connection fails, it gives the following message:
Try using
the Change Login button to change the login details of
Oracle server.
Step
10:
Enter
the Username and Password and click the OK
button.
NOTE: You need to enter the login and password
details of the Oracle server.
For example:
Username:
Scott
Password:
tiger
Step
11:
If
the connection succeeds, it gives the following message:
Click the
Next button to proceed.
Step
12:
Select
the No button and click the Next button to end the
Net Service name configuration process.
Step
13:
Click
the Next button to complete the Net service name configuration.
Step
14:
Click
the Finish button to close the Oracle Net Configuration
Assistant dialog box and complete the process.
Click
the Compliance Scanner header tab and then the Database
link.
Click on any one of
the link.
NOTE: This step could be reached only after
completing few inevitable steps.
Step 2
Select
ORACLE database, SQL Authentication, enter user
name, password, and instance name of the server on which the Oracle
database resides and then click the Add button.
NOTE: You will find the instance name in
Step 3 of “Adding Server Details in tnsnames.ora File.”
Click
Start, All Programs, Sybase, Connectivity,
and then Open Client Directory Service Editor.
Step 2
From
the DS Name list, select a directory service to open and
click OK.
Step 3
From
the Server Object menu, click Add.
Step 4
In
the Server Name box, enter the name of a server on which
Sybase database resides and click OK.
The right panel displays the server
attributes along with the corresponding values.
Step 5
Here,
we need to modify the Server Address attribute. To do this,
right-click on the Server Address attributes, and then
click Modify Attribute option.
Step 6
Here,
we need to add protocol and network address of the server. To
do this, click the Add button.
Step 7
Select
the appropriate protocol, enter IP address of the server along
with the port number, and then click OK twice.
Click
the Compliance Scanner header tab and then the Database
link.
NOTE: This step could be reached only after
completing few inevitable steps.
Step 2
Select
SYBASE database, SQL Authentication, enter user
name, password, and IP address of the server on which the Sybase
database resides and then click the Add button.
This section provides
additional language specific information regarding assessments.
It doesn’t instruct how to create assessments or perform various
assessment related operations but rather briefs on the language
specific deviation.
Arabic
Support
This section provides
information (along with illustrations) about few major areas that
are affected when Arabic is selected as assessment creation language.
Guidelines
for General Tab:
·Assessment Filenameshould be typed
in English or else the assessment would not be usable
· The
text direction of the form fields (except Assessment
Filename) will be inverted
Users can fill in the
assessment in any language. If Multilingual Input support is disabled,
users will still see the assessments in the language they were
created (here, Arabic) and can fill in their language. However,
there is no guarantee that the responses would be saved or displayed
properly.